Instantiating Objects Randomly Within a Given Polygon

June 11th, 2018

Randomly Selecting Points within a Given Polygon

References Used:

Stack Overflow – Random Points in a Quadrilateral
Wolfram Alpha Information on Points in a Triangle

Notes

I needed to be able to randomly but evenly distribute a number of objects within a 2D area so these are the sources I started with. The Stack Overflow question ended up being a very good starting point, but there were errors with the calculations that I needed to solve in order to actually use their logic.

Fixes from Stack Overflow

First calculation to fix was the originally randomly selected position of the object. It turned out that it was very close, but it actually only worked if v0 was the origin. It was simple enough to fix by adding v0 to the x equation.

The second equation to fix was the v3 equation. They were subtracting v0 twice which is incorrect (again something unnoticeable if v0 is that origin as you’re simply subtracting (0,0) twice). v0 should only be subtracted once to obtain the correct v3 value.

Finally, a correction that was found in the comments was that there are two rotation equations for x’ and the larger one is incorrect. In the text, it can be found that a rotation of pi is necessary. This can be mathematically applied by simply reversing (x – v3) to (v3 – x).

Work to do

Fixing these mathematical errors has appeared to give me the desired results with some further testing required after a final issue. I still need to determine how to let it know mathematically when to “flip” the x position into the x’ position. The original thought was to simply compare the distance from x to v3 and v0, and if it was closer to v3 (distance was less), then apply the x’ flip transformation. This however does not seem to be a geometrically sound solution as I am sometimes getting the flipped applied when it is within the proper bounds.

July 2nd, 2018

Update: Resolved issue for determining when to flip the spawn positions

Reference:

Point in Triangle Test: Math Foundation

Building off of the previous work and calculations being done, the points for the triangles to contain the objects to spawn already exist. Using these with the calculations found in the reference for “Point in Triangle Test”, it can be determined if the point the collectible will be spawned at is indeed within the 3 vector locations of the vertices of the triangle. If it is not, then the “flip” algorithm is applied to put it into the triangle.

The test uses the existing triangle to basically check the cross products of each edge with the potential spawn location and the location of the third/final vertex of the triangle. As long as the directions of the cross product results of these two checks are the same, it can be concluded that the points are on the same side of the tested edge. If this is applied to all three edges, and the case is true for all three, it can be concluded that the point is within the triangle. If any of these are false, it is outside of the triangle and the “flip” algorithm is applied.


Video of Spawner in Action

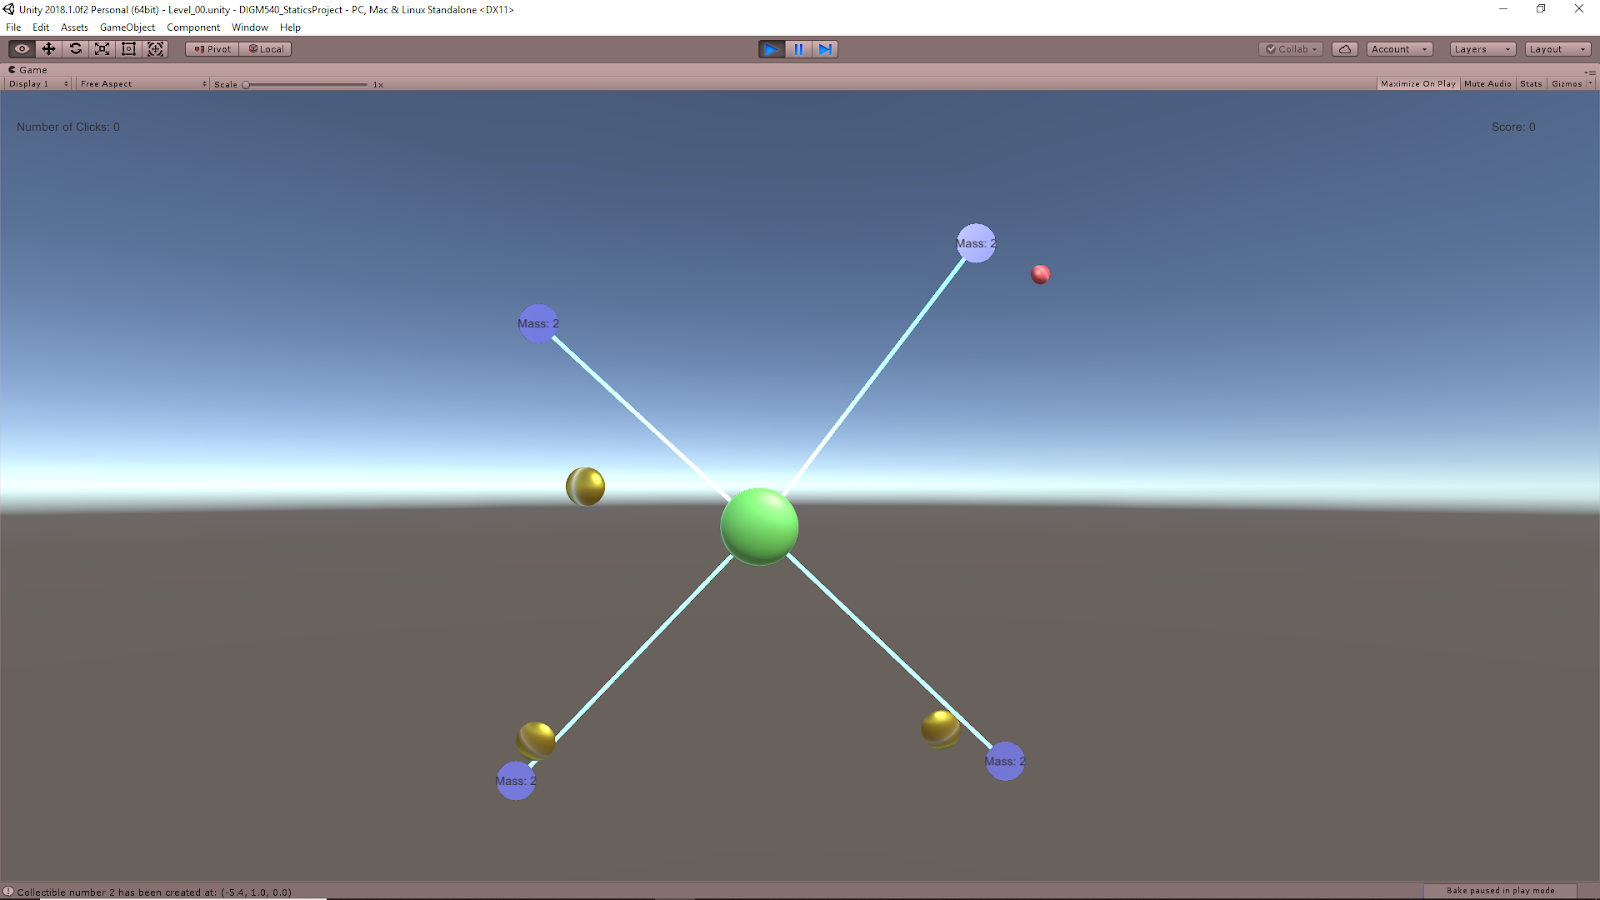
This shows a few test runs of having the collectibles randomly spawned to check if they consistently spawn within the play area. The small red orbs that sometimes appear are error checking markers added to help determine if everything was working properly. These are spawned right before an out of bounds collectible if flipped, to leave an indication of where it was at to see if it was truly out of bounds. Some of them appear very close to the edges of the play area, but those still appear to be just outside of the triangle and seem to be getting flipped into the play area effectively so those seem correct as well.

DIGM 540 – Engineering Statics Game Concept 00 – Ring with Strings

May 24th, 2018

Engineering Statics Game Concept – 00

Vimeo – Concept for Engineering Statics Game

This was a quick proof of concept to show the idea from the last post at work. This concept takes inspiration from the hands on engineering kit that used masses on strings tugging on a central ring object to teach topics such as center of mass and vector math.

The forces from the nodes on the ring are calculated to emulate that of a mass attached to a string. Each node has a mass value associated with it (which would be the mass hanging off of it in the real world kit), and this influences how much force that node is applying to the main circular object. Moving the nodes or changing their mass value will influence the position of the ring, as it effectively represents the center of mass of the entire system through the forces applied by the nodes.

Using a simple example, I was quickly able to run a test to double check if the values provided by this toy were matching that of the true calculations and they did for the single test I’ve run so far. The center of mass equations of a system of particles was used, which can be found here on Wikipedia: Center of Mass – Wiki

DIGM 540 – Engineering Statics Game Project – Forces in Unity

May 23rd, 2018

Forces in Unity

AddForce – Unity Official Tutorials

Youtube – AddForce – Unity Official Tutorials

The bare basics of scripting forces in Unity with rigidBody’s. The AddForce can take two inputs: a vector for direction and magnitude, and what type of force it is.

ForceModes
  • Acceleration – Continuous change; not affected by mass
  • Force – (Default) Continuous change; affected by mass
  • Impulse – Instant change; affected by mass
  • VelocityChange – Instant change; not affected by mass

AddTorque – Unity Official Tutorials

Youtube – AddTorque – Unity Official Tutorials

The bare basics of scripting torques in Unity with rigidBody’s. The AddTorque can take two inputs: a vector axis to apply torque around, and what type of torque it is. This is very similar to AddForce. Important to remember, Unity uses “LEFT HAND RULE” for rotation.

ForceModes
  • Acceleration – Continuous change; not affected by mass
  • Force – (Default) Continuous change; affected by mass
  • Impulse – Instant change; affected by mass
  • VelocityChange – Instant change; not affected by mass

Game Ideation

Engineering Teaching & Research Equipment – Armfield

EF-1.1 – Statics – Forces experiment kitYoutube – EF series video Statics Forces 1 1 3

The links are similar videos, the first is just directly to the site of those that made the kit, and the second is a Youtube link. This kit provides hand on experience for understanding a lot of topics based around static equilibrium. Topics such as 2D shape center of masses, force vectors, and much more can be covered with this tool.

Game Idea – Engineering Statics Game

Following the general idea of the kit shown above, the game environment is populated with nodes that apply controllable forces to a central ring object. These forces can be altered to change the position of the ring. The environment will spawn collectibles that the player must direct the ring towards in order to collect them. To move the ring, they will need to intelligently alter the forces applied by the nodes.

Quick sketch of concept
May 20th, 2018

Sources to Learn Procedural Generation Techniques for Games

Procedural Generation in Unity

Unity Tutorial: A Procedurally-Generated Galaxy – Part 1 by: quill18creates

Youtube Link to Part 1 of Tutorial

A tutorial to look into for basic procedural generation of a galaxy in Unity. Also has some information on different variable types in C#.

Unity – Cellular Automata Tutorial

Unity Link to Cellular Automata Tutorial

Tutorial directly from unity on the basics of using the procedural generation technique of cellular automata.

May 13th, 2018

Procedural Generation

Unite 2016 – The Power of Procedural Meshes

Unity Talk by Alexander Birke

Youtube Link to Talk

Suggested Reading:

“Essential Mathematics for Games – A Programmers Guide” by James M. Van Verth & Lars M. Bishop

Links to examples to learn about procedural generation of meshes
Notes from talk:
    Why use procedural meshes?

  • Player Made Content (Ex. Spore)
  • Unique Mechanics (Ex. Gish)
  • Procedural Generation (Ex. Sir You’re Being Hunted)
Unity Procedural Meshes
  • Mesh starts by creating vertices, and then making triangles from those vertices
  • Components Needed:
    • MeshFilter – stores the mesh
    • MeshRenderer – shows the mesh
    • Script – to generate the mesh
  • Normal vectors used to determine surface orientation
  • Colors
    • Used to be determined by assigning values to vertices
    • Can be used to provide more information to vertices still
    • Can be done as bytes or floats
    • Bytes generally better
  • UVs
    • 2d coordinates for each vertex
    • Used to map textures
    • Create vector2d array to assign to mesh object
  • Setting Trangle Indices
    • Most difficult part
    • Find common features of topology that repeats
    • Draw it out to help find these patterns!
  • Delaunay Triangulation
    • Maximizes angle of all angles of triangles in triangulation
    • Good for GPU rendering since skinny triangles can lead to visual artifacts
    • Port of triangle.net can be found in an above link
  • Debugging Procedural Meshes
    • Very important to do
    • Use Gizmos and Debug classes
    • Rotate camera to check if tris are facing correct direction
    • Turn on wireframe rendering
  • Optimizing Meshes
    • StaticBatchingUtility: batches multiple game objects together into fewer drawcalls but where each can still be culled
    • Mesh.CombineMeshes: Puts many meshes into one, good if individual meshes not likely to cull, but can break things if not done carefully
  • Optimizing Dynamic Meshes
    • Mesh.MarkDynamic: allocates a memory buffer of sorts to designated mesh to let graphics API know mesh data will change often
    • Base data structure to store data in is flat arrays when possible
    • Lists can be used too, especially if you are unsure how many vertices you will need before creating mesh
    • Frustrum Culling
    • Skinned Meshes
  • Multithreaded Mesh Generation: Unity API not thread safe
  • Compute Shaders
    • GPU great for running parallel tasks
    • Only available on modern platforms: PS4, Xbone, DirectX 11, OpenGL 4.3, OpenGL ES 3.1
    • Unity can cross compile with these options
Summary

Procedurally generating a mesh starts with creating vertices, and then triangles from these vertices. Normals and UVs can be added to this data for more informed meshes. In Unity, your mesh will need a MeshFilter and MeshRenderer component. Debugging your mesh is important, and some tools in Unity to help with that are the gizmo and debug classes, moving the camera around, and turning on wireframe rendering. There are also several options to look into to either optimize your existing meshes how they are, or compute them more efficiently.

More to Research
  • Bezier Curves: parametric mathematical curves used commonly in generating computer graphics
  • Use of GPU to do parallel calculations, and how to connect that with Unity scripting
  • Thread and Multithread Mesh Generation: Not sure what this actually meant
  • Computing shaders
  • Talk through Unity by “Sir You’re Being Hunted” on 3D Mesh Generation
May 5th, 2018

Finite Element Analysis in Games – Deformable Objects

Unity Tools

DefKit – Deformable Bodies Toolkit for Unity [v0.2] – FEM and SBD

Plugin for Unity that uses FEM to deform solid bodies.


Fractuccino – Real time fracturing for Unity

Tool that attempts to allow for real time fracturing of solid objects in Unity. This tool is based on methods that were researched by Matthias Muller, Nuttapong Chentanez, and Tae-Yong Kim in the PhysX team.

Paper Fractuccino is Based on can be found here.

May 3rd, 2018

Unity – ProGrids

Brackeys Tutorial on ProGrids – Youtube

Progrids is a tool that can be obtained for free on the Unity asset store. It allows you to have a grid-system in Unity for constructing your scenes. This can be useful for basic level design and simply keeping items in line with each other.
This can be extremely helpful for prototyping and grayboxing level designs, or even full game creation, especially in a 2D sprite/tile setting.

March 12th, 2018

Prototype of Gear Mesh Creator in Unity

Gear Mesh Creator Protoype

This is a very bare bones version of the gear mesh generator in Unity. Enter values into all of the parameters on the left side of the screen, then press “Create Gear” to generate a gear with those parameters. Clicking and dragging a gear allows you to move it around on the xy-plane. While dragging a gear, press space bar to delete it.

The scripting allows for the functionality of real time updates to the mesh and colliders of the gears, but I was unable to implement a player based way to use that that. While editing the values in the Unity editor, it will change the shape in real time. This action just needs to be translated to the build side. I will be looking at something where clicking a gear selects it, then the parameters of that gear will fill the boxes on the side, and when the player edits them, they will see the changes immediately on that gear. Then there will be a separate way to access the parameters when needing to create an entirely new gear.

March 10th, 2018

Working with Meshes Via Scripting in Unity

Creating a Game Object and Mesh at Runtime
Tutorial Series – Moving Mesh Vertices at Runtime

This short video shows a very basic way to manipulate existing vertices. It simply moves a few vertices along their normals in a sine wave type pattern.

Writing to .CSV Files with Unity Scripting

How to write data to CSV file in UNITY

Printing out arrays of data to .CSV files can be useful when creating large arrays of data for things such as vertices and tris as it can give you a better way to figure out where errors are occurring.

Using InputFields with C# Unity 5.4 (Basic Tutorial)

This video shows the most basic use of input fields in Unity. This may be a direction to take to connect the player to the variables in the gear mesh editor.

Basic UI Functionality – Interacting Directly with Game Objects Unity

Unity 5 UI Tutorial – Input field and event handlers

This video is in the middle of a series by this author on some basic UI functions within Unity. These UI elements focus on types which the player can interact with, and they will cause some change in the game (as opposed to more static UI elements that just show values for things such as score or lives). This can prove useful as a simple way to give users access to the parameters of the gear mesh objects.