Architecture AI Pathing Project: Upward Raycast for Better Opening Detection

January 11, 2021

Raycast for A* Nodes

Architecture AI Project


Original Downward Raycast and Downfalls

The raycasting system for detecting the environment to setup the base A* pathing nodes was originally using downward raycasts. These rays traveled until they hit the environment, and then set the position of the node as well as whether it is walkable or not. An extra sphere collision check around the point of contact was also conducted so as to check for obstacles right next to the node as well.

This works for rather open environments, but this had a major downside for our particular needs as it failed to detect openings with in walls and primarily doors. Doors are almost always found within a wall, so the raycast system would hit the wall above the door and read as unwalkable. This would leave most doors as unwalkable areas because of the walls above and around them.

Upward Raycast System Approach

Method

The idea of using an upward raycast was that it would help alleviate this issue of making openings within walls unwalkable when they should be walkable. By firing the rays upward, the first object hit in most cases can safely be assumed to be the floor because our system only works with a single level at this time. Upon hitting the first walkable target (in this case, the assumed floor), this point is set and another raycast is fired upward until it hits an unwalkable target. If no target is hit, this is determined as walkable (as there is clearly nothing unwalkable blocking the way), but if a target is hit, the distance between these two contact points is calculated. This distance is then compared with a constant height check and if the distance is greater, the node is still marked as walkable even though it eventually hit an unwalkable object.

This approach attempts to measure the available space between the floor and any unwalkable objects above it. If a wall is set directly onto the floor, as many are, the distance will be very small so it will not meet the conditions and will be set unwalkable appropriately. If there is a walkable door or just a large opening such as an arch, the distance between the floor and the wall above the door or the example arch way should be large enough that the system notes this area is still walkable.

Sphere Collision Check for Obstacles

Similarly to the original system, we still wanted a sphere collision check to help note obstacles very close to nodes so that the obstacles would not slip between the cracks of the rays cast, effectively becoming walkable. We included this similarly, but it is noted because the initial hit used is now below the floor, so the thickness of the floor must be accounted for. Currently a larger radius check is just needed so it can reach above and through the floor. In future edits, it could make sense to have a noted constant floor thickness and perform the sphere radius check above the initial raycast contact point according to this thickness.

Test Results

Details

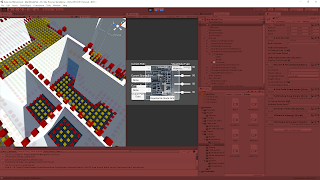
I compared the two raycast methods with a few areas in our current test project. In the following images, the nodes are visualized with Unity’s cube gizmos. The yellow nodes are “walkable” and the red nodes are “unwalkable”. Most of the large white objects are walls, and the highlighted light blue material objects are the doors being observed.

Test 1

A high density door area was chosen to observe the node results of both systems.

The downward check can work for doors when the ray does not directly hit a wall, as the sphere check properly checks them as walkable from the floor. However, the rays hitting the walls can be seen by the unwalkable nodes placed on top of them. A clear barrier is formed along the entirety of the walls, effectively making the doors unwalkable.

The upwards raycast test clearly shows every door has at least a single node width gap of walkable nodes in every case. The doors that were originally unwalkable with the downward raycast and now walkable as the height check was met.

Test 1: Downward Raycast


Test 1: Upward Raycast

Test 2

A larger room with a single noteable door was observed.

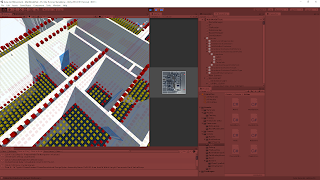
The downward check does pose a problem here as a full line of unwalkable nodes can be seen on the floor blocking access through the door and into the room. Because the problem is seen with nodes on the floor rather than nodes on top of the wall, this is actually a case where the sphere collision check is the problem and not the raycast particularly. Changing the collision radius for the check could potentially solve the issue here.

The upwards raycast is able to cleanly present a walkable path through this door into the room. While this does give us the result we desired, it should be noted again this difference can be attributed to the difference in the sphere collision check for obstacles. The same radius was used for both tests, but the upwards raycast sphere orginates from the bottom of the floor, so the extra distance it has to travel through the floor is what really opens up this path.

Test 2: Downward Raycast


Test 2: Upward Raycast

Summary

The upwards raycast seems extremely promising in providing the results we wanted for openings, doors especially. The tests clearly demonstrate that it helps with a major issue case the downward check had, so it is at worst a significant upgrade to the original approach. The upward raycast with distance check method also succeeded in other door locations, supporting its consistency. It will still have trouble from time to time with very narrow openings, but should work in a majority of cases.

via Blogger http://stevelilleyschool.blogspot.com/2021/01/architecture-ai-pathing-project-upward.html
Architecture AI Pathing Project: File Reader and Different Resolutions of Data and A* Pathing Grid

December 1, 2020

File Reader

Architecture AI Project


File Reader Data Array Creation

The file reader for this projects starts with the CSVReader class. This class is responsible for reading data in from .csv files generated by Revit to pass it on to the underlying A* pathing node grid for use by the agents when pathing. These .csv files have 2D coordinate values to locate the data, the actual data value, and a reference ID. The coordinate data and the data values themselves are separated and saved into many data objects within Unity (in a class named DataWithPosition). This prepares the data to be used to pass on to the A* pathing node grid.

While the .csv data is generally consistently spaced based on coordinates, it can have many gaps as it does not assign a value somewhere where there is a gap in the model. This results in data that is not perfectly rectangular. To make the process of tying this data array in with the pathing grid more consistent, I manually make a rectangular data array to hold all of the data and fill in the missing coordinates with additional data objects that have some default value (usually “0”). This helps fill the data into the A* pathing grid as the grid is created because it can simply go through the data list one at a time instead of doing any searching of any kind.

Applying the Read Data to the A* Pathing Grid

Data Assumptions:

  • In order by coordinates, starting with the x-coordinates
  • There is a general consistent distance between the data points

After reading in all the data and creating the foundational array of data, it can then be applied to the node grid. The first basic case of this reads through the data array as A* pathing grid is created and assigns values as the grid is made. This however only makes sense when the resolution of the data being read in and the A* pathing grid are similar. If there is a substantially higher density of data points, or a higher density of node grids, this is no longer the case and we need other ways to apply the data.

Data Resolution Cases

This leads to three cases (Cases with respect to data resolution):

  1. Data Resolution = A* Pathing Grid Resolution
  2. Data Resolution > A* Pathing Grid Resolution
  3. Data Resolution < A* Pathing Grid Resolution

(The 3 cases with respect to distance):

  1. Data Distance = A* Pathing Grid Node Diameter
  2. Data Distance < A* Pathing Grid Node Diameter
  3. Data Distance > A* Pathing Grid Node Diameter

The resolution here is the inverse of the distance between the data points (i.e. the distance between the data point coordinates, and the node diameters). This also means these cases can be checked based on the distance between data points as well, but the condition is reversed (except for the case where they are equal, where it stays the same).

Determining which case is present is important to determine how to apply the data to the A* pathing nodes. I determined the best way to deal with these cases in a simple manner was the following:

Dealing with the 3 Cases of Data Resolutions

Dealing with the 3 Cases:

  1. Similar Number of Data Points and A* Nodes: Apply data to the A* pathing nodes 1-to-1
  2. Substantially More Data Points than A* Nodes: Average the data value of all the data points covered by each A* node for each A* node
  3. Substantially Less Data Points than A* Nodes: Apply the same data value from each data point to all the A* nodes in the same area it covers

These other cases require additional information to accurately apply these various techniques. Adding an additional data assumption that when there is a difference in the distance between data points and the A* node diameter that this difference such that the distances are divisible by one another leads to a useful term that can consistently help with both of these cases.

If (distance between data is divisible by A* node diameter OR A* node diameter is divisible by distance between data)

To keep it somewhat consistent, I created a term called the “Distance Ratio (D)”, which is the node diameter divided by the distance between the data point coordinates. This term can be used as an important data dimension when dealing with array indices for the different data application cases. Since the key is using this as a dimensional property, it needs to be a whole number, which is not the case when the node diameter is less than the distance between data coordinates. In this case, the inverse of “D” can be used to find the dimensional term.


Distance Ratio (D) = Node Diameter / Distance Between Data

Dimensional Ratio (D*)

if (D >= 1) D* = D

if (D < 1) D* = 1 / D

Using Dimensional Ratio for Cases 2 and 3

Case 1 does not need the dimensional ratio whatsoever, but both other cases can use it.

Case 2

For case 2 there are more data points per area than A* nodes, so the A* nodes must average the value of all the data points they cover. These data points can be found using the dimensional ratio. Each A* node covers a number of data points, n, where (n = D* ^ 2). This information makes it much easier and more consistent to find the proper data to average while setting the values during the creation of the A* node grid.

Case 3

For case 3, there are less data points than there are A* nodes in each given area. Since this case just applies the same value from a given data point to several A* nodes, it is just about figuring out all the A* nodes each data point should pass its data to. This can also be done by expanding the initial data array out with a bunch of identical data points so that it can then follow the 1-to-1 passing on approach of case 1.

To do this, the dimensional ratio, D*, is used again. The initial data array created from the reading of the .csv file can be modified and expanded. A new 2D data array is created with each dimension (height and width) multiplied by D*. Then each data point passes on all of its information to a square of data points in the new array, where the number of new data points created, n, is such that (n = D* ^ 2).

File Reader Data Resolution Difference Summary

This allows us to deal with various types and sizes of data while using various resolutions of A* pathing node systems somewhat consistently. This can be beneficial when passing in many types of data that could have different data resolutions and you want to keep the A* node grid resolution consistent. This also just helps the system perform properly when many types of data are passed through it over the course of several tests.

Unfortunately the distance between the data points is not determined automatically at this time, so it must be input manually. I initially thought of just finding the difference between the first couple coordinates to determine the distance, but this would fail edge cases where some of the data right at the beginning is missing. The better solution could be to randomly select several pairs of coordinates throughout the data and find the difference, then use the mode of that data as the determined data distance. This would work in most cases, and could then just have a manual override for fringe cases.

Case 3 in particular is definitely not the most efficient approach, but it was a quicker and simpler implementation for now. Ideally it would not need to create another expanded data grid as a reference, and the A* node grid could use some method to know which ones should read from the same data point.

Next Step

This process could benefit from some of the possible updates mentioned in the “File Reader Data Resolution Difference Summary” section, but most of those should be unnecessary for now. The next steps will look to other parts of the system, which does include some more file reading that some of this process could benefit. We need to read in more Revit data to assign data to the model objects themselves.

via Blogger http://stevelilleyschool.blogspot.com/2020/12/architecture-ai-pathing-project-file.html