Pokemon Randomizers – Universal Pokemon Randomizer, UPR ZX, and pk3ds – Github Links and Intros

August 23, 2021

Pokemon Randomizers

Resources


Title:
Universal Pokemon Randomizer

By:
Dabomstew


Github – Repo #1

Description:
Original top level pokemon randomizer for generations 1 through 5.


Title:
Universal Pokemon Randomizer ZX

By:
Ajarmar


Github – Repo #2

Description:
Extended work from original universal pokemon randomizer that works for all original handheld generations 1 through 7.


Title:
pk3ds

By:
kwsch


Github – Repo #3

Description:
Randomizer for the 3DS pokemon games, which were generations 6 and 7.


Overview

I have always been a huge fan of pokemon randomizers for their ability to add replayability to games I am always looking to replay with different variations. I wanted to collect and archive some of the best current tools for doing so in one place to make them easy to reference, especially through their github repos since I am interested in seeing if I can make any contributions to add fun and exciting randomization settings.

Universal Pokemon Randomizer

This is the original randomizer tool that became the main standard for randomizing most pokemon games. It has a lot of very nice options and has just existed for a while now so its errors are not found as often and are generally more minor.

This however is limited in that in only works for pokemon generations 1 – 5, leaving a few on the 3DS unable to be randomized. The project was put on stop and archived as good enough, but it was recently continued with the ZX version to add further generation support. I will also note it is written almost exclusively in Java.

Universal Pokemon Randomizer ZX

This is an extension of the original Universal Pokemon Randomizer that adds support for generations 6 and 7 on top of the original 1 – 5. This appears to be relatively active and growing (with changes submitted between 2 months and 4 hours ago as of the time of collecting this information).

With how great the original tool is, I would love to explore this option with the newer generations. I have not personally tested this randomizer tool since it is on the newer side, but I’ve seen some cases for it working which look promising. As a continuation of the original Universal Pokemon Randomizer, this is also written primarily in Java.

pk3ds

This tool was created to fill the gap the original Universal Pokemon Randomizer had, as this tool was made specifically to randomize the 3DS pokemon games which cover generations 6 and 7.

With less background and time to mature, I remember it having a bit less flexibility in its options compared to the Universal Pokemon Randomizer, but it worked well for the primary need of shuffling the major content of the game. Being its own separate tool, this one is actually written majorly in C#, which fits directly in my wheel house.

via Blogger http://stevelilleyschool.blogspot.com/2021/08/pokemon-randomizers-universal-pokemon.html
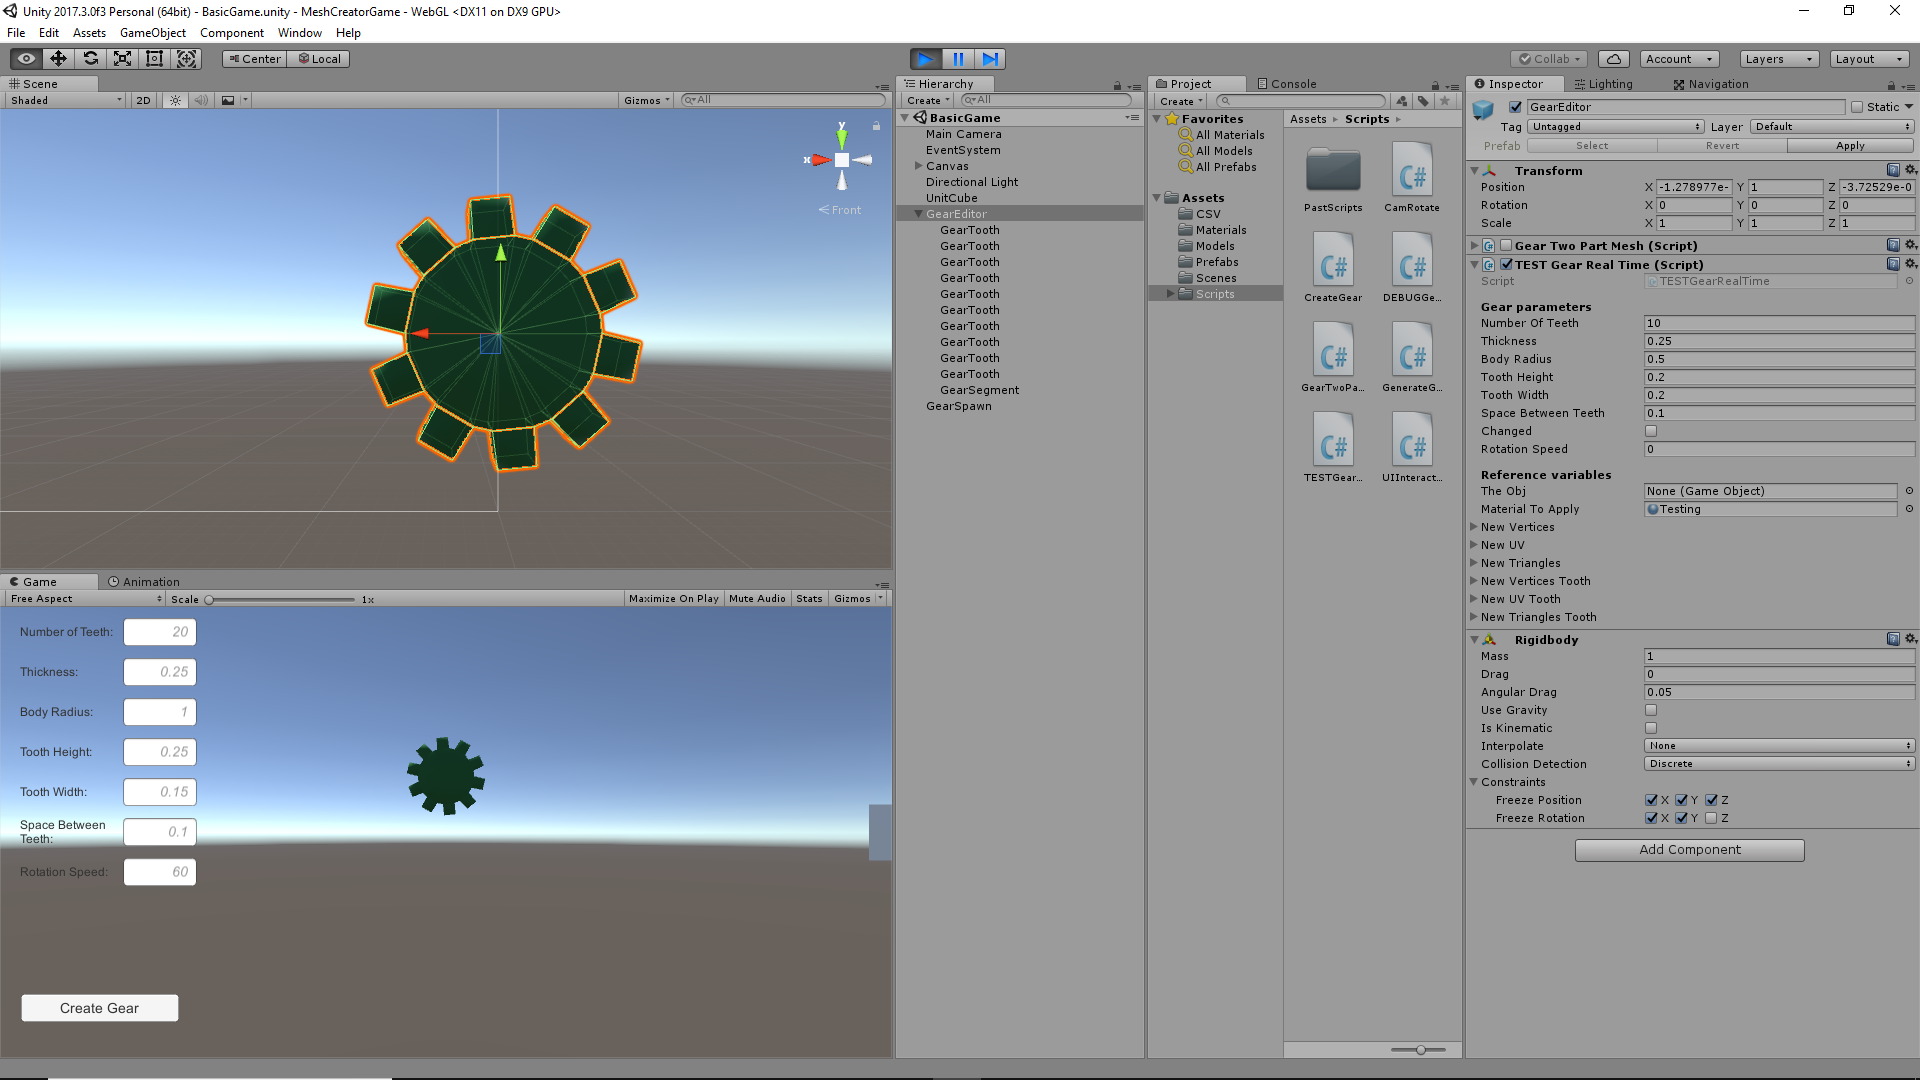
Gear Mesh Generating Web Build

Link to Web Build of Prototype Currently

Current Controls
  • Left Mouse Button – Press: Select a gear to make it active
  • Let Mouse Button – Drag: Move selected gear around
  • Left Mouse Button – Drag + Spacebar: Destroy selected gear
  • w : makes the gear spawning object the active object (instead of any gears)
  • Typing in input fields: Changing the number in this input field will alter the corresponding parameter of the currently active (selected) object.

Selecting a gear and changing the value in the input field will immediately change that corresponding parameter on that gear. For example, if you left click a gear, then type the value “1” into the “Body Radius” input field, that gear will have its body radius value immediately change to 1, and its mesh and colliders will update along with it.

There is an invisible gear spawning object (“gear spawner”) that creates a gear when the “Create Gear” button is pressed. The gear created will have values based on whatever the spawner’s current values are. To change the spawner’s values, the spawner must be the active object. This is where the “w” key control comes in. Once the player presses “w”, as long as they don’t left click another gear in the mean time, changes to the input field will become the values of the spawner. Then the next time the “Create Gear” button is pressed, it will use those updated spawner values to create the new gear. This gear can then be altered as any other gear.

Current Issues to Avoid

The input fields do not show the values of an object when it is selected. This can be a bit confusing since it makes it hard to tell what the currently selected object’s values are, unless the player just remembers them. This is something that would be crucial to update as there is currently no way to actually see the current values.

The spawner does initialize at all values of “0”. Just be aware that if you try to create gears before changing the spawner’s parameters, you will be creating invisible empty objects.

When attempting to update the spawner, make sure to press “w” before changing any values in the input fields. This was something I found myself messing up a lot, and would be a feature to improve in the future. Again, make sure to press “w”, and not click any other gears, before changing the input fields to update the spawner’s values.

Example setup of gear mesh generator in Unity’s editor.

DIGM-540 Gear Mesh Generating Resources

  1. Basic Mesh Scripting Tool Description for Unity
  2. Creating Basic Billboard Mesh Through Unity Scripting
    Shows how to create a vertex array, set these into triangles, and create a full mesh.

  3. More Help for Procedural Generation of Mesh

This shows that it is possible to create/modify meshes within Unity using scripting.

Project Direction – Create Script in Unity that Will Take User Inputs to Instantiate a Gear Model Based on Said Parameters

This may be possible through the general use of the Mesh class in Unity scripting. Something along the lines of creating a set of vertices for the central body (some smoothness level of cylinder), then creating a gear tooth mesh that can be multiplied and geometrically positioned around the central core body mesh created.

Bump Mapping

Normal Maps from Unity

“Normal Maps and Height Maps are both types of Bump Map. They both contain data for representing apparent detail on the surface of simpler polygonal meshes, but they each store that data in a different way. A height map is a simple black and white texture, where each pixel represents the amount that point on the surface should appear to be raised. The whiter the pixel colour, the higher the area appears to be raised.

A normal map is an RGB texture, where each pixel represents the difference in direction the surface should appear to be facing, relative to its un-modified surface normal. These textures tend to have a bluey-purple tinge, because of the way the vector is stored in the RGB values.”

Displacement Maps

Unity Displacment Maps and Tesselation

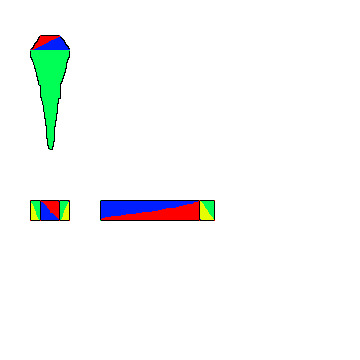
Tri Setup to Create Mesh for Gear Segments
Showing example breakdown of a gear segment in tris.

Randomly Selecting Points within a Given Polygon

References Used:

Stack Overflow – Random Points in a Quadrilateral

Wolfram Alpha Information on Points in a Triangle

I needed to be able to randomly but evenly distribute a number of objects within a 2D area so these are the sources I started with. The Stack Overflow question ended up being a very good starting point, but there were errors with the calculations that I needed to solve in order to actually use their logic.

Fixes from Stack Overflow

First calculation to fix was the originally randomly selected position of the object. It turned out that it was very close, but it actually only worked if v0 was the origin. It was simple enough to fix by adding v0 to the x equation.

The second equation to fix was the v3 equation. They were subtracting v0 twice which is incorrect (again something unnoticeable if v0 is that origin as you’re simply subtracting (0,0) twice). v0 should only be subtracted once to obtain the correct v3 value.

Finally, a correction that was found in the comments was that there are two rotation equations for x’ and the larger one is incorrect. In the text, it can be found that a rotation of pi is necessary. This can be mathematically applied by simply reversing (x – v3) to (v3 – x).

Work to do

Fixing these mathematical errors has appeared to give me the desired results with some further testing required after a final issue. I still need to determine how to let it know mathematically when to “flip” the x position into the x’ position. The original thought was to simply compare the distance from x to v3 and v0, and if it was closer to v3 (distance was less), then apply the x’ flip transformation. This however does not seem to be a geometrically sound solution as I am sometimes getting the flipped applied when it is within the proper bounds.

Altering UI Grid System for Unity 2017

Changing our project from Unity 2018 to 2017 caused a small issue with the UI grid system I created. It relied on a prefab of a UI image object, which 2017 does not play nicely with. They did not take on the positional data assigned to them on instantiation, they would simply keep the transform information of the prefab, so they would all be in the same location which does not create our nice grid.

To get around the need for a prefab, I simply created new gameObjects which then had image components added to them and attached the necessary script since our objects were relatively small and simple. This got around the issue of needing a preexisting object to instantiate in the first place.

These UI image prefabs also had an event trigger attached to them to perform the method to change their color and array value when clicked, so this also needed to be attached or emulated when creating these new objects. Instead of specifically trying to add a pointer click event trigger, I simply added an OnPointerDown method to the script already being attached to the newly created objects that would perform the array value changing method.

Links Referenced for Solution:

UI OnPointerDown Method for Unity
Create UI Elements in Unity

Additional Image Reading Feature for UI Grid Tool

Another feature was added to this tool to help the artists make wall assets for the game, but it also doubles as another option for therapists to create wall poses. The UI grid can intake an image file (a 2D sprite) and output a grid based on the alpha values of individual pixels from this input image. This initially always looked at every pixel, but to help the tool deal with higher resolution (or just larger) images, I also added a resolution factor that would just very simply look at “every x pixels” instead of each individual one. The resolution factor just gets multiplied into the loop looking for pixels.

For example: With resolution factor of 4, the tool will look at pixel numbers: 0 * 4 = 0, 1 * 4 = 4, 2 * 4 = 8, etc.

While this clearly isn’t an amazingly intelligent system, it is a simple way to generally get a roughly similar shape to initially higher resolution images without creating hundreds of thousands of objects.

Creating UI Grid to Build Wall of Objects

Our team wanted to created a tool that could generate walls made of blocks for our “Hole in the Wall” style game. As a health game, we also wanted to have an in game system that a therapist could use to create their own wall objects as well. To satisfy these requests I decided to create a simple UI grid made of images that would tie into a wall generator object in Unity.

Using Unity 2018, I was able to use UI Image prefab objects. The height and width of the wall can be determined in “number of objects”. This will also be reflected in the UI grid object. The user can then click grid elements to either turn them on or off, which will also correspond with a color (white or black). Then when the user clicks the “create wall” button, a wall will be created of 3d objects directly reflecting the UI grid. The wall will have objects where the grid elements are on, and it will just have nothing (a hole) where elements are off.

Generating Levels for Physics-based Puzzle Games with Estimation of Distribution Algorithms

Title: Generating Levels for Physics-based Puzzle Games with Estimation of Distribution Algorithms

Resource: Academic Paper

Authors:Lucas Ferreira, Claudio Toledo

Link to Paper on Researchgate.net

“This paper presents an estimation of distribution algorithm (EDA) to generate levels for physics-based puzzle games with the Angry Birds mechanics” from the abstract.

This can serve as a foundation for generating meaningful and interesting content for physics-based games

Procedural Generation – Far Cry 5 GDC Content Generation

Procedural Generation – GDC 2018 Talk – Procedural World Generation of ‘Far Cry 5’

By: Etienne Carrier

GDC 2018 – Procedural World Generation of ‘Far Cry 5’ – GDC Vault Link

GDC talk where Etienne details a large scale tool they created using procedural generation techniques to help build the world of Far Cry 5. It covers both the user end (world editors/designers) and the behind the scenes processes that make everything possible. They use Dunia and Houdini together to create these tools.

GDC 2018 Talk – Math for Programmers by Squirrel Eiserloh

There are 6 talks about techniques and implementations of procedural content generation in games. The order is as follows:

  1. The Power of Procedural Recipes – Procedural Recipes
  2. Semi-Procedural Content Pipelines – Semi-Procedural Methods
  3. Staged Parametric Map Generation – Staged Parametric Generation
  4. Digging with Perlin Worms – Perlin Worms (for rivers/roads/caves)
  5. Discrete Constructs in Endless Worlds – Infinite Worlds
  6. Juicing World Generation with Metadata Feedback – Juicing PCG with Metadata