Video Game Physics – Constrained Rigid Body Simulation by Nilson Souto

January 5, 2019

Video Game Physics – Constrained Rigid Body Simulation by Nilson Souto

Toptal – Video Game Physics Tutorial – Part III: Constrained Rigid Body Simulation

By: Nilson Souto

Link to Erin Catto’s box2d.org

This appears to be a good follow up to the game physics GDC talk by Erin Catto I watched earlier. This serves as another listing of physics constraints and how they can apply in games, specifically when dealing with rigid body elements. I also learned the constraint type is “revolute”, not “resolute”. This article actually references Erin Catto and his Box2D site since it goes into his creation of the sequential impulse method.

Physics for Game Programmers: Understanding Constraints

January 5, 2019

Physics for Game Programmers: Understanding Constraints

Constraints in Game Physics

Youtube – GDC – Physics for Game Programmers: Understanding Constraints

By: Erin Catto

EDIT: Updated to correct “resolute” constraint to “revolute” (Jan 5, 2019)

Erin goes over the importance of physics constraints in physics game programming and how to implement them to add diversity and creativity when designing physics for games.

Erin explains that physics constraints are to physics programmers as shaders are to graphics programming. You can use the already existing recipes that will get the job done, but designing your own will allow you more flexibility and creativity.

Shaders – lighting, shadows; Physics constraints – revolute, prismatic

Position constraint: in example, it is a particle that is restricted to a surface. Appears the equation should be 0 if particle is on surface, than < 0 or > 0 depending on what side of the surface it is on if it moves away from surface.

Contact constraint: the contact points on the contacting bodies do not move relative to each other along the contact normal

Global solvers vs Local solvers: Global solvers would solve everything somewhat simultaneously by having everything in a single large matrix equation setup. Local solvers are used to do computations linearly and solve one thing at a time.

Physics solver will need to iterate multiple times to solve impulses, but cannot run enough times to get everything completely accurate which leads to some overlap.

Iterations allow for convergence of the system’s solution and the actual determined solution. The iterations and time for this convergence to occur vary based on the complexity of the physical system. In the examples, circle stacks with assigned mass values were used. It turns out heavier masses on top of smaller masses leads to much slower convergence, and it gets slower as the mass ratio increases. This occurs because the solver needs to bring the top circle to rest, but each iteration it does on the contact occurring between the two circles only removes a small amount of the large circle’s velocity because it does it relative to the size of the lower circle.

Warm Starting – since a lot of things in games aren’t moving all the time, you can “save” impulses to try initially later so that it will have a saved solution if it hasn’t moved and if it starts moving, it may be closer to the next solution already This does not do well with quick load changes.

Inequality constraints – only want impulses to be able to push, not pull (lamba > 0); For accumulated impulses, you actually don’t want each incremental impulse to be restricted by > 0, you just want to apply that to entire accumulated impulse. Sometimes you need negative incremental impulses to solve cases of overshooting. This is when impulse applied at a step is actually too great and you need to bring it back down.

Global solvers are great but too expensive.

Don’t use acceleration constraints because it leads to cases where you need an infinite force to truly stop an object instantaneously, which is theoretically what should occur in rigid body collision.

Link to Erin Catto’s box2d.org

References from the talk:
  • David Baraff: Coping with Friction for Non-penetrating Rigid Body Simulation
  • Metthias Muller: Position Based Dynamics
Tactics Movement Tutorial (Cont.) – AI and A*

January 4, 2019

Tactics Movement – AI

AI with A* (A Star)

Youtube – Unity Tutorial – Tactics Movement – Part 6

By: Game Programming Academy

This part of the tutorial implements A* for use as the AI for NPCs. Most tactics games would generally involve some type of action phase, but this tutorial finishes with just getting the movement setup.

NOTES

The tutorial’s breakdown of A*:

  • processing the open list by finding the lowest f cost
  • put it in the closed list
  • checking for the target
  • then process adjacency and see if tile is in open list, closed list, or neither (in which case it is added)

Like in many tactics games, the NPCs will still show all of their selectable locations to move before actually selecting one.

For checking distance, tutorial just uses “Vector3.Distance”, but they suggest using the squared magnitude value since it is easier computing because Distance uses square root. Used for setting up simple AI searching algorithm to find the closest thing. It is a simple foreach loop that goes through an array of gameobjects checking the distance between the gameobject itself and each of those individual objects. The distance as well as the object is stored, so whenever a new lower distance is found, the object will be replaced, otherwise, the same object remains there (as that indicates the currently checked object is farther away).

The tutorial tries to keep the TacticsMove script as a generalized class that holds all the helper methods for use in the other classes.

A* uses two lists: an open list and a closed list. A* can also use a priority queue, but C# doesn’t have a built in priority queue. The open list is any tile that has not been processed, and the closed list is those that have been processed. It will finish when the target tile is added to the closed list.

Since we’re using tiles, we could use the “Manhattan Distance” instead. Manhattan distance may work better particularly with arrays though so tutorial sticks with Euclidean distance.

Since we’re using pathing to walk up to a unit, not on top of, the tutorial just decides to follow the A* path and then stop one node before the end (which would be where the target unit is located).

TERMINOLOGY

Manhattan Distance:The sum of the absolute differences of the Cartesian coordinates of two points. This represents the straight line nature of moving around on tiles in this case which is a grid-like layout.

Priority Queue: Like a normal queue but each element within has a priority value associated with it.

TODO

Suggested by the tutorial, program NPC for case where there is no target in range.

Tactics Movement Tutorial (Cont.) – Turn Manager

January 3rd, 2019

Turn Manager – Tactics

Turn Management

Youtube – Unity Tutorial – Tactics Movement – Part 5

By: Game Programming Academy

This part of the tactics game tutorials focused on creating the turn manager. An NPC character was created to represent another team. Even though there are only two units, the tutorial design deals with entire teams. The turnManager used static variables and methods because it should be very accessible and will act as a sort of global since there should only ever be one.

TERMINOLOGY

Subscriber Pattern: the tutorial mentions using this method to add units to the turn manager queue. This was tied to the idea that when a unit comes “online”, it should be able to add itself to the proper list in dictionary.

Dictionary: more uses of this in turnManager system, so I still need to look into this to see how they work.

NOTES

Will need to add method to remove unit from queue when it is defeated, which will then also lead into another method that will be needed for dealing with what happens when an entire team is defeated.

There was a method named “EndTurn” in the TurnManager script and the TacticsMove script. I am not sure if this is a bad practice or something that is generally done without consequence.

PROBLEMS

My units could move through each other or even on to the same space. Going back to tutorial video “Tactics Movement – Part 2” I saw there was an adjacencyList.Clear(); command I was missing in my Tile Reset method. Adding this back in fixed the issue. I wasn’t sure if this was removed later in the tutorial by the tutorial itself for bug testing when player movement was buggy. After checking video “Tactics Movement – Part 4” in the debugging segment, this does not appear to be the case, so it does seem that I just missed that line of code the first time.

Tactics Movement Tutorial (Cont.) – Jumping and State Machines

December 23rd, 2018

Tactics Movement (Cont.) – Jump State Machine

Jumping in Tactics Game

Unity Tutorial – Tactics Movement – Part 4

By: Game Programming Academy

This part of the tutorial focused a lot on the jumping aspects of the player movement. The movement when the unit jumps up or down to different elevation tiles should operate differently than when it just moves around on equal elevation tiles. A state machine is created to deal with all the various aspects of a jump, as well as the possibility of jumping upward or downward. The state machine however appears to have significant bugs in it that will need to be worked out.

Terms

  • Stack: Pop, Peek
  • Protected class

Problems

This part of the tutorial had several bugs that could possibly occur, which the creator of the videos also encounters. The tutorial video showed an issue where the unit would just float in a straight line when it should come down, but I have yet to have that occur. Most bugs I saw had the unit not perform a jumping action, such as just instantly teleporting onto the top of a block instead of performing its slow jump animation. My errors seem to come from the jump state machine not updating properly consistently, where the tutorial video errors seemed to be coming from an issue with the forward-facing vector of the unit not being perfectly lined up at all times (the floating issue might also just be a strange state machine update issue).

Lessons Learned

Locomotion is a good term to use as a commenting term in coding to determine where movement of an element is truly occurring. Can be helpful for figuring out timing for adding animations.

State machines can require a lot of debugging. This will just require consistently calling out what state the object is in at what times, and checking if all of the flag changes are occurring properly.

Learning Tactics Movement (Cont.) – BFS and Collections

December 22, 2018

Tactics Movement (Cont.) – Programming Collections

Breadth First Search (BFS) and Using Programming Collections

Unity Tutorial – Tactics Movement – Part 3

By: Game Programming Academy

This section begins to finally create the breadth first search algorithm for creating list of available selectable tile options. This section relies heavily on collections type elements in C# programming which I will need to delve into more.

Notes

Look into breadth first search, stacks, queues, and lists.

Stacks: Used to add things to a collection in a certain order and use/apply them in reverse order. Stack uses command “push”.

Queues: Use “enqueue” to add to queue and “dequeue” to remove/pull from the queue.

halfHeight was a variable used to find the center point of the game object in conjunction with the “bounds” and “extents” values of the collider. This is used when positioning the unit on a tile to make sure it is on/above the tile.

Lessons Learned

Had an issue where the mouse clicking functionality wasn’t working. It turned out that the main camera just was not tagged “maincamera”. Make sure to check camera labeling and that it matches what you call out in code when dealing with functions that deal with screen space and the camera.

Dealing with Unity Forces for Statics Game Concept

AddForce – Unity Official Tutorials

Youtube – AddForce – Unity Official Tutorials

The bare basics of scripting forces in Unity with rigidBody’s. The AddForce can take two inputs: a vector for direction and magnitude, and what type of force it is.

ForceModes
  • Acceleration – Continuous change; not affected by mass
  • Force – (Default) Continuous change; affected by mass
  • Impulse – Instant change; affected by mass
  • VelocityChange – Instant change; not affected by mass
AddTorque – Unity Official Tutorials

Youtube – AddTorque – Unity Official Tutorials

The bare basics of scripting torques in Unity with rigidBody’s. The AddTorque can take two inputs: a vector axis to apply torque around, and what type of torque it is. This is very similar to AddForce. Important to remember, Unity uses “LEFT HAND RULE” for rotation.

ForceModes
  • Acceleration – Continuous change; not affected by mass
  • Force – (Default) Continuous change; affected by mass
  • Impulse – Instant change; affected by mass
  • VelocityChange – Instant change; not affected by mass
Game Ideation
Engineering Teaching & Research Equipment – Armfield

EF-1.1 – Statics – Forces experiment kit
Youtube – EF series video Statics Forces 1 1 3

The links are similar videos, the first is just directly to the site of those that made the kit, and the second is a Youtube link. This kit provides hand on experience for understanding a lot of topics based around static equilibrium. Topics such as 2D shape center of masses, force vectors, and much more can be covered with this tool.

Game Idea – Engineering Statics Game

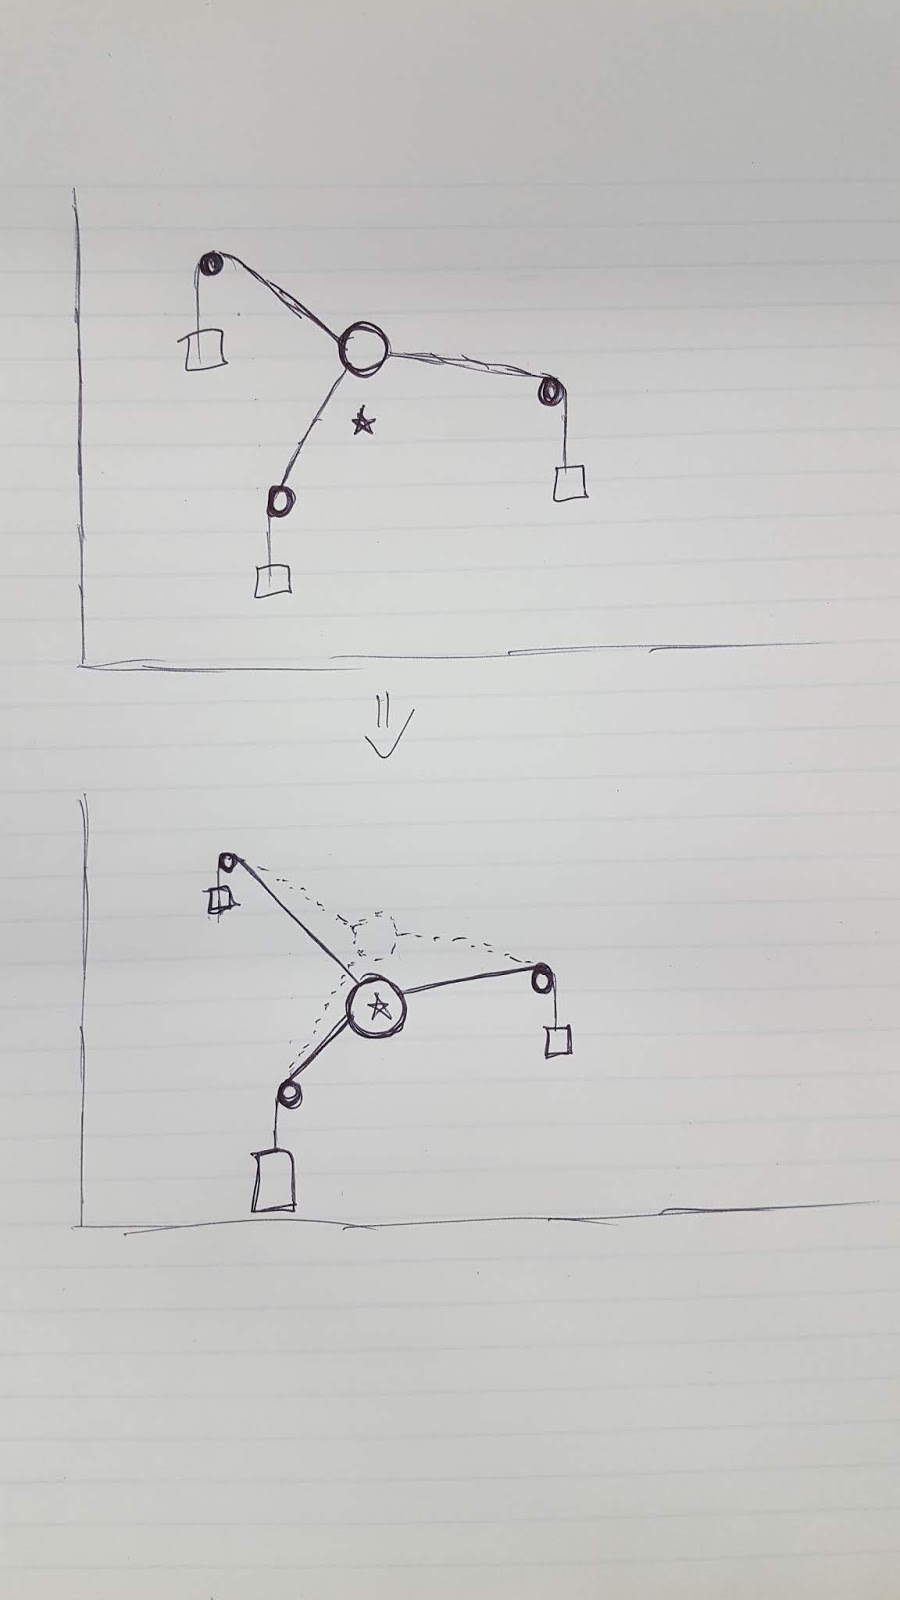
Following the general idea of the kit shown above, the game environment is populated with nodes that apply controllable forces to a central ring object. These forces can be altered to change the position of the ring. The environment will spawn collectibles that the player must direct the ring towards in order to collect them. To move the ring, they will need to intelligently alter the forces applied by the nodes.

Quick sketch of concept
Concept visualization of force body diagram to show how game can function.

Gear Mesh Generating Web Build

Link to Web Build of Prototype Currently

Current Controls
  • Left Mouse Button – Press: Select a gear to make it active
  • Let Mouse Button – Drag: Move selected gear around
  • Left Mouse Button – Drag + Spacebar: Destroy selected gear
  • w : makes the gear spawning object the active object (instead of any gears)
  • Typing in input fields: Changing the number in this input field will alter the corresponding parameter of the currently active (selected) object.

Selecting a gear and changing the value in the input field will immediately change that corresponding parameter on that gear. For example, if you left click a gear, then type the value “1” into the “Body Radius” input field, that gear will have its body radius value immediately change to 1, and its mesh and colliders will update along with it.

There is an invisible gear spawning object (“gear spawner”) that creates a gear when the “Create Gear” button is pressed. The gear created will have values based on whatever the spawner’s current values are. To change the spawner’s values, the spawner must be the active object. This is where the “w” key control comes in. Once the player presses “w”, as long as they don’t left click another gear in the mean time, changes to the input field will become the values of the spawner. Then the next time the “Create Gear” button is pressed, it will use those updated spawner values to create the new gear. This gear can then be altered as any other gear.

Current Issues to Avoid

The input fields do not show the values of an object when it is selected. This can be a bit confusing since it makes it hard to tell what the currently selected object’s values are, unless the player just remembers them. This is something that would be crucial to update as there is currently no way to actually see the current values.

The spawner does initialize at all values of “0”. Just be aware that if you try to create gears before changing the spawner’s parameters, you will be creating invisible empty objects.

When attempting to update the spawner, make sure to press “w” before changing any values in the input fields. This was something I found myself messing up a lot, and would be a feature to improve in the future. Again, make sure to press “w”, and not click any other gears, before changing the input fields to update the spawner’s values.

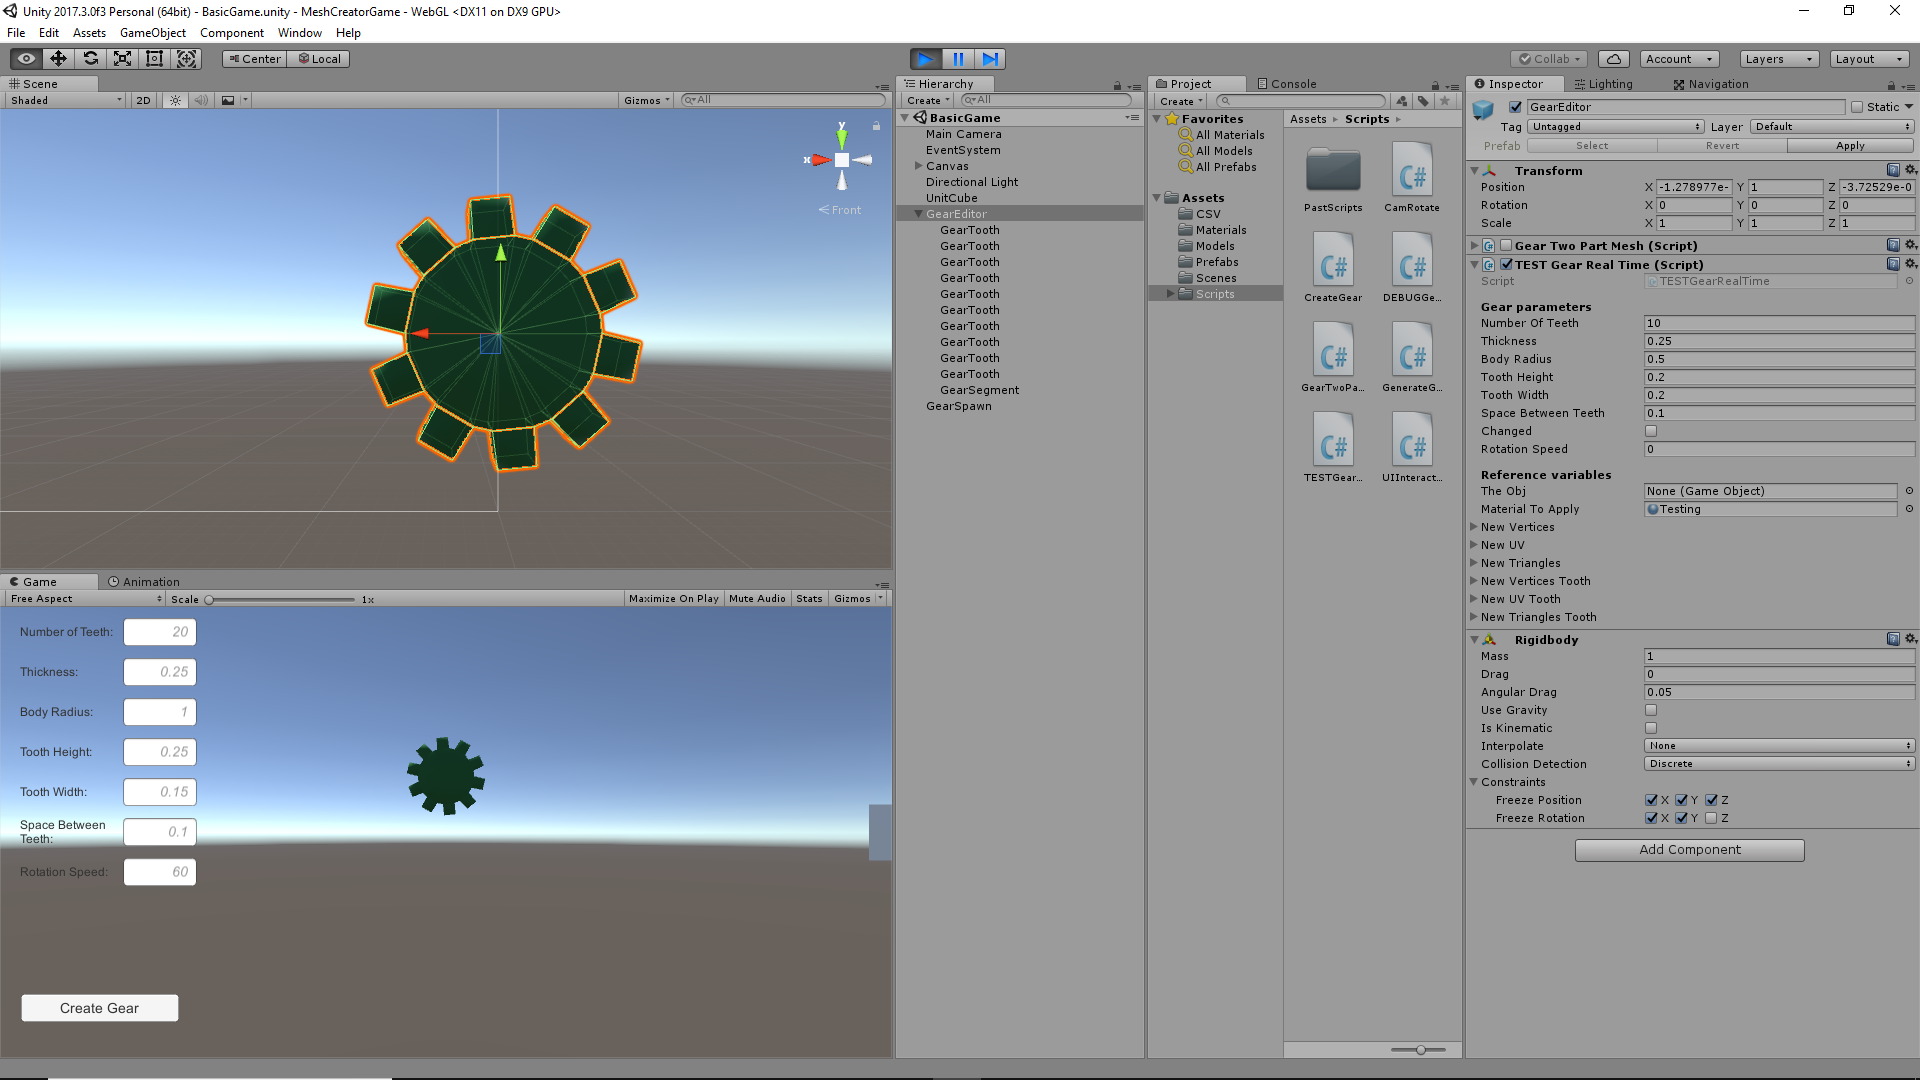
Example setup of gear mesh generator in Unity’s editor.

DIGM-540 Gear Mesh Generating Resources

  1. Basic Mesh Scripting Tool Description for Unity
  2. Creating Basic Billboard Mesh Through Unity Scripting
    Shows how to create a vertex array, set these into triangles, and create a full mesh.

  3. More Help for Procedural Generation of Mesh

This shows that it is possible to create/modify meshes within Unity using scripting.

Project Direction – Create Script in Unity that Will Take User Inputs to Instantiate a Gear Model Based on Said Parameters

This may be possible through the general use of the Mesh class in Unity scripting. Something along the lines of creating a set of vertices for the central body (some smoothness level of cylinder), then creating a gear tooth mesh that can be multiplied and geometrically positioned around the central core body mesh created.

Bump Mapping

Normal Maps from Unity

“Normal Maps and Height Maps are both types of Bump Map. They both contain data for representing apparent detail on the surface of simpler polygonal meshes, but they each store that data in a different way. A height map is a simple black and white texture, where each pixel represents the amount that point on the surface should appear to be raised. The whiter the pixel colour, the higher the area appears to be raised.

A normal map is an RGB texture, where each pixel represents the difference in direction the surface should appear to be facing, relative to its un-modified surface normal. These textures tend to have a bluey-purple tinge, because of the way the vector is stored in the RGB values.”

Displacement Maps

Unity Displacment Maps and Tesselation

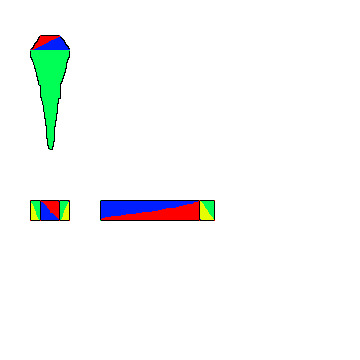
Tri Setup to Create Mesh for Gear Segments
Showing example breakdown of a gear segment in tris.

Randomly Selecting Points within a Given Polygon

References Used:

Stack Overflow – Random Points in a Quadrilateral

Wolfram Alpha Information on Points in a Triangle

I needed to be able to randomly but evenly distribute a number of objects within a 2D area so these are the sources I started with. The Stack Overflow question ended up being a very good starting point, but there were errors with the calculations that I needed to solve in order to actually use their logic.

Fixes from Stack Overflow

First calculation to fix was the originally randomly selected position of the object. It turned out that it was very close, but it actually only worked if v0 was the origin. It was simple enough to fix by adding v0 to the x equation.

The second equation to fix was the v3 equation. They were subtracting v0 twice which is incorrect (again something unnoticeable if v0 is that origin as you’re simply subtracting (0,0) twice). v0 should only be subtracted once to obtain the correct v3 value.

Finally, a correction that was found in the comments was that there are two rotation equations for x’ and the larger one is incorrect. In the text, it can be found that a rotation of pi is necessary. This can be mathematically applied by simply reversing (x – v3) to (v3 – x).

Work to do

Fixing these mathematical errors has appeared to give me the desired results with some further testing required after a final issue. I still need to determine how to let it know mathematically when to “flip” the x position into the x’ position. The original thought was to simply compare the distance from x to v3 and v0, and if it was closer to v3 (distance was less), then apply the x’ flip transformation. This however does not seem to be a geometrically sound solution as I am sometimes getting the flipped applied when it is within the proper bounds.