Unity Using Events and Building Effective UI Systems

September 7, 2021

Unity Events

UI Systems


Title:
C# Events in Unity! – Intermediate Scripting Tutorial

By:
Unity


Youtube Link – Tutorial #1

Description:
Brief introduction to using Events in Unity.


Title:
How To Build An Event System in Unity

By:
Game Dev Guide


Youtube Link – Tutorial #2

Description:
Quick showing of implementing a basic Event system in Unity for gameplay reasons.


Title:
Delegates, Events, Actions and Funcs – The Observer Pattern (Unity & C#)

By:
One Wheel Studio


Youtube Link – Tutorial #3

Description:
Covers Events, as well as Delegates, Actions, and Funcs specifically through the Observer Pattern in Unity.


Title:
Game Architecture Tips – Event Driven UI – Unity

By:
Dapper Dino


Youtube Link – Tutorial #4

Description:
An Event system built in Unity specifically with a focus on UI.


Title:
Building Unity UI that scales for a real game – Prefabs/Scenes?

By:
Jason Weimann


Youtube Link – Tutorial #5

Description:
General coverage of building effective UI systems in Unity.


Overview

I wanted to delve further into using Event systems in Unity specifically when building UI systems, so I collected a few resources I thought would help with researching that. These tutorials cover everything from the basic foundations of Events themselves to fully fledged UI system tutorials near the end implementing those tools and concepts covered in the earlier tutorials.

I think Event heavy systems are very effective ways to build out UI in games, so I want to get a better grasp of setting that up. I especially think the final tutorial by Jason Weimann will help bring those topics together as well as cover other important factors for building larger scale UI systems.

via Blogger http://stevelilleyschool.blogspot.com/2021/09/unity-using-events-and-building.html

Adobe Photoshop – Introductory Tutorials – Game Art Focus – Part 1

August 12, 2021

Adobe Photoshop

Game Art Tutorial List


Title:
Total BEGINNERS guide to drawing in photoshop 2021

By:
Trent Kaniuga


Youtube – Tutorial #1

Description:
Quicker coverage of just a lot of general tools and what they do in Photoshop.


Title:
Learning the basics of drawing in Photoshop

By:
Michael Clarida Arts


Youtube – Tutorial #2

Description:
Shows a drawing example within Photoshop to show some of the tools at work to create a piece.


Title:
HOW TO PAINT 2D GAME ART IN PS – STEP BY STEP TUTORIAL

By:
Blackthornprod


Youtube – Tutorial #3

Description:
Very quick example on some tips for drawing 2D game assets.


Title:
How To BLEND COLORS Like A Pro (For Beginners) | Photoshop Digital Painting Tutorial

By:

The Geek Artist


Youtube – Tutorial #4

Description:
Quick example of how to blend colors in Photoshop.


Title:
Lava Potion Game Asset Tutorial in Photoshop – full game design tutorial

By:
Jaysen Batchelor


Youtube – Tutorial #5

Description:
Tutorial for creating a 2D potion game asset in Photoshop.


Title:
Game Design Character in Photoshop – full character design art in Photoshop

By:
Jaysen Batchelor


Youtube – Tutorial #6

Description:
Tutorial for creating a 2D shadow creature game asset exploring character design in Photoshop.


Title:
Creature Game Design in Photoshop – Cute turtle creature tutorial

By:
Jaysen Batchelor


Youtube – Tutorial #7

Description:
Tutorial for creating a 2D turtle creature game asset exploring creature design in Photoshop.


Overview

Photoshop being one of the most used artistic softwares seemed like a good point to start exploring tutorial to use with my new Wacom tablet, so I compiled a lot of tutorials that seem good for getting me started. I’ve used it before, but not to the extent of actually drawing full assets, and I want to be able to draw out decent characters and creatures. I figure I will cover the basics again just to get comfortable with all the tools available, and I hope these tutorials are a good starting step for that as well as transitioning into learning how to actually apply these tools to get started making some solid sketches.

Tutorial #1 covers a lot of the tool basics, and Tutorial #4 with color blending was a good example of something I believe will be something I will like to explore extensively while getting started making creatures and characters, so those seem like strong basics coverage. The rest generally cover examples of making some kind of 2D art asset, and I will be using those as guides to show me how to use some of those tools to actually create the assets. Getting those examples from a few different sources can help show different approaches, but the final 3 are all from the same creator since they do just appear to be nice quick examples that I can grasp fairly quickly.

via Blogger http://stevelilleyschool.blogspot.com/2021/08/adobe-photoshop-introductory-tutorials.html

Unity Shader Graph – Energy Shader – by Casey Farina

August 9, 2021

Shader Graph

Unity


Title:
ART 200: Creating an energy Shader in Shader Graph in Unity

By:
Casey Farina


Youtube – Tutorial

Description:
Tutorial on creating an energy effect on a surface with Unity’s Shader Graph.


Introduction

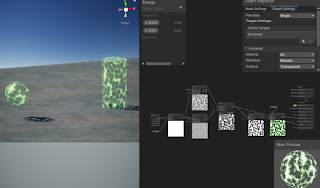
This tutorial covers the creation of a shader in Unity’s Shader Graph which covers the surface of an object with a glowy, plasma-like effect. Further in the tutorial they cover how to make the less pronounced parts of the effect actually completely transparent, which gives a cool effect on its own, or allows for this to be placed over other effects or surfaces to apply the effect with gaps showing the surface below.

Fig. 1: My Results of the Energy Shader Along with Shader Graph View

Quick Notes

HDR Color and Emission

It starts with HDR color with significant intensity into Emission to create glowing, radiant effective.

Voronoi Noise in Layers

Use Voronoi noise to create moving globules effect within the energy. Contrast node used with this to create more distinct dots.

They then created two Voronoi noises with differet cell densities and blended them with a Blend node, giving a combination of tiny particles moving with some larger effects moving throughout the material.

Transparency and Alpha Clip Threshold

By making the Surface of the Graph Inspector Transparent, feeding the Blend result into the now present Alpha on the Fragment node, and setting a proper Alpha Clip Threshold (0.1 is usually a good start), then you can get an effect where parts of the energy shader are totally transparent and see through.

Summary

This tutorial helped me make a simple, yet effective energy effect shader that works decently well on multiple surfaces. The extra segment on including transparency into the effect really took it up a level for me as an interesting effect that could have a lot of uses. This would help expand the effect a bit by also giving it the option of being used on a larger mesh outside of an object’s actual mesh to provide a sort of aura off of and around an object that could be cool, as well as allowing for layering with other effects easier.

They also covered a small segment on using the Gradient node for some strange effects. This was a small segment that also didn’t appeal to me particularly so I didn’t try that portion out myself. That could give some more variety to the tool, but it just wasn’t something I wanted currently.

My result can be seen in action below with a few variations in speed of the effect and color!

via Blogger http://stevelilleyschool.blogspot.com/2021/08/unity-shader-graph-energy-shader-by.html

Unity Shader Graph – Black Hole VFX – by Gabriel Prod.

July 7, 2021

Shader Graph

Unity


Title:
Unity VFX & Shader Graph – Black Hole Effect Tutorial

By:
Gabriel Aguiar Prod.


Youtube – Tutorial #1

Description:
Tutorial for a black hole VFX using Unity’s Shader Graph, particle systems, and Visual Effect graph.


Title:
{ How to CHANGE the SKYBOX in Unity } – HDR Textures in the description

By:

GameDevTraum


Youtube – Tutorial #2

Description:
Quick tutorial to use texture as Skybox in Unity.


General Notes

Fixing Errors

I immediately ran into an issue with the Scene Color node. The fix for this was going to the Main Camera and setting the “Opaque Texture” to ON (found under the Rendering section of the Camera). This made the shader and material match the scene color appropriately, giving that transparent look.

I found a generic space texture to use for my background to emulate the one used in the tutorial. I turned it into a Cube texture to create a Cubemap material to use as my Skybox material. That was what I used Tutorial #2 linked to above for.

I was still having an issue seeing the effects in the scene view (it was just remaining as a matte gray plane). I found that modifying the Opaque Texture flag in the UniversalRenderPipelineAsset (High-Quality for me and my current Unity version) resolved this issue, as described here:


Unity Questions – scene color node not working in shader graph

Multiply to Control Effect Distribution

They multiplied the noise with a round particle texture to create a round visual effect on the rectangular plane that contained all the interesting visual effects. The white parts of the texture contained the focus on the noise, while the black parts did not receive impact from the noise. The transition between the two then also creates a bit of a smoother transition from where the distortion occurs to the lack of distortion.


My Resulting Black Hole VFX from Following Tutorial #1


My Resulting Shader Graph for the Heat Distortion Following Tutorial #1


My Resulting Visual Effect Graph for the Floating Particles Following Tutorial #1

via Blogger http://stevelilleyschool.blogspot.com/2021/07/unity-shader-graph-black-hole-vfx-by.html

Unity Shader Graph – Signed Distance Fields – Update with Subgraph Fix

June 24, 2021

Shader Graph

Unity


Title:
Drawing Boxes and Rectangles in URP Shader Graph with 2D SDFs! 2021.1 | Unity Game Dev Tutorial

By:
Ned Makes Games


Youtube – Tutorial

Description:
Exploration into calculating signed distance fields and using them with Unity’s Shader Graph.


Title:
Rectangle SDFs and Procedural Bricks! Video Production Stream | Unity Game Dev Livestream

By:
Ned Makes Games 2


Youtube – Tutorial

Description:
The full stream which most of the previous tutorial is pulled from. Useful for any more in depth questions of previous tutorial.


Overview

When I visited this tutorial yesterday I ran into an issue with Unity 2021.1.3 that working with subgraphs was extremely bugged and error prone. I had seen online that later versions potentially fixed the issue, so I download the latest version, 2021.1.12, and this did indeed fix the issue for me, making this tutorial much easier to follow along with.

This tutorial was mostly just looking at the subgraphs and shader graphs they built and following along to build them out myself. This was at least a decent learning experience at getting familiar with the work flow of setting up subgraphs for your shader graphs, as well as just using a lot of the math nodes.

Helper Scripts to Show Off Shader

Along with building the shader, they made two simple scripts to make the shader a bit interactive and more flexible.

SetPoints

This class was responsible for letting the user move the two points dictating the general length of the rectangle shape by just clicking and dragging. This however did not work immediately, as they were using a helper class named MousePointer I did not use.

I was able to get a similar result by replacing their process of getting the point:


var p = MousePointer.GetWorldPosition(Camera.main);


with my replacement:


var p = Camera.main.ScreenToWorldPoint(new Vector3(Input.mousePosition.x, Input.mousePosition.y, distanceToPlane));

distanceToPlane was a value the user could put in that is the distance from the camera to the flat plane the camera is facing to test the shader. As long as the exact same distance is put there for the z-value of ScreenToWorldPoint, the points moving correlate exactly with where the user is dragging them.

RectangleThicknessByScrollWheel

This class lets the user control the thickness, or width, of the rectangle with the scroll wheel. This class directly worked as shown.

General Notes with Scripts Interacting with ShaderGraph Properties

Integrating the scripts with the Shader Graph properties was actually pretty easy. It worked similarly to working with the Animator in Unity. You just use methods like SetFloat() and give it two parameters where one is the exact string name of the property you want to set, and the second is the value you are passing in to said property. It is worth noting this was just accessed through the Material, there was no strange Shader Graph object that needed to exist or anything like that.

An example of my implementation of the tutorial can be seen below.


Unity Shader Graph: SDF Rainbow Pulse from Tutorial by NedMakesGames from Steve Lilley on Vimeo.

Video Example of my Following of the Pulse Shader in the Ned Makes Games Tutorial

via Blogger http://stevelilleyschool.blogspot.com/2021/06/unity-shader-graph-signed-distance_24.html

Unity Shader Graph – Signed Distance Fields and Subgraph Errors

June 23, 2021

Shader Graph

Unity


Title:
Drawing Boxes and Rectangles in URP Shader Graph with 2D SDFs! 2021.1 | Unity Game Dev Tutorial

By:
Ned Makes Games


Youtube – Tutorial

Description:
Exploration into calculating signed distance fields and using them with Unity’s Shader Graph.


Overview

This shader tutorial quickly explores calculating signed distance fields and using that for interesting effects. These effects were built in HLSL in the tutorial video originally, but they also show how these can be implemented with Unity’s Shader Graph system. I wanted to use the Shader Graph approach, but unfortunately I found that Unity’s Shader Graph Subgraphs have some major issues.

Signed Distance Fields (SDFs)

Signed Distance Fields (SDFs): calculate the distance from any arbitrary point to a specific shape

Principles of Calculating

To start, they look at an example using a rectangle whose center is at the origin (0, 0).

First, they find the distance from the point, p, to the center of the rectangle, which is just the length of the Vector2 p because the center is at the origin.

Then, using the symmetry of the rectangle, the absolute value of point, p, and the half dimensions of the rectangle are used to determine the distance of the point to any corner of the rectangle.

To get the positive results, they find the vector between the absolute value of point, p, and the corner of the rectangle and find the length of this vector after converting any negative components to 0.

Since the core of an SDF is that it is signed, meaning that a point inside the shape returns a negative value and a point outside the shape returns a positive value, they expand it to deal with negative distances. The vector, d, which is that from the absolute value of point, p, to the corner of the rectangle is only inside of the shape when both components of d are negative.

Assuming both components of d are negative, the result from the previous step already results in 0, so they can add a secondary component to this that returns a negative result in this case. By using min(max(d.x, d.y), 0) they can find this distance because a point within the rectangle must be closer to one wall or the other, or they are identical values. This is why there also is no rounded effect within the rectangle.

Moving the rectangle’s center from the origin just requires an additional offset argument.

Then, rotation requires another argument, and requires rotational matrix math (something I covered in my investigation to changing vector spaces).

Unity Problem with Subgraphs

While following along to mimic their Shader Graphs, I came across a Unity issue working in Sub Graphs especially. When creating properties and moving those property nodes around, Unity consistently runs in ArgumentNullException errors which completely shut the graph down and prevent any further progress until it is closed and reopened. Apparently Unity versions 2021.2 and up may work better with this, so I will have to look into more Unity versions in the future.

via Blogger http://stevelilleyschool.blogspot.com/2021/06/unity-shader-graph-signed-distance.html

Unity Shader Graph – Liquid Effect by Gabriel Aguiar Prod.

June 18, 2021

Shader Graph

Unity


Title:
Unity Shader Graph – Liquid Effect Tutorial

By:
Gabriel Aguiar Prod.


Youtube – Tutorial

Description:
Quick shader graph tutorial exploring interesting effects of moving shader based on psuedo-physics.


Overview

This shader tutorial looked like a great way to extend my knowledge on Unity’s shader graph since it appears to have some neat and unique mechanics. The fact that the shader is responding to the changes in position and rotation of the object explore ways to have shaders follow physics-like rules to create effects visually that can mimic for physical phenomena. Many of this user’s tutorials also include setting up the initial models, but I think this effect can work decently with other simple shapes I can easily make with ProBuilder.

via Blogger http://stevelilleyschool.blogspot.com/2021/06/unity-shader-graph-liquid-effect-by.html

Accessing Variables in Other Scripts in Unity

May 26, 2021

Accessing Variables

Unity


Title:
How To Access Variables From Another Script In Unity

By:
Infallible Code


Youtube – Tutorial #1

Description:
Goes over many programming techniques within Unity to access variables in one script from another.


Key Concepts

Scripts

C# classes that inherit from MonoBehaviour.

Collaborators

Scripts that require a reference to at least one other script in order to function.

Dependencies

Objects that collaborators need in order to function.

Categories of Resolution

Where the burden of dependency resolution lies.

External Resolution

The responsibility of dependency resolution falls somewhere else.

Public Properties

Expose dependency of a public field or property


Simple and requires no overhead, but can easily make bugs that are also hard to debug. This is because it can be unclear where the dependencies lie.

Editor Properties

Expose serializable dependencies in the Unity editor.
Use SerializeField on attribute private properties.


Similar to public properties, but are much safer.

Unity Event Methods

Functions that are called when specific events occur at runtime.


This specific example covers methods like OnCollisionEnter(). These are functions that are called when specific events occur, and they help resolve dependencies when those events are triggered.

Internal Resolution

The script itself is responsible for resolving its own dependencies.

FindObjectByType() Method

Search for dependencies in the scene based on their type.
FindObjectsByType() returns a list of matching objects.

This can be tricky to use sometimes since you may not be sure of the state of your scene when this is called. It is also relatively expensive. Most consistent to use to find manager scripts, since they should confidently be active in the scene when called.

Static Instances

Expose dependency on a public static property.
Commonly used in the Singleton pattern.

Dependency Injections

A pattern for automating dependency resolution based on a configuration.

It allows you to configure all your dependencies in one place and have them resolve automatically based on that configuration.

Summary

I have used all these techniques before, but it is always good to find condensed lists of them all together to really help organize them. Determining the cleanest and safest way to pass around variables through scripts is something I work on a lot, so laying out these options to go through in an effort to determine the best approach is always helpful. This also led me to some other resources on the topic that I am looking forward to investigating.

via Blogger http://stevelilleyschool.blogspot.com/2021/05/accessing-variables-in-other-scripts-in.html

Singletons in Unity and Many of Their Downfalls by Infallible Code

May 26, 2021

Singletons

Unity


Title:
Everything You Need to Know About Singletons in Unity

By:
Infallible Code


Youtube – Tutorial #1

Description:
Goes over the true properties of singletons in code and why they should be used sparingly in Unity game development.


Intro to Singletons

Singleton Pattern: class that is both globally accessible and can only be instantiated once

Common Example:

Audio Manager – because it is something many scripts will want access to, and you specifically want only one in your game at a time

Singleton Requirement #1: Global Access Specification

Singletons sound promising because they are an easy solution to “how do you access other scripts” or “how do you fill your class dependencies”. Using Singletons for access can hide the fact that a class depends on another, which can lead to difficult to track bugs and difficulties. This may lead to using the singleton even more than necessary because of ease of access, which creates more and more hidden dependencies.

Example #1

Non-Singleton Version

public class GameManager : MonoBehaviour
{
	[SerializeField] private Player player;
	
	privat void OnPlayerDied()
	{
		print($"Final Score: {player.Score}");
	}
}

Singleton Version

public class GameManager : MonoBehaviour
{
	privat void OnPlayerDied()
	{
		print($"Final Score: {Player.Instance.Score}");
	}
}

Because the Singleton pattern accesses a specific class directly, additions of derived classes will require more updates that may also be hard to find because of the hidden dependencies. Again, doing something similar to the Non-Singleton version of Example #1 makes it so that an additionally created derived class could fill the Player dependency with little to no edits.

Singleton Requirement #2: Restricted to a Single Instance

This is generally accomplised by creating a private constructor for the class, and then instantiating a single instance from the getter. This is already difficult in Unity as many classes you create in Unity will be MonoBehaviours, which cannot be instantiated in code with the new keyword. This is because Unity hides their constructor and allows anything to instantiate them through object.Instantiate().

So to help satisfy this, you need an extra check if another instance of the class already exists in the scene in case it was added directly in the Editor or through other object.Instantiate() calls. Once these are located, they may also require being destroyed to make sure there only exists one instance at any given time. This can also lead to strange results, as sometimes destruction prevention is used in Unity, such as with the DontDestroyOnLoad() method. Sometimes you may also get rid of and keep the “wrong” singleton if multiple somehow run into each other.

Singleton Criteria:

1) Absolutely required to exist only once
2) Must be accessible from every part of your code
3) Controls concurrent access to a resource

Summary

While I already knew that singletons should be used sparingly, having a better understanding of them fundamentally really helps put that into perspective just how sparingly they should be used. It also helps confirm that it can generally be a bad way of passing around data in Unity, and with a need that comes up so often and has so many options to be accomplished, it is good to generally remove an option from that list. It is also important to acknnowledge that in Unity specifically they are extra difficult to implement when it involves MonoBehaviours, as this again helps narrow down the process of passing around data.

via Blogger http://stevelilleyschool.blogspot.com/2021/05/singletons-in-unity-and-many-of-their.html

Coroutine Fundamentals in Unity

May 20, 2021

Coroutines

Unity


Title:
Introduction to Game Development (E21: coroutines)

By:
Sebastian Lague


Youtube – Tutorial #1

Description:
Covers the basics of coroutines in Unity.


Title:
Coroutines In Unity – What Are Coroutines And How To Use Them – Coroutines Unity Tutorial

By:
Awesome Tuts


Youtube – Tutorial #2

Description:
Covers some intermediate complexity uses of coroutines as well as tying them in with Invoke calls.


Title:
Coroutines – Unity Official Tutorials

By:
Unity


Youtube – Tutorial #3

Description:
Old official Unity tutorial on the fundamentals of coroutines in their system.


Overview

Coroutines appear to be a strong tool within Unity that I still am looking for ways to implement better in my systems. While understanding the basic uses for them with timing related events, I feel like they offer a lot more that I am not utilizing, so I wanted to further my understanding of them by following up on one of my older tutorial blogs and going through the tutorials it offers.

Tutorial #1 Notes

Coroutines are part of the Unity engine, and are not native to C#. They also belong to the Monobehaviour base class, so they class they are used in must inherit from Monobehaviour.

The coroutine return type is IEnumerator. Because of this, coroutines can also be stored in IEnumerator variables. This also allows them to be passed in as a paramter for the yield return statement within a Coroutine.

Use a reference to properly control the starting and stopping of a specific coroutine instance.

Tutorial #2 Notes

You can call a Coroutine from within itself (the same Coroutine). This is one way to cycle a Coroutine continously.

WaitForSecondsRealtime is similar to WaitForSeconds, except that WaitForSecondsRealtime is independent of Unity’s timescale. WaitForSeconds however is affected by the timescale. WaitUntil suspends the coroutine until the given delegate returns true.

Invoke Notes

  • Invoke – call a method after a given amount of time
  • InvokeRepeating – call a method every given amount of time, after a starting given time
  • CancleInvoke – stops an InvokeRepeating call

Tutorial #3 Notes

Coroutines are functions which execute in intervals. They work with special yield statements which return the code execution out of the function. Then, when the function continues, execution begins from where it left off.

Combining coroutines with properties can allow for efficient code which produces execution only when a value is changed, without the need to check for variable changes every frame with the Update() method or something similar.

Coroutine Return Statements

A substantial part of using and controlling coroutines is the various return statements you can use within them to determine when they should run and when they should pause execution. As such I listed several of these options and how they work within the coroutines.

yield return null

waits a frame before progressing to the next step

seems similar to the rate of the Update() method

yield return new WaitForSeconds(float time)

waits the given amount of seconds between each run of the process

yield return WaitForSecondsRealtime(float time)

waits the given amount of seconds, regardless of Unity’s timescale

yield return StartCoroutine(DoSomething())

waits until the given Coroutine “DoSomething” is finished running

yield return new WaitUntil(bool test)

suspends coroutine until the given parameter is true (opposite of WaitWhile)

yield return new WaitWhile(bool test)

suspends coroutine until the given paramter is false (opposite of WaitUntil)

Summary

Coroutines are starting to become a bit more clear to me, and this helped me learn a few more ways to incorporate them into my projects. Just seeing that they are specifically a Unity native concept was helpful to me as I did not think about that before, and that makes their somewhat strange nature make more sense in my head. This made it more clear that Unity is doing a lot of work behind the scenes to accomplish their main goals of determining when to start, pause, resume execution based on their yield values. Also the Unity note on tying them in with properties is very interesting and something I want to experiment with more myself for more efficient code.

via Blogger http://stevelilleyschool.blogspot.com/2021/05/coroutine-fundamentals-in-unity.html