Unity Shader Graph – Black Hole VFX – by Gabriel Prod.

July 7, 2021

Shader Graph

Unity


Title:
Unity VFX & Shader Graph – Black Hole Effect Tutorial

By:
Gabriel Aguiar Prod.


Youtube – Tutorial #1

Description:
Tutorial for a black hole VFX using Unity’s Shader Graph, particle systems, and Visual Effect graph.


Title:
{ How to CHANGE the SKYBOX in Unity } – HDR Textures in the description

By:

GameDevTraum


Youtube – Tutorial #2

Description:
Quick tutorial to use texture as Skybox in Unity.


General Notes

Fixing Errors

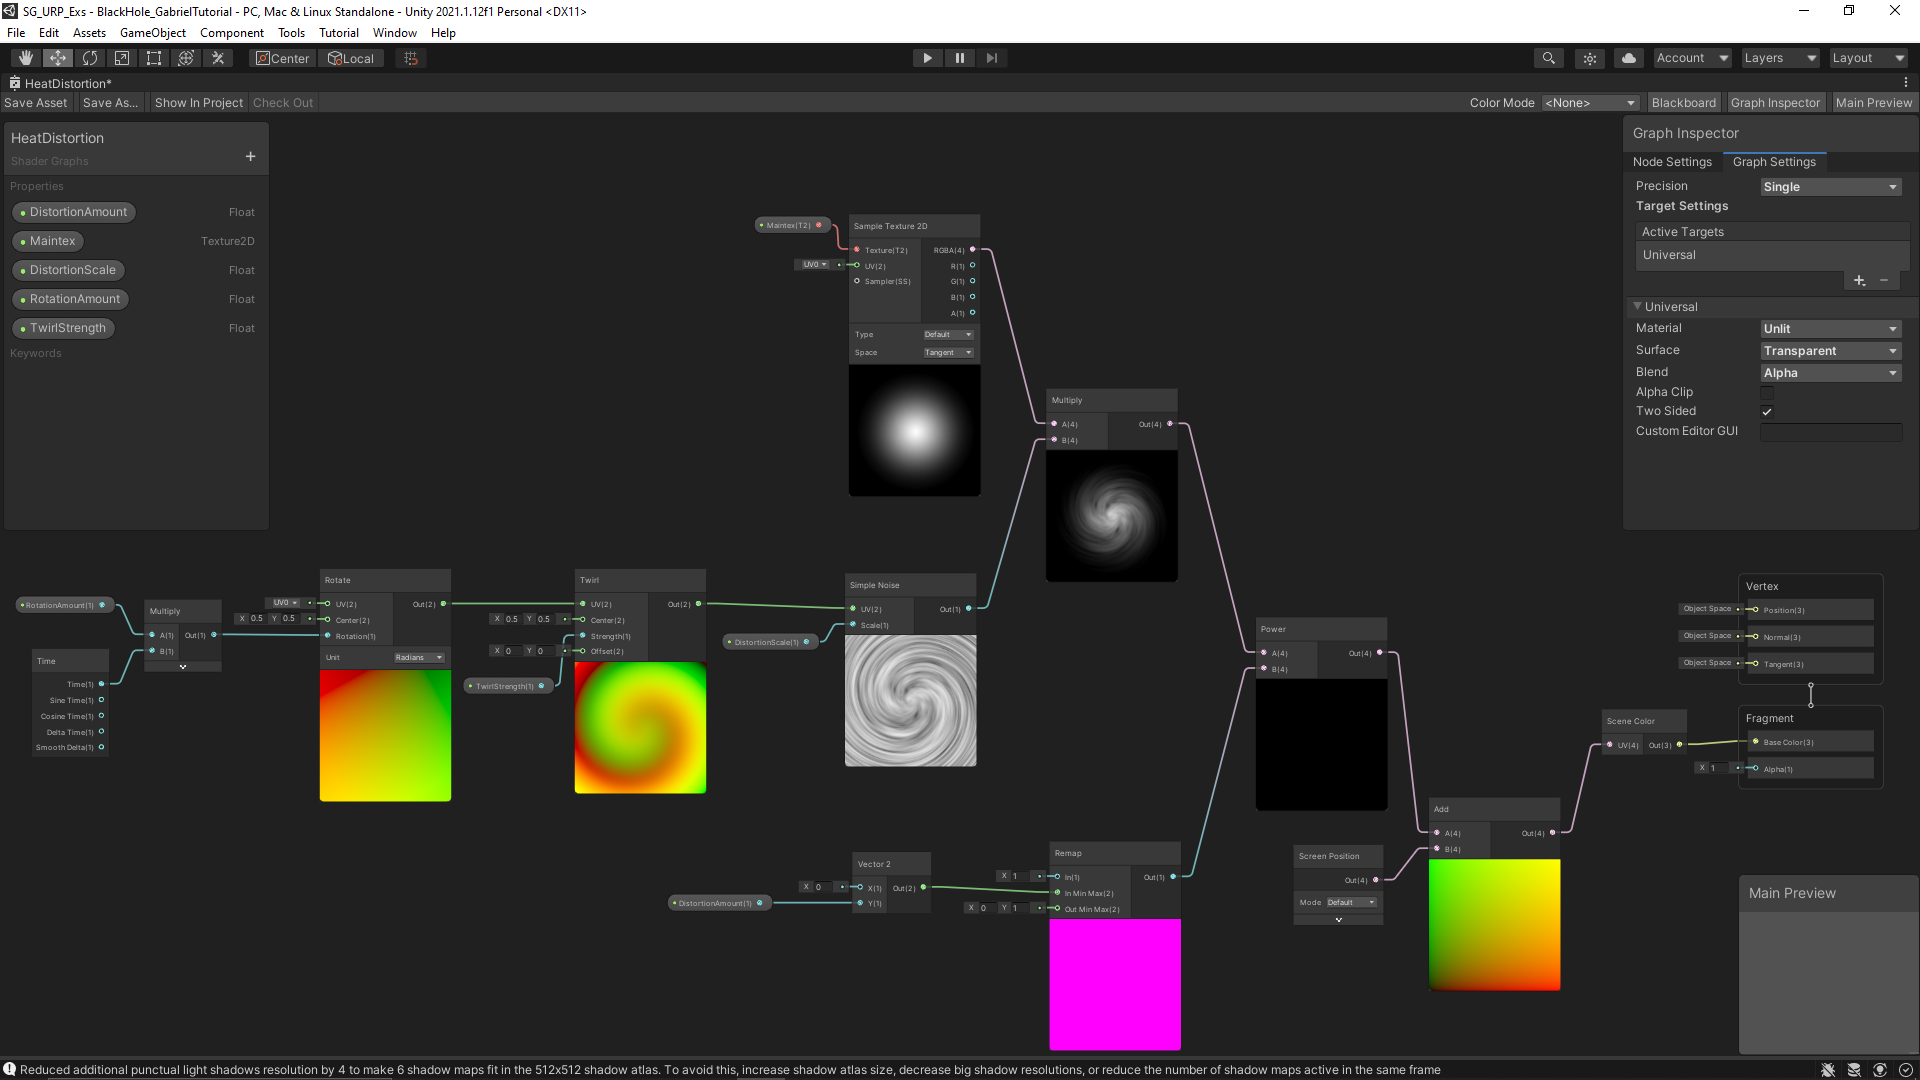
I immediately ran into an issue with the Scene Color node. The fix for this was going to the Main Camera and setting the “Opaque Texture” to ON (found under the Rendering section of the Camera). This made the shader and material match the scene color appropriately, giving that transparent look.

I found a generic space texture to use for my background to emulate the one used in the tutorial. I turned it into a Cube texture to create a Cubemap material to use as my Skybox material. That was what I used Tutorial #2 linked to above for.

I was still having an issue seeing the effects in the scene view (it was just remaining as a matte gray plane). I found that modifying the Opaque Texture flag in the UniversalRenderPipelineAsset (High-Quality for me and my current Unity version) resolved this issue, as described here:


Unity Questions – scene color node not working in shader graph

Multiply to Control Effect Distribution

They multiplied the noise with a round particle texture to create a round visual effect on the rectangular plane that contained all the interesting visual effects. The white parts of the texture contained the focus on the noise, while the black parts did not receive impact from the noise. The transition between the two then also creates a bit of a smoother transition from where the distortion occurs to the lack of distortion.


My Resulting Black Hole VFX from Following Tutorial #1


My Resulting Shader Graph for the Heat Distortion Following Tutorial #1


My Resulting Visual Effect Graph for the Floating Particles Following Tutorial #1

via Blogger http://stevelilleyschool.blogspot.com/2021/07/unity-shader-graph-black-hole-vfx-by.html

Particle Systems and the VFX Graph in Unity

February 27, 2019

Particle Systems in Unity 2018 and Later

Particle Systems and New VFX Graphs

I originally intended to look up new tutorials for particle systems in Unity to get a better grasp of the differences in the newest version of the Particle System editor. This was because a lot of older tutorials had the old setup so some of the differences made it hard to follow. While I did find one newer particle system tutorial using the editor, I stumbled upon the Visual Effects graph which appears to be a node/graph based editor for creating VFX new to the latest version of Unity, so I gathered a lot of tutorials for that. Several of them are from Brackeys as well, which is someone I follow often for basic Unity tutorials.


Youtube – Everything to know about the PARTICLE SYSTEM

By: Brackeys

This is the video just going over a lot of the basics of the Particle System editor. Since this was only about a year old I hoped it would cover some of the weird differences I run into, like shaders for particle materials.


Youtube – Visual Effect Graph – Realtime visual effects In Unity 2018.3

By: Unity

This is a quick video from Unity that just shows off some of the basics and capabilities of the VFX graph.


Youtube – FIRE AND SMOKE with Unity VFX Graph!

By: Brackeys

This is a nice example tutorial by Brackeys on using the VFX graph to create a fire/smoke effect.


Youtube – MILLIONS OF PARTICLES! – Unity VFX Graph

By: Brackeys

This is another Brackeys tutorial using the VFX graph that just focuses on doing weird effects with a very large amount of particles.


Youtube – MAKING VISUAL EFFECTS IN UNITY 2018.3 | Beginner’s Guide: VFX Graph

By: Sykoo

This is a longer look into the VFX graph and a lot of it’s capabilities from the very beginning.


Game VFX – Basic Fireball Projectile

STANDARD

February 26, 2019

Fireball FX in Unity

Unity 5 – Game Effects VFX – Fireball Spell / Projectile

Gabriel Aguiar Prod.

They start by creating a basic fireball shape in Photoshop. They used the brush presets to get a nice, fuzzy and flowy effect for drawing this. I went with Round Watercolor since that seemed pretty close to what they used. They also turn the opacity down to allow for increased color on the overlapped sections.

In Photoshop I had something selected on a layer still so when I tried to draw it would only draw in that selection, so that took some time to figure out that issue. They like to use white and just color in Unity. I also used some black to hedge out some of the white values, but not sure if that will create issues in Unity later.

We started creating the Particle System in Unity. We begin by creating a new material that they suggest changing the shader to Particles/Additive, which is a legacy shader now. I tried Particles/Standard Surface, and set the Albedo map to our PNG file instead of dragging it into a texture box (what is done in Particles/Additive).

In the Particle System, we turned off Shape. We edited 3D start size with random between 2 constants. This lets you set bounds that it could scale on any axis. We changed Emission Rate over Time to 1.

We added Rotation over Lifetime. You turn on Separate Axes to get access to more axis options. You also need to change the Start Speed to 0 so it stays in place and solely rotates. You raise the emission rate now to have several spinning at once, and alter the opacity to get the desired visual.

We changed the Render Alignment to Local so it doesn’t always face the camera.

You need to find the balance between: Start Lifetime, Opacity, and Emission Rate over Time. For Colors you can use Start Color/Random Between 2 Constants, or Color over Lifetime. Color over Lifetime gives better options with a gradient functionality.

We added another particle system as a child to the original one. This used another Photoshop image as a texture that was just a small ball of light. This would be used in the material (another Particles/Standard Unlit) of the particle system, as well as for its trail.

This particle system used the following effects: Velocity over Lifetime, Color over Lifetime, Size over Lifetime, Noise, and Trails. The trails add a wind-like light trail effect to each particle that adds a lot to the system. The noise makes trails curvier and more random/organic looking as opposed to always firing in straight lines.

We then added a duplicated version of this secondary particle system but removed the noise and random velocities to just have it travel in a straight line directly behind the overall particle system. Finally we added a Light to the main particle system. This is done by creating a light prefab and dragging it into the Light section of the particle system.

SUMMARY

  • Use white colors for FX for Unity so you can color them in Editor
  • In Particle Systems, in Renderer, increase Max Particle Size (i.e. 3) so when you get closer you don’t get weird problems
  • Adding Noise to the particle system can make it look more random and organic
  • You can add Light prefabs to particle systems

Pawel Margacz – Generalist to VFX Artist – Learning VFX

January 7, 2019

Good Sources to Learn About VFX

80.lv – Link to Description

A quick write up by Pawel Margacz on how they got into VFX and how to learn the art. This included a few good youtube channels to follow to get helpful tutorials.

Youtube Channel – Mirza VFX
Youtube Channel – Sirhaian’Arts
Youtube Channel – ErbGameArt

These three channels offer great tutorials and showings for VFX. Mirza in particular has Unity specific examples with all of the work needed in multiple softwares (such as creating images in Photoshop to use as base for VFX in Unity).