Lerp Fundamentals in Unity

May 10, 2021

Lerp

Unity


Title:
How to Use Lerp (Unity Tutorial)

By:
Ketra Games


Youtube – Tutorial

Description:
A brief coverage of exactly how Lerp works in Unity with a couple ways to use it.


Overview

I was recently researching ways to effectively use Lerp in Unity and came across some strange implementations that made me unsure if I understood how it worked. This video however specifically covered that case and explained that it does work, but it’s not a particularly ideal solution.

The case covered is specifically called the “Incorrect Usage” in this video. It is when Time.deltaTime alone is entered as the time parameter for Lerp. As I thought, this is just entering some tiny number as a time parameter each time it is called, which is then used to just some value between the intial and final values entered into the Lerp. It is not very controlled, and it leads to a strange situation where it keeps getting called and updated but it does not theoretically reach the final position ever (although this may be different with how computers handle the values eventually).

Finally they cover a couple time parameters to use with Lerp to get a few varied results. SmoothStep is one they suggest to get a result similar to the “Incorrect Usage” but done properly. It adds a bit of a slowing effect as the value gets closer to the final result. They also show using an Animation Curve to control the value in many various mathematical ways over time.

via Blogger http://stevelilleyschool.blogspot.com/2021/05/lerp-fundamentals-in-unity.html

How to Make a Multiplayer Game in Unreal Engine 4 [Blueprint Tutorial] (Unreal) – Part 1 – by DevAddict

April 27, 2021

Multiplayer

Unreal


Title:
How to Make a Multiplayer Game in Unreal Engine 4 [Blueprint Tutorial]

By:
DevAddict


Youtube – Tutorial

Description:
A tutorial extension to the previous Unreal platformer tutorial that shows multiplayer implementation.

Summary

This tutorial extends the previous tutorial on making a platformer in Unreal found here:

Youtube – Lets Make a Platformer – Unreal Engine 4.26 Beginner Tutorial

The original tutorial follows one created by Unreal with some extra steps added. This tutorial is an expansion made by DevAddict specifically to show how to add multiplayer to this project.

Lesson 1: Introduction to Multiplayer

Play Modes

When going into Play Mode in Unreal, there are many options for testing and debugging multiplayer.

    Play Modes: Net Modes:

  • Play as Offline (Standalone): (Default) You are the server
  • Play as Listen Server: Editor acts as both the Server and the Client
  • Play as Client: Editor acts solely as Client and a Server is started behind the scenes for you to connect to

Testing Multiplayer Settings

Approach #1

  • Set Number of Players to: 2
  • Set Play Mode to: Play as Client

This tests both windows as if they were both individual clients.

Approach #2

  • Set Number of Players to: 2
  • Set Play Mode to: Play as Listen Server

The Editor will act as the Server (host) and the extra windows will act as Clients connected to that Server. This helps point out differences occurring between the Server and Clients for debugging multiplayer actors.

Editing Blueprints

Editing Game Mode

The Game Mode class only exists on the Server. It does NOT exist on any of the Clients.

This fact is why transitioning this tutorial to multiplayer causes many issues, the first of which is fixing the UI so it displays for all players. It originally only displays for the Server player because much of the programming for it is within the Game Mode class. Similarly, the respwan code is also only in the Game Mode.

Use “Event OnPostLogin” node

-> “Cast To BP_PlatformerController” node

-> Client Draw HUD (Event we created in the BP_PlatformerController class)

This tells the Game Mode (Server) that when a new player logs in and has their own Player Controller created, that that specific instance will create its own HUD for that individual Client. Note that they intially tried the “Event Handle Starting New Player” node in place of the “Event OnPostLogin” node, which did create the UI, but it did NOT create the character (so in the Unreal editor you just moved around as a camera). This approach may work with some extra modifications, but it did not direclty work in this instance.

Player Controller

The Player Controller is very powerful in multiplayer because it is replicated on the Server and the Client. They like to keep UI on the Player Controller because it exists throughout the play session. While the character may be destroyed in some instances, the Player Controller generally persists. This makes the Player Controller beneficial for respawning mechanisms as well.

Building a Player Controller:

Right-Click -> Blueprint Class -> Player Controller
Named: BP_PlatformerController

You need to connect the Player Controller and your Game Mode, as they work together to realy information between players and the Server.

In the Game Mode class (ThirdPersonGameMode) Event Graph -> Details -> Classes -> Player Controller Class -> Use dropdown to select new Player Controller (BP_PlatformerController)

Common Error – Event BeginPlay to Initialize Player Controller Blueprint

When initializing their Player Controller class, many may try using the “Event BeginPlay” node. This works for single player, which is why it may be prevalent, but it does not work for a multiplayer project. Instead you want an event that will run on the Client ONLY.

Moving HUD from Game Mode (Server) to Player Controller (Client):

Add Custom Event

Connect Custom Event to start of class

In Details of Custom Event -> Graph -> Replicates: Run on owning Client -> Replicates: Check ON Reliable

via Blogger http://stevelilleyschool.blogspot.com/2021/04/how-to-make-multiplayer-game-in-unreal.html

Observer Pattern in Unity with C# – by Jason Weimann

April 22, 2021

Observer Pattern

Game Dev Patterns


Title:
Observer Pattern – Game Programming Patterns in Unity & C#

By:
Jason Weimann


Youtube – Tutorial

Description:
Introduction to the observer pattern and implementing it in Unity through C#.


Overview

This tutorial covers the basics of the observer pattern in game development with two ways of implementing it in Unity. The first approach is relatively simple just to establish the concept, whereas the second approach uses events with C# to create a more flexible system.

Observer Pattern Basics

An object, called the subject, maintains a list of its dependents, called observers, and notifies them automatically of any state changes (usually by calling one of their methods)

Example Uses in Games:

UI elements updating when data behind them changes

Achievement systems

Implementation #1: Inheriting Observer and Subject Classes

Observer Class:

Abstract class your observers will inherit from

OnNotify() method that accepts a value and notification type


Subject Class:

Abstract class your subjects will inherit from

Hold information on their list of observers they report to

RegisterObserver() method to add Observers to list of those reporting to

Notify() passes a value and notification type on to all the observers they report to in their list, in turn calling their OnNotify methods with the passed on data

This example gets the point across, but is not particularly well suited for Unity or C# projects. Requires a base class on all observers and subjects (although could possibly be changed to using an interface system).

Implementation #2: Using Events

Subject objects create a ‘static event Action‘, which they then call when the requirements are met.

Observer objects have their own methods to perform when those same requirements are met, and they are connected by having the observers subscribe their relevant methods to that same ‘static event’.

This reduces the direct coupling between the observers and subjects, as well as any other objects involved. Should profile this as calling events every frame can start to lead to performance loss. As always, also need to be careful to properly unsubscribe methods from events when needed (such as when deactivating or destroying objects).

via Blogger http://stevelilleyschool.blogspot.com/2021/04/observer-pattern-in-unity-with-c-by.html

Coding Adventure: Ray Marching by Sebastian Lague

April 12, 2021

Ray Marching

Unity


Title:
Coding Adventure: Ray Marching


By: Sebastian Lague


Youtube – Tutorial

Description:
Introduction to the concept of ray marching with some open available projects.


Overview

This video covers some of the basics of ray marching while also visualizing their approach and creating some interesting visual effects and renders with the math of signed distance along with ray marching logic. The major ray marching method they show is sphere tracing, which radiates circles/spheres out from a point until anything is collided with. Then, the point moves along the ray direction until it reaches the radius of that sphere projection and emits another sphere. This process is repeated until it radiates a very small threshold radius sphere, which is when a collision is determined.

The resulting project made is available, and I think it would be very useful and interesting to explore. The Youtube video description also holds many links to various sources used to create all the tools and effects in the video, which could also be beneficial for further research into these topics.

Fig. 1: Example of Raytracing Visual from Video (by Sebastian Lague)

via Blogger http://stevelilleyschool.blogspot.com/2021/04/coding-adventure-ray-marching-by.html

Linear Algebra and Vector Math – Basics and Dot Product – by Looking Glass Universe

April 8, 2021

Linear Algebra

Vectors and Dot Product


Title:
Vector addition and basis vectors | Linear algebra makes sense


Youtube – Link #1

Description:
Introduction to this series and the basics of linear algebra and vectors.


Title:
The meaning of the dot product | Linear algebra makes sense


Youtube – Link #2

Description:
Deep dive into the dot product and what it represents and how to determine it.


Overview

I wanted to brush up on my vector math fundamentals, particularly with my understanding of the dot product and its geometric implications as it is something that comes up often in my game development path. While I am able to understand it when reading it and coding it for various projects, I wanted to build a more solid foundational understanding so that I could apply it more appropriately on my own. This video series has been very nice for refreshing my learning on these topics, as well as actually providing me a new way of looking at vector math that I think will really further my understanding in the future.

Video #1 – Vector addition and basis vectors

This was the introductory video to the series, and starts with vector addition. They then move on to linear combinations as an extension of basic vector addition. Next they show for 2D vectors that as long as you have two independent vectors, you can calculate any other vector using those two in some linear combination. This then relates to how vectors are normally written out, but they are simply using linear combinations of the standard orthonormal basis of something like x and y, or x, y, and z in 3D space.

This means a vector is simply 2 or 3 vectors created with the unit vector in the x, y, or z direction multiplied by some scalar and then summed up to create the resulting vector. This was actually a new way for me to look at vectors, as this is more intuitive when you are looking to create a new vector set to base vectors off of different from the standard x, y, z, but I never really thought to also apply it in the standard case. The x, y, z, or even i, j, k, became some standardized to me that I generally ignored them, but I think looking at them in this way will help make much more of linear algebra more consistent in my thinking space.

They then continue on to explain spans, spaces, and the term basis a bit more. A set of vectors can be called a span. If that span is all independent vectors, this indicates it is the smallest amount of vectors which can fully describe a space, and this is known as a basis. The number of basis elements is fixed, and this is the dimension of the space (like 2D or 3D). And for a given basis, any vector can only uniquely be defined in one linear combination of the basis vectors.

Video #2 – The meaning of the dot product

Dot Product

A really simple way of describing the dot product is that it shows “how much one vector is pointing in the same direction of another vector”. If those two vectors are unit vectors, the dot product of two vectors pointing the same direction is 1, two vectors that are perpendicular would have a dot product of 0, and two vectors pointing directly opposite directions would have a dot product of -1. This is directly calculated as the cosine of the angle between the two vectors.

However, the dot product also factors in the magnitude of the two vectors. This is important because it makes the dot product a linear function. This also ends up being more useful when dealing with orthonormal basis vectors, which are unit vectors (vectors of length 1) that define the basis of a space and are all orthogonal to each other.

They cover a question where a vector u is given in the space of the orthonormal vectors v1 (horizontal) and v2 (vertical) and ask to show what the x value of the u vector is (which is the scalar component of the v1 vector part of the linear combination making up the vector u) with the dot product and vectors u and v1. Since v1 is a unit vector, this can be done directly by just the dot product (u . v1). They then show that similarly the y component would just be the dot product (u . v2). They explain this shows the ease of use of using the dot product along with an orthonormal basis, as it directly shows the amount of each basis vector used in the linear combination to create any vector. This can also be explained as “how much of u is pointing in each of the basis directions”.

Since the dot product is linear, performing the dot product function on two vectors is the same whether done directly with those two vectors, or even if you break up one of the vectors before hand into a linear combination of other vectors and distribute it.


Example:

a . b = (x*v1 + y*v2) . b = x*v1 . b + y*v2 . b

Projecting a Vector onto Another Vector

They then cover the example I was very interested in, which is what is the length of the vector resulting in projecting vector A onto vector B in a general sense. The length, or magnitude, of this vector is the dot product divided by the magnitude of vector B. This is similar to the logic in the earlier example showing how vectors project onto an orthonormal basis, but since they had magnitudes of 1 they were effectively canceled out originally.

This then helped me understand to further this information to actually generate the vector which is the projection of vector A onto vector B, you then have to take that one step more by multiplying that result (which is a scalar) with the unit vector of B to get a vector result that factors in the proper direction. This final result ends up being the dot product of A and B, divided by the magnitude of B, then multiplied by the unit vector of B.


Example:

Projection vector C

C = (A . B) * ^B / ||B|| = (A . B) * B / ||B||^2

Dot Product Equations

They have generally stuck with the dot product equation which is:

a . b = ||a|| ||b|| cos (theta)


They finally show the other equation, which is:

a . b = a1b1 + a2b2 + a3b3 + …

But they explain this is a special case which is only true sometimes. It requires that the basis you are using is orthonormal. So this will generally be true in many standard cases, but it is important to note that it does require conditions to be met. This is because the orthonormal basis causes many of the terms to cancel out, giving this clean result.

via Blogger http://stevelilleyschool.blogspot.com/2021/04/linear-algebra-and-vector-math-basics.html

Basics of Bits and Bytes with C++: Operands and Manipulation

March 26, 2021

Manipulating Bits and Bytes

C++


Title:
Wikipedia – Bitwise Operation


Wikipedia – Bitwise Operation

Description:
Wikipedia’s page on bitwise operations.


Title:
Bitwise Operators in C/C++


GeeksforGeeks – Bitwise Operators

Description:
The basics of bitwise operators and using them in C and C++ with some guidance on more involved usage.


Title:
sizeof operator


cppreference – sizeof operator

Description:
Definition of the sizeof operator used in C++ to find the size of an something in bytes.


Title:
Bit Manipulation

By:
Make School


Youtube – Tutorial #1

Description:
Basic introduction to bit operators as well as how to use them together for simple manipulation.


Summary

These are several of the more encompassing sources I came across recently on the basics of working with bits and bytes, especially in C++. More directy memory management and bit manipulation is not something I come across often using C# in Unity, but it still seems good to understand as it does come up every now and then. Unity uses bit maps for instance with their layer masks, which reading these sources greatly helped me understand better. I am also starting to do more work in Unreal, which uses C++ as its primary language, where I feel like this type of work is done more often.

via Blogger http://stevelilleyschool.blogspot.com/2021/03/basics-of-bits-and-bytes-with-c.html

Intro to Unreal: Basics and Intro to Blue Prints

March 17, 2021

Intro and Blue Prints

Unreal


Title:
Unreal Engine 4 Complete Beginners Guide [UE4 Basics Ep. 1]

By:
Smart Poly


Youtube – Tutorial

Description:
A quick introduction to using the Unreal engine and just getting acquainted with the main editor window.


Title:
Unreal Engine 4 – Blueprint Basics [UE4 Basics Ep. 2]

By:
Smart Poly


Youtube – Tutorial

Description:
Quick introduction to using Unreal’s blueprints.


Title:
Unreal Gameplay Framework

By:
Unreal


Unreal – Link

Description:
Unreal Gameplay Framework, the official Unreal documentation.


Learning the Basics

It has been a while since I have used Unreal in any significant capacity, so I am going back to the basics to try and make sure I have all the fundamentals covered.

Tutorial #1

Moving/Positioning Objects

By default, Unreal has all the transformation functions snap. So moving an object, rotating it, and scaling it all occur in steps as opposed to smooth transforms. This can easily be changed in the top right of the viewport at any time.

Extra Camera Controls

F: focuses on object (like Unity)

Shift + move an object: Camera follows the moving object

You can directly change the camera speed in the top right of the viewport.

Adding Content Pack Later

If you find that you want to add the starter content to a project later than the start, this can easily be done through “Content” in the “Content Browser” window, then “Add New”, and choosing “Add Feature or Content Pack”. The starter content options will be one of the first to show up by default under the “Content Packs”.

Lighting Basics

“LIGHTING NEEDS REBUILT” Error Message

The static meshes want the lighting to be rebuilt when added so they are accounted for. Fixed with:

Go to: Build -> Build Lighting Only

Light Mobility Options

Lights by default have 3 mobility options: Static, Station, Movable

  • Static: can’t be changed in game; fully baked lighting
  • Station (Default): only shadowing and bounced lighting from static objects baked from Lightmass; all other lighting dynamic; movable objects have dynamic shadows
  • Movable: fully dynamic lighting, but slowest rendering speed

Tutorial #2

General Structure of Blue Prints

Components:

area where different components can be added

what allows you to place objects into the viewport of the blue print

this is where colliders are shaped to the proper size/shape


Details:

all the different details for this particular blue print


Event Graph:

this is the tab where visual scripting is majorly done


Function:

effectively contained event graphs with more specialized functionality


Variables:

representation of fields as you’d expect

Events

These are events which call the given functions when something in particular occurs. These functions are created within the blue print Event Graph.

Actions (Examples)

On Component Begin Overlap: occurs when something initially enters a collider
– Similar to Unity’s OnTriggerEnter

On Component End Overlap: occurs when something initially leaves a collider
– similar to Unity’s OnTriggerExit

E: occurs when the “E” key is pressed

Action: Timeline

Timeline:

allows you to visually create a graph of how a variable changes over a particular set of time

By default, the x-axis is the time and the y-axis is the variable value.
Points can be added as wanted to act as key frames for the variable.
Also allows for easy modifications to the interpolation between points, such as changing it from a line to a cubic interpolation by selecting multiple points.

Make sure to pay attention to the time Length set in the time line. Even if you didn’t put points somewhere in particular, if that is way longer than where your points are, you can get strange results since it will perform the action over the entire length of time.

Debugging Blue Prints

If you select Play from within the blue print, you can get a separate play window while leaving the blue print window visible. This can be helpful for example with the Event Graph, as you can actually see when different events occur according to the system and when inputs are read. This also shows the variables changing in some nodes, such as Timeline.

Classes (as covered by the Gameplay Framework Quick Reference)

Agents

Pawn

Pawns are Actors which can be possessed by a controller to receive input to perform actions.

Character

Characters are just more humanoid Pawns. They come with a few more common components, such as a CapsuleComponent for collision and a CharacterMovementComponent by default.

Controllers/Input

Controllers are Actors which direct Pawns. These are generally AIController (for NPC Pawns) and PlayerController (for player controlled Pawns). A Controller can “possess” a Pawn to control it.

PlayerController

the interface between a Pawn and the human player

AIController

simulated AI control of a Pawn

Display Information

HUD

Focused on the 2D UI on-screen display

Camera

The “eye” of a player. Each PlayerController typically has one.

Game Rules

GameMode

This defines the game, including things such as game rules and win conditions. It only exists on the server. It typically should not have much data that changes during play, and definitely should not have transient data the client needs to know about.

GameState

Contains the state of the game.
Some examples include: list of connected players, score, where pieces in a chess game are.
This exists on the server and all clients replicate this data to keep machines up to date with the current state.

PlayerState

This is the state of a participant in the game (which can be a player or a bot simulating a player). However, an NPC AI that exists as part of the game would NOT have a PlayerState.
Some examples include: player name, score, in-match level for a MOBA, if player has flag in a CTF game.
PlayerStates for all players exist on all machines (unlike PlayerControllers) and can replicate freely to keep machines in sync.

via Blogger http://stevelilleyschool.blogspot.com/2021/03/intro-to-unreal-basics-and-intro-to.html

Intro to Unreal: Basics Tutorial Compilation

March 16, 2021

Intro and Basics

Unreal


Title:
Unreal Engine 4 Complete Beginners Guide [UE4 Basics Ep. 1]

By:
Smart Poly


Youtube – Tutorial

Description:
A quick introduction to using the Unreal engine and just getting acquainted with the main editor window.


Title:
Unreal Engine 4 – Blueprint Basics [UE4 Basics Ep. 2]

By:
Smart Poly


Youtube – Tutorial

Description:
Quick introduction to using Unreal’s blueprints.


Title:
Unreal Engine 4 Beginner Tutorial: Getting Started

By:
DevAddict


Youtube – Tutorial

Description:
A more in depth intro to getting through the Unreal editor and starting to apply it to some general case uses.


Title:
Unreal Engine Beginner Tutorial: Building Your First Game

By:
Devslopes


Youtube – Tutorial

Description:
A good introduction focusing on building more of your own assets instead of using the Unreal given assets.


Title:
Unreal Engine 4.26 Beginner’s Tutorial: Make a Platformer Game

By:
DevAddict


Youtube – Tutorial

Description:
A large tutorial focusing on fleshing out the functionality of a given project and assets in Unreal.

Summary

This is a quick list of some Unreal tutorials just to get familiar with the engine. I listed them in order of a progression that I believe makes sense, where the first couple simply introduce the main Unreal editor and some of the tools it gives you, and the later tutorials start to implement those individual components to varying degrees. Some of these focus on using blue prints, while some focus on applying parameters to assets just through the Unreal editor directly. Finally, some of the tutorials near the end beging to show these tools making more complete systems and projects.

via Blogger http://stevelilleyschool.blogspot.com/2021/03/intro-to-unreal-basics-tutorial.html

Designing Pixel Art Color Palettes in Aseprite by AdamCYounis

February 19, 2021

Pixel Art

Color Palettes with Aseprite


Title:
Pixel Art Class – Palettes & Colour

By:
AdamCYounis


Youtube – Tutorial

Description:
Learning about creating your own pixel art color palettes with the help of Aseprite.


Overview

This video covers the creation of color palettes for use in pixel art projects at an introductory level. The user is well versed in Aseprite, so they do so through this software and show some tricks within it to help in the palette creating process. They also go over some general color choosing concepts and their general process for creating palettes to give you a nice starting point.

Reviewing a Palette Against the Spectrum

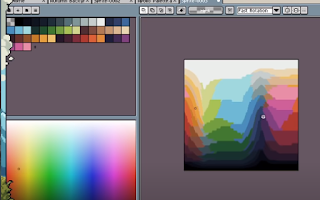
To check how a chosen palette matches up against an entire section of a color spectrum, they copy and paste a full slice of the color spectrum (slice because the color spectrum is 3D ‘i.e. R, G, and B or H, S, and V’ so you can only view a particular 2D slice at any given time) into a new image in Aseprite. Then from here, they select their color palette and check the Indexed Color Mode in Aseprite. This will break down the full spectrum shown into which colors of the palette most closely resemble each and every part of the spectrum.

This is very effective in seeing how a given color palette covers a full spectrum to see which types of colors it can represent in more detail and which will be more generalized. This means it can also help you guide your color selection process while building a palette because you can see areas it is deficient in that you may want to add more options to.

Found through:

Sprite -> Color Mode -> Indexed


Aseprite Indexed Color Spectrum Compared to Palette Example (from video tutorial)

Creating a Color Palette

They start with selecting an initial saturation level.
This helps set the tone for all your colors and it is generally uncommon to see images with stark contrasts in saturation, making this a good starting point. They tend to choose a saturation around the 50 – 60% area since that’s just in the middle.

They then choose a starting color in the greens or blues and mostly just look for a color they think looks nice. Starting with green, they generally look for something that works well for grass since they are looking for practical applications as a game developer most of the time. Once they find a good starting color, they add that to the palette.

Creating Color Ramps

Next they look to build a color ramp with that color. They simply shift the color somewhat in hue and somewhat in lightness or value. For example with the green, they will move up towards a lighter green as well as left towards the yellow in a single shift. If they move down, they move towards the darker green as well as right towards the blue. They choose more colors than they think they will need, so they can see more color options during the building process and they can remove excess colors later.

As they note later, if you are working on a yellow hue, moving towards yellow does not particularly work. They reference using your specific context and feel you are going for to help you determine how you will shift colors. Their example was that they had their yellow shift towards brown as it got darker to help with getting woody and leathery tones. They also had a red that shifted towards yellow as it got lighter (which would be to the ‘right’ as opposed to the ‘left’ the green is using).

You can see the color you select in the palette on your chosen color spectrum. This can be used to see how well your colors line up with your original designated color. If they do not line up well, you can use this to help you determine how to tweak individual colors in the ramp to work better for you.

After this, they start to throw the colors on the canvas to see how they look individually as well as with each other. A helpful shortcut for this is the square bracket keys ([,]) as they let you move between color indices. They identify which colors they like and which ones work well with those and which don’t. They then modify the colors they don’t like or that don’t match well with their ideal colors to fall in line. Afterwards, they then identify any colors in the ramp they do not need or that seem extraneous and remove them to simplify the palette.

They do not tend to try and exactly make precise mathematical jumps from color to color or shade to shade. While it can help as a general starting point, they suggest just going by what your eyes tell you when they think it “looks good”. The example they show was that a larger jump between the brighter colors and much smaller jumps between the darker colors looked pretty nice for their color ramp.

Another option to keep in mind is changing the values of all the colors in a ramp at once. You can select the entire ramp, or portions of the ramp, and alter their hue, saturation, or value/lightness all together. Hue will change the color, so usually only slight variations will work their, but some of the other ones can support significant differences to provide different feels or tones.

Keyboard Shortcuts:

Move Between Color Indices = [ and ]

Bridging Ramps

They tend to think of their overall color palette as converging at the ends of lightness and darkness. So as they get closer to white, the colors all get much more similar, and likewise as they get closer to black. The colors then in effect, widen and spread a larger range closer to the middling values between white and black.

This is not something that needs to be done everytime by any means, this is just one approach they tried. Again looking at the color bridge examples, this approach effectively makes the top and bottom (the whites and blacks) a color bridge spanning across all your various hues.

To help this process, once a ramp is in place, they looked to increase the saturation of the colors in the upper-middle-third of the colors, and desaturate all the other colors. This helps the higher and lower colors “bleed into each other” better.

They then move to their next hue (blue in this case) and begin the process of building another color ramp. They can leave previous colors and ramps on the canvas to help provide context for the current color ramp they are structuring. As they place the new colors on the canvas to test them, they also use Aseprite’s shade tool to quickly check all the different colors through their ramp.

Summary

To recap their process shown in the tutorial:
They start by selecting a saturation level to use across the entire palette (usually in the 50 – 60% range). They start with a main focus color and just try to find a good looking color to represent it to serve as a starting point. They then create a color ramp for this color by moving up and towards yellow to provide warmth as they brighten their colors, and down and towards blue to provide coolness as they darken the colors. Some colors will require moving towards other colors, so choose what fits your overall feel and needs. Creating a linear color ramp (a straight line through the HSV spectrum image) can be a decent starting point, but they do not fear strongly breaking away from this to get the right tones. Also choose extra colors, as later when colors seem too close they are easily removed to simplify the palette.

They then throw the colors from that ramp all over the canvas to see how they look individually as well as with each other. Here they do further tweaking until it looks good. These processes are then repeated with each of the next colors, and they can continually be added to the canvas to see how they work in the context of your other selected colors as well.

To create one type of bridging, they look to bridge everything at the brightest and darkest levels. To achieve this they increase the saturation on the upper-part of the middle third of all their color ramps, and desaturate everything else. This widens the color range of those middling colors, while brinding all the more extreme colors closer together so they can blend together easily.

Finally, the entire color palette can be cross examined with the HSV spectrum to see how your colors cover the full spectrum. This is done in Aseprite by taking a quick snapshot of the HSV spectrum, opening it as an image, and using the “Indexed” color mode with the palette selected. From here further tweaks can be made if you feel a color is under/over represented in the amount of detail and differentiation it provides.

via Blogger http://stevelilleyschool.blogspot.com/2021/02/designing-pixel-art-color-palettes-in.html

Aseprite Crash Course by AdamCYounis

February 18, 2021

Pixel Art

Aseprite Introduction


Title:
An Aseprite Crash Course In 30 Minutes

By:
AdamCYounis


Youtube – Tutorial

Description:
Intro to using Aesprite and some basic work flow tips.


Overview

This tutorial offered a great overview of the most used tools, as well as how to quickly and efficiently use them. They cover their workflow and how these tools fit into that to get you started using Aseprite effectively.

Timeline

This is where the layers are contained. This also holds the separate frames, which can help which creating and previewing animations.


View Timeline Shortcut: Tab

New Frame Shortcut: Alt + N

Their Workflow

  1. Blocking (Silhouette)
  2. Shading
  3. Coloring
  4. Detailing

Feature Options

  • Pixel-perfect: Off
  • Symmetry: Sometimes
  • Pencil (Brush): Often round
  • Pressure Sensitivity: Off

Shading

Blot several colors

Eyedropper Tool


Alt temporarily gives you the eyedropper tool while holding it. This lets you quickly use it to just grab one of the few colors you have already blotted on the canvas and use it to continue coloring as you start the initial shading phase. This is very strong for a quick early workflow since you tend to only use a couple colors, so this gives you access to those couple colors while switching between them easily very quickly.

Shading Mode

This let’s you select a small palette of colors and whenever you paint over a color included in that set, it will cover it with the next shifted color (either 1 up or 1 down depending on ordering selected). This can be tricky to use, but can help quickly modify some shading areas.

Their keyboard shortcut setup (Not default):

  • B = Pencil (Brush)
  • D (while in Pencil) = Simple Ink
  • S (while in Pencil) = Shading Mode

Zoom

Zoom Tool Shortcut: Z

LClick/RClick (while in Zoom) = zoom in/out

Move mouse horizontally while holding either click = zoom in/out continuously

This focuses on the pixel you have selected, so very useful for focusing in on a specific pixel/area.

Marquee Tool

Marquee Tool Keyboard Shortcut: M


This tool lets you select an area that will allow only that area to be worked on. For example, you can select an area then your brush will only paint that area, even if you go outside of the box while painting.

There is also a lasso option and a wand option. The lasso option lets you draw an area to cover manually, and the wand option selects all similarly colored contiguous pixels (similar to a bucket tool).

Move Tool (Layer Selector)

Move Tool Keyboard Shortcut: V


This lets you move an entire layer. This can also select the layer you click on when the “Auto Select Layer” option is toggled ‘On’. They use this feature a lot as more of a layer selection tool than it’s base movement functionality to quickly swap between layers.

Operations Across a Selection

Aseprite is very good at allowing you to select multiple items at once and applying an operation to all of them at once.

Examples:

  • Select several colors in the palette and increase all of their brightness values an even amount.
  • Select multiple frames and perform a color swap (i.e. change all of one specific color found in all the frames to another specific color)
  • That can be done along with the marquee tool to only change the colors on every frame within the area selected by the marquee tool on every frame.

Other Strong Features (Replace Color and Outline)

Replace Colors: Shift + R

Outline: Shift + O


Outline is extremely strong for creating outlines around an entire body. The outline can be placed on the inside or outside of the body. Their are options for creating a rounded or square outline, as well as only outlining horizontally or vertically. It also includes a tool to fine tune which types of corners to include extra squared off pixels or not.

Export Options

Exporting for General Sharing

Resize during export can be beneficial for sharing your work often as if will often be very small, so it will either show up extremely tiny or very blurry if resized by your sharing option.

You can also choose specific layers or specific frames to export. Exporting multiple frames can allow you to export as a .gif file.

Exporting as Game Asset

DO NOT CHANGE SIZE WHEN EXPORTING FOR GAME ASSETS!!!!

For exporting multiple frames as a sprite sheet:

  • Press Ctrl + E
  • Sheet type: by rows, by columns, etc.
  • Still choose layers and frames

Quick Art Sample I Create Learning Tools

Here is a quick lava creature I was able to create while learning to use some of the tools and workflow exhibited in this tutorial.

Workflow Summary

Common tools:

  • Pencil (Brush)
  • Eraser
  • Eyedropper
  • Zoom
  • Marquee
  • Move

They use pencil and eraser to draw out the initial silhouette. Next, they add a couple shading colors to the canvas so they can quickly move between those colors with the eyedropper tool to apply shading. Shading mode on the brush tool can help with this once you are a bit more advanced.

The zoom tool helps focus in on specific pixels or areas for shading, coloring, and detailing, as it will focus in on the pixel you are hovering. The marquee tool helps with focusing your work on a specific area without affecting the area around it.

The move tool is actually a very strong layer selection tool with the “Auto Select Layer” option. This helps them move between different layers quickly.

via Blogger http://stevelilleyschool.blogspot.com/2021/02/aseprite-crash-course-by-adamcyounis.html