Game Project: Flying Game – Part 1 – Introductory Movement and Camera Controller

April 30, 2021

Flying Game

Game Project


Overview

I wanted to do some work on a small, simple 3D game in Unity I could make within a week or so. My original focus is on player movement, and from there I decided to hone in on a flying game of some kind. I have been watching Thabeast721 on Twitch and he recently played Super Man 64 which I have also seen at Games Done Quick (GDQ) events and thought building off of and improving their flying controller could be a fun project.

Player Controllers

Controller #1 – Rotate Forward Axis

My initial thoughts on a basic flying player controller was to have left/right rotate the player on the y-axis, up/down rotate the player on the x-axis, and a separate button to propel the player in their current forward direction.

As a controller standard, I also tend to have the player’s input be received in the Update method to receive as often as possible, but then output these inputs as movement in FixedUpdate to keep it consistent on machines with different frame rates.

	private void Update()
    {
        horizontalInput = Input.GetAxisRaw("Horizontal");
        verticalInput = Input.GetAxisRaw("Vertical");

        if (Input.GetButton("Jump"))
        {
            isMoving = true;
        }
        else
        {
            isMoving = false;
        }
    }

    private void FixedUpdate()
    {
        // Inputs in reverse position for direction vector because that influences which axis that input rotates AROUND
        Vector3 direction = Vector3.Normalize(new Vector3(verticalInput * inversion, horizontalInput, 0.0f));
        Flying(direction);
    }

    private void Flying(Vector3 dir)
    {
        RotatePlayer(dir);
        MovePlayer(dir);
    }

    private void RotatePlayer(Vector3 dir)
    {
		transform.Rotate(dir * rotationSpeed * Time.deltaTime);
    }

    private void MovePlayer(Vector3 dir)
    {
		if (isMoving)
		{
			transform.position += transform.forward * movementSpeed * Time.deltaTime;
		}
    }

Controller #2 – Rotate on Y-Axis but Translate Directly Vertically

With my second approach I wanted to try and emulate the flying controller from Super Man 64 just to see how it felt. It seems like a more acarde-y style of flying with easier controls, so I thought it would be a good option to investigate. For this horizontal rotation (rotation on the y-axis) remained the same, as this is pretty standard with grounded player controllers as well.

The up and down rotation (rotation on the x-axis) however, was completely removed. The up/down inputs from the player simply influence the movement vector of the player, adding some amount of up or down movement to the player. This makes it much easier to keep the player’s forward vector relatively parallel to the ground and is much less disorienting than free-form rotational movement in the air.

	private void Start()
    {
        if (isInvertedControls)
        {
            inversion = -1.0f;
        }
    }

    private void Update()
    {
        horizontalInput = Input.GetAxisRaw("Horizontal");
        verticalInput = Input.GetAxisRaw("Vertical");

        if (Input.GetButton("Jump"))
        {
            isMoving = true;
        }
        else
        {
            isMoving = false;
        }
    }

    private void FixedUpdate()
    {
        // Inputs in reverse position for direction vector because that influences which axis that input rotates AROUND
        Vector3 direction = Vector3.Normalize(new Vector3(verticalInput * inversion, horizontalInput, 0.0f));
        Flying(direction);
    }

    private void Flying(Vector3 dir)
    {
        RotatePlayer(dir);
        MovePlayer(dir);
    }

    private void RotatePlayer(Vector3 dir)
    {
		transform.Rotate(dir.y * Vector3.up * rotationSpeed * Time.deltaTime);     
    }

    private void MovePlayer(Vector3 dir)
    {      
		if (isMoving)
		{
			Vector3 movementDirection = Vector3.Normalize(transform.forward + dir.x * Vector3.up);
			transform.position += movementDirection * movementSpeed * Time.deltaTime;
		}     
    }

Camera Controller

Follow Position

To follow the player’s position, I am using a really simple case where it just follows them at some fixed offset. The offset is originally determined by the initial position of the camera relative to the player, and then for the rest of its run its position is just that of the player summed with the offset.

Where transform.position is the position of the camera object:


offset = transform.position – player.transform.position;


transform.position = player.transform.position + offset;

Rotate to Follow

My first test just to initialize the camera follow was to child it to the player to see how it looked that way. This worked ok for following position, but having multiple rotation influences made this impossible to use quickly at first. As I changed the player controller to a more general, arcade-style, it worked better but was still poor for rotation.

To fix this I put the camera as a child onto a separate empty gameobject. This gameobject could then follow the player and rotate to rotate the camera around the player while keeping it at a fixed offset distance. This also made determining the rotation angle/looking vector from the camera to the player much simpler. Since the camera is rotate downward some, its forward vector is not in-line with the world z-axis anymore. This camera container however could keep its axes algined with the world’s axes. This meant I could just make sure to align this container’s forward vector with the player’s forward facing vector on the xz-plane. To do so it just required the following:

private void RotateView()
{
	Vector3 lookDirection = new Vector3(player.transform.forward.x, 0.0f, player.transform.forward.z);

	transform.rotation = Quaternion.LookRotation(lookDirection, Vector3.up);
}

Unity’s Quaternion.LookRotation method allows me to set the rotation of the object based on the direction of a forward facing vector (lookDirection in this case), with a perpendicular upward vector to make sure I keep the rotation solely around the y-axis.

The following is a quick look at how the final player controller and camera controller interact from this initial prototype approach:

Flying Game Project: Initial Player Controller and Camera Controller Prototypes from Steve Lilley on Vimeo.

Summary

via Blogger http://stevelilleyschool.blogspot.com/2021/04/game-project-flying-game-part-1.html

How to Make a Multiplayer Game in Unreal Engine 4 [Blueprint Tutorial] (Unreal) – Part 1 – by DevAddict

April 27, 2021

Multiplayer

Unreal


Title:
How to Make a Multiplayer Game in Unreal Engine 4 [Blueprint Tutorial]

By:
DevAddict


Youtube – Tutorial

Description:
A tutorial extension to the previous Unreal platformer tutorial that shows multiplayer implementation.

Summary

This tutorial extends the previous tutorial on making a platformer in Unreal found here:

Youtube – Lets Make a Platformer – Unreal Engine 4.26 Beginner Tutorial

The original tutorial follows one created by Unreal with some extra steps added. This tutorial is an expansion made by DevAddict specifically to show how to add multiplayer to this project.

Lesson 1: Introduction to Multiplayer

Play Modes

When going into Play Mode in Unreal, there are many options for testing and debugging multiplayer.

    Play Modes: Net Modes:

  • Play as Offline (Standalone): (Default) You are the server
  • Play as Listen Server: Editor acts as both the Server and the Client
  • Play as Client: Editor acts solely as Client and a Server is started behind the scenes for you to connect to

Testing Multiplayer Settings

Approach #1

  • Set Number of Players to: 2
  • Set Play Mode to: Play as Client

This tests both windows as if they were both individual clients.

Approach #2

  • Set Number of Players to: 2
  • Set Play Mode to: Play as Listen Server

The Editor will act as the Server (host) and the extra windows will act as Clients connected to that Server. This helps point out differences occurring between the Server and Clients for debugging multiplayer actors.

Editing Blueprints

Editing Game Mode

The Game Mode class only exists on the Server. It does NOT exist on any of the Clients.

This fact is why transitioning this tutorial to multiplayer causes many issues, the first of which is fixing the UI so it displays for all players. It originally only displays for the Server player because much of the programming for it is within the Game Mode class. Similarly, the respwan code is also only in the Game Mode.

Use “Event OnPostLogin” node

-> “Cast To BP_PlatformerController” node

-> Client Draw HUD (Event we created in the BP_PlatformerController class)

This tells the Game Mode (Server) that when a new player logs in and has their own Player Controller created, that that specific instance will create its own HUD for that individual Client. Note that they intially tried the “Event Handle Starting New Player” node in place of the “Event OnPostLogin” node, which did create the UI, but it did NOT create the character (so in the Unreal editor you just moved around as a camera). This approach may work with some extra modifications, but it did not direclty work in this instance.

Player Controller

The Player Controller is very powerful in multiplayer because it is replicated on the Server and the Client. They like to keep UI on the Player Controller because it exists throughout the play session. While the character may be destroyed in some instances, the Player Controller generally persists. This makes the Player Controller beneficial for respawning mechanisms as well.

Building a Player Controller:

Right-Click -> Blueprint Class -> Player Controller
Named: BP_PlatformerController

You need to connect the Player Controller and your Game Mode, as they work together to realy information between players and the Server.

In the Game Mode class (ThirdPersonGameMode) Event Graph -> Details -> Classes -> Player Controller Class -> Use dropdown to select new Player Controller (BP_PlatformerController)

Common Error – Event BeginPlay to Initialize Player Controller Blueprint

When initializing their Player Controller class, many may try using the “Event BeginPlay” node. This works for single player, which is why it may be prevalent, but it does not work for a multiplayer project. Instead you want an event that will run on the Client ONLY.

Moving HUD from Game Mode (Server) to Player Controller (Client):

Add Custom Event

Connect Custom Event to start of class

In Details of Custom Event -> Graph -> Replicates: Run on owning Client -> Replicates: Check ON Reliable

via Blogger http://stevelilleyschool.blogspot.com/2021/04/how-to-make-multiplayer-game-in-unreal.html

Exploring Vector Math with Unity – Dot Product

April 23, 2021

Dot Product Unity Project

Vector Math


References

Dot Product Wiki


Wikipedia – Link


Falstad Dotproduct Online Visualizer


Falstad Visualizer – Link


Fig. 1: My Updated Visualizer at Work

Overview

I wanted to explore vector math as a refresher for myself while also creating ways to visualize it through Unity. The dot product seemed like a good focal point to start with since it is such a useful tool in game development but can be a bit strange to fully understand the full reach it has. I took a lot of inspiration from the Falstad visualizer on how to visually represent this.

While similar to the Falstad visualizer, I wanted to create a 3D representation instead of a 2D one. I wanted to have a tool that creates two manueverable vectors that would show all the values of those vectors, as well as their dot product and the projected vector from one onto the other. While most of the math and systems behind this are practically identical in the 3D case, interacting with the vectors becomes a much trickier problem.

Dragging Objects Around 3D Space

I ended up following a tutorial on a really simple 3D dragging setup found here:

Unity Object Dragging || Tutorial: by Kjip

Youtube – Link

This provides a very quick and simple setup that at least allows the user to move objects around in 3D space using the screen to world point methods of Unity. Their exact solution however did not work for me, as the object would always gravitate to the exact position of the camera, eventually leaving it too close to interact with.

The Vector3 they were feeding into the ScreenToWorldPoint method was determined as such:


Vector3 mousePosition = new Vector3(Input.mousePosition.x, Input.mousePosition.y, Camera.main.transform.position.z + transform.position.z);

I eventually just removed the additional transform.position.z of the object added into this vector, which provided a fixed distance from the camera plane to the object at all times. This at least constantly kept it in frame, and allowed decent manueverability. The range of motion is a little weird, but it works well enough for now. I eventually just changed the entirety of the z portion of the vector to a variable float controlled from the inpspector since tying it to the camera position didn’t make any sense at this point.

Visualizing the Vectors

Line Renderers

This is the most straight forward way since I can just put in the two end points of a vector as waypoints of the line renderer to directly render that vector in 3D space. However, overlapping line renderer visuals leads to poor rendering in many cases, which is not ideal for showing the overlap of the projected dot product vector with the vector being projected on to.

Rotating/Scaling a 3D Object (Cylinder)

After trying line renderers for a while, I swapped over to using primitive cylinders as a basis for the vectors. By setting the cylinders as children of an empty container gameobject, I was able to falsely move the anchor point of the cylinder for scaling to the base of the cylinders. This allowed me to scale this container to match the exact size of the vector, and this would exactly match up the size of the cylinder while also making sure it specifically scaled up/outward from the origin of the visualization.

As for rotating the cylinder to match the individual vectors, this could easily be done by setting the up vector of the cylinders. This looks like:


cylinderA.transform.up = vectorOfInterest;

Video Samples of My Project

The following links show my first prototype of this project with the line renderer visuals, and the first update using cylinders and some cleaner camera controls.

Vector Projection Simulation – Dot Product – Prototype from Steve Lilley on Vimeo.


Vector Projection Simulation – Dot Product – Update 1 from Steve Lilley on Vimeo.

via Blogger http://stevelilleyschool.blogspot.com/2021/04/exploring-vector-math-with-unity-dot.html

Observer Pattern in Unity with C# – by Jason Weimann

April 22, 2021

Observer Pattern

Game Dev Patterns


Title:
Observer Pattern – Game Programming Patterns in Unity & C#

By:
Jason Weimann


Youtube – Tutorial

Description:
Introduction to the observer pattern and implementing it in Unity through C#.


Overview

This tutorial covers the basics of the observer pattern in game development with two ways of implementing it in Unity. The first approach is relatively simple just to establish the concept, whereas the second approach uses events with C# to create a more flexible system.

Observer Pattern Basics

An object, called the subject, maintains a list of its dependents, called observers, and notifies them automatically of any state changes (usually by calling one of their methods)

Example Uses in Games:

UI elements updating when data behind them changes

Achievement systems

Implementation #1: Inheriting Observer and Subject Classes

Observer Class:

Abstract class your observers will inherit from

OnNotify() method that accepts a value and notification type


Subject Class:

Abstract class your subjects will inherit from

Hold information on their list of observers they report to

RegisterObserver() method to add Observers to list of those reporting to

Notify() passes a value and notification type on to all the observers they report to in their list, in turn calling their OnNotify methods with the passed on data

This example gets the point across, but is not particularly well suited for Unity or C# projects. Requires a base class on all observers and subjects (although could possibly be changed to using an interface system).

Implementation #2: Using Events

Subject objects create a ‘static event Action‘, which they then call when the requirements are met.

Observer objects have their own methods to perform when those same requirements are met, and they are connected by having the observers subscribe their relevant methods to that same ‘static event’.

This reduces the direct coupling between the observers and subjects, as well as any other objects involved. Should profile this as calling events every frame can start to lead to performance loss. As always, also need to be careful to properly unsubscribe methods from events when needed (such as when deactivating or destroying objects).

via Blogger http://stevelilleyschool.blogspot.com/2021/04/observer-pattern-in-unity-with-c-by.html

Unreal Tutorial – Unreal Engine 4.26 Beginner’s Tutorial: Make a Platformer Game – by DevAddict

April 15, 2021

Tutorial

Unreal


Title:
Unreal Engine 4.26 Beginner’s Tutorial: Make a Platformer Game

By:
DevAddict


Youtube – Tutorial

Description:
A large tutorial focusing on fleshing out the functionality of a given project and assets in Unreal.

Summary

This was one of the tutorials from my “Intro to Unreal: Basics Tutorial Compilation” post. This ended up being a great introductory tutorial where the first half provides a lot of information on just the basics of moving around the Unreal editor and basic level building, and the second half delves into blueprints and how to read them, modify them, and creat your own. The focus is on building a 3D platformer with an Unreal learning project that is provided, and most of the basics for that type of game creation are all covered here.

Notes and Lessons Learned from the Tutorial

Keyboard Shortcuts

End (while moving an actor): drops that actor directly to the ground plane below it


Ctrl + W (In Blue Print editor): duplicates currently selected nodes/node system

Editing a Static Mesh

Opening Mesh in Mesh Editor:

With a static mesh selected in your level, you can double click the Static Mesh component in the Details tab to open that mesh in the Mesh Editor.

Collision:

The Collision dropdown (Show Collision button) near the top of the Mesh Editor allows for visualizing the collider(s). If nothing appears, your mesh is probably missing colliders.

Auto-Collider Generator and K-DOP

The Collision tab further up can be used to create and apply simple colliders quickly. The K-DOP collider creater is a “type of bounding volume that basically takes K axis-aligned planes and pushes them as close to the mesh as it can, where K is the number of planes.” So 6DOP presses 6 planes against the mesh, and 18DOP pushes 18 planes against the mesh for example.

The Auto Convex Collision option opens the Convex Decomposition tab, which is used to create more complex meshes that more accurately represent the surface of the Static Mesh. The Collision properties of the mesh area found in the Details tab within the Mesh Editor. Here are many of the important collision options.

Collision Presets:

This is similar to the concept of using layers for collision in Unity, where you can determine what this collider actually interacts with. A common choice is “BlockAll” for environmental obstacles as this will cause it to collide with everything.

Editor Settings

Change Editor Camera Position Exiting Play Mode:

I really did not like that when exiting play mode for quick testing that the editor camera stayed in the exact same position as the player camera when I ended play mode (so basically the camera appears to not change at all when leaving play mode). I preferred if the editor camera returned to where I had it positioned before entering play mode to test, and found that there is a setting in Editor Preferences for this case.

Editor Preferences -> Level Editor: Viewports -> Look and Feel -> Uncheck “Use Camera Location from Play-In-Viewport”

Pain Causing Volumes

Pain Causing Volumes can be used to create a death plane in your game if the player falls into a pit or on some other dangerous floor. This is can be found in the “Place Actors” tab.

Setting Up a Physics Object

There is a Physics section in the Details tab of many actors and meshes. Turn on “Simulate Physics” here. Then under the Collision section, the Collision Preset “PhysicsActor” can be used, along with the Object Type “PhysicsBody”.

Game Mode

This is a section found in the World Settings. Most projects will have a GameMode Override used (the default for a new project is usually none however).
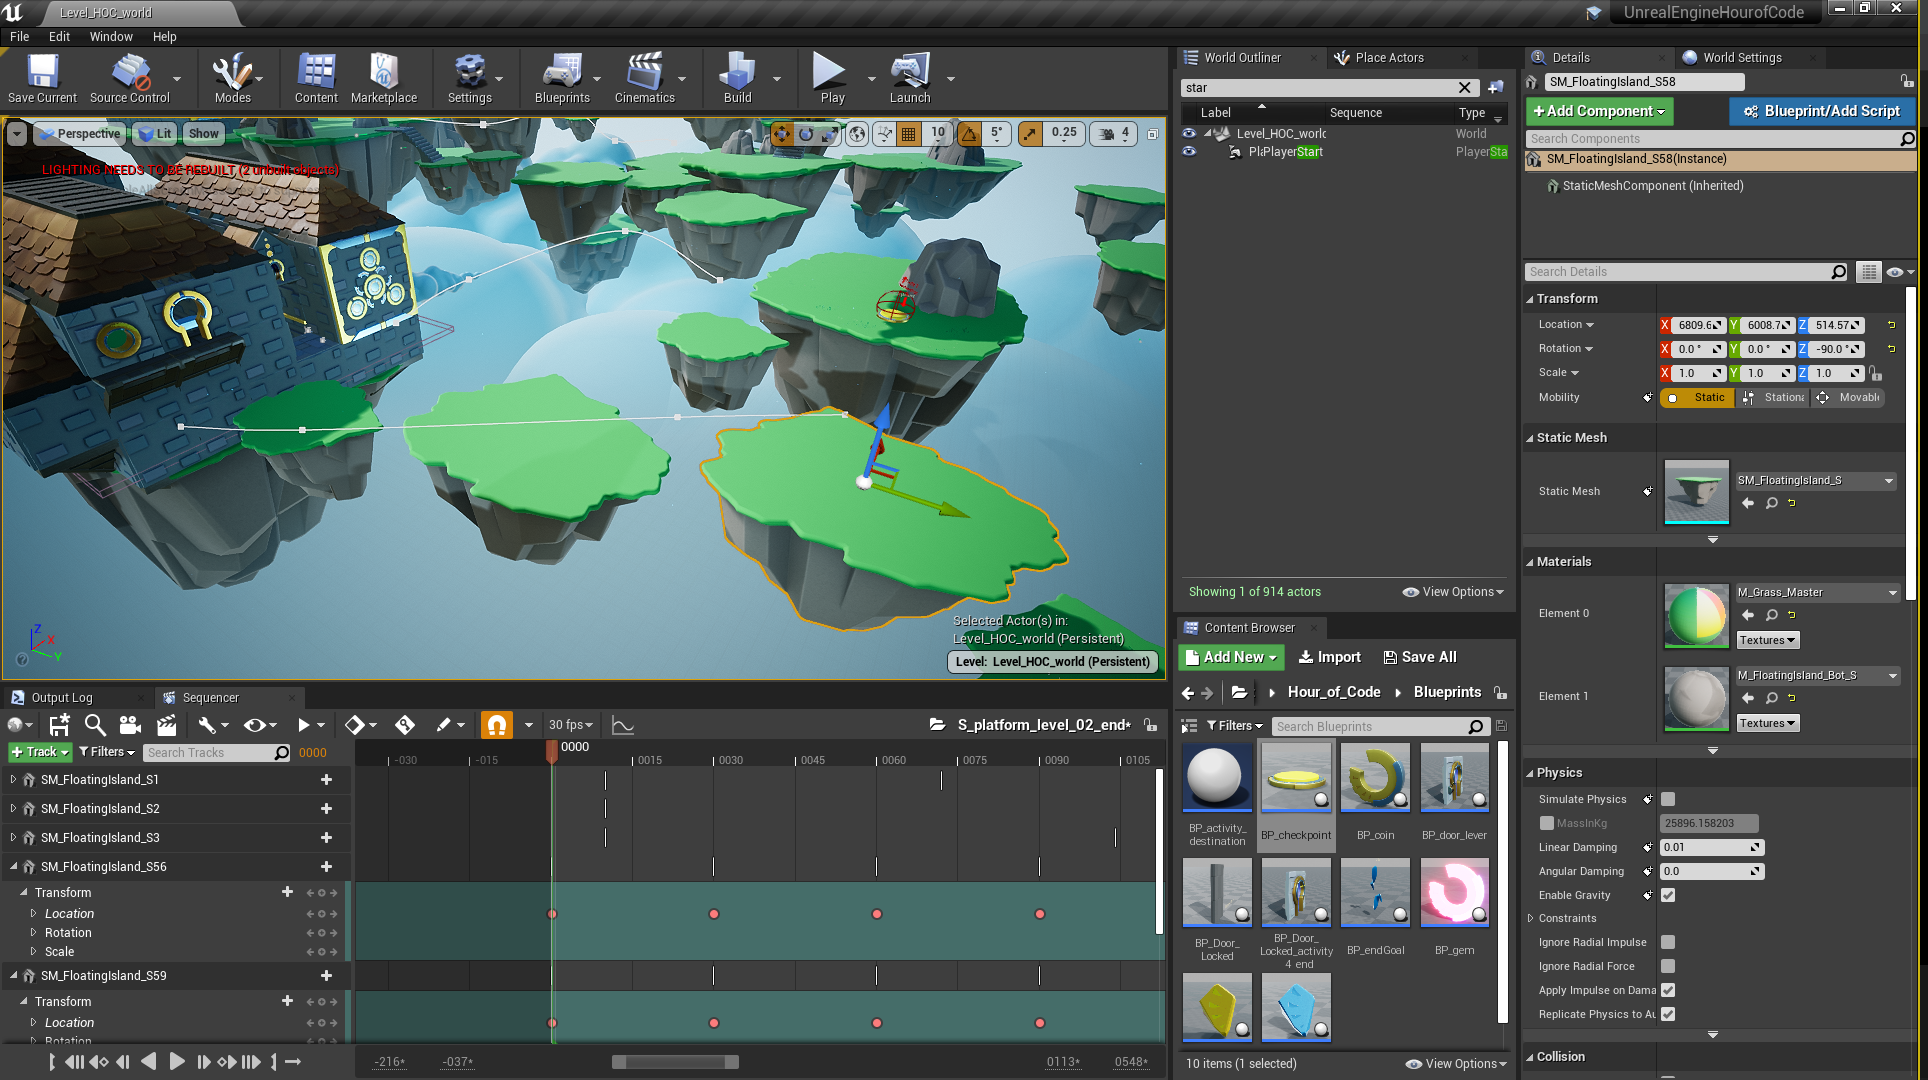
Level Sequencer

The Level Sequencer is its own window to help control the timeline of events and animations of objects throughout the level. In this tutorial, it was used to help control the infinite periodic movement of moving platforms.

Adding Actors to Level Sequencer:

Within the Sequencer window, go to “+ Track” and hover “Actor to Sequencer”. From here, a list of all possible actors comes up which can be added. You can also select an actor before this, and it will appear at the top of the list to make it easy to quickly add the currently selected actor to the Sequencer.

Widgets

Widgets are elements which make up the HUD or UI of the screen of the game.

Editing Text:

By default, text objects are not variables and are expected to be relatively static. If you want to have text that updates, like a collection counter of some kind, you need to make sure in the Widget Designer to check that a specific Text “Is Variable”, which can be found in the Details window. This appears to be similar to making a public text variable that is accessible in your blueprints.

Input Settings

You can get to the Input Settings through:

Edit -> Project Settings -> Engine-Input

Again, this is similar to the Input Settings in Unity where specific names or labels can be given to different actions which can then be tied to specific key bindings or joystick inputs. These names/labels can then be used in blueprints with nodes such as the InputAction node.

This approach is good to keep your inputs more organized. Your blueprints will be clearer since the name of the action will be there instead of arbitrary inputs like key “K”, and this makes it easier to modify inputs later if you want to change keybindings.

Blueprints Notes from Tutorial

This section covers many of the blueprints related notes that are given throughout the tutorial.

Within a Blue Print, in the Event Graph, some events can be added directly to components by selecting options presented in the Details tab for the currently selected component. For example, this tutorial starts with the checkpoint blue print and its sphere collider uses one of these events named “On Component Begin Overlap”. Selecting this immediately creates an event node in your event graph of that type referencing the currently selected component.

A lot of important information for your blue print can be found in the “My Blueprint” tab. This displays information such as the various functions and variables throughout the current blueprint.

Components can be dragged into the Event Graph from the Component tab to quickly use them as references for your blueprint.

Ctrl + W (In Blue Print editor): duplicates currently selected nodes/node system

Finding Variable References:

Select a variable under “My Blueprint” and right click and select “Find References”. This generates a list of references at the bottom of the editor which shows everywhere that variable is used. These can then be double-clikced to directly take the user to that specific reference.

Splitting Pins:

Some pins can be split into their more basic components in blueprints when necessary. This is done by right-clicking DIRECTLY on a pin, and selecting “Split Strcut Pin”. The example seen in this tutorial split a Transform pin so it then became 3 separate pins: position, rotation, and scale. These can then separately be connected into other pins.

IsValid Node:

Determines if input is valid or not, and performs functions based on the result. This can be used as a way to perform null reference checks to make sure to only do something as long as an input even exists or not.

PrintString Node:

Similar to the Debug.Log method in Unity, can be used to determine notes to be output as string data to check and debug blueprint maps.

DestroyActor Node:

Similar to the DestroyGameObject method within Unity, this is a quick and dirty way to remove something from existence in Unreal.

Auto Finding Proper Data from Variables Between Pins:

Sometimes you can drag a pin of one variable/class type to a pin of another variable type and it will add inbetween nodes to get a variable of the appropriate type for you that is contained within that class. For example, when connecting the actor pin of the OnComponentBeginOverlap node to a PrintString node’s string pin, it will add a GetDisplayName node in between to make sure it is passing the string data of the name of the object of interest into the PrintString node.

Casting Actors for More Detailed Variable Modification:

Many nodes work with Actors in blueprints, but often you need to adjust variables within deeper classes. When you need to start with a general node, but access a class inheriting from Actor, you can use a “Cast To …” node to get access to the proper tools. After casting to your designated class, it is then possible to modify the variables and values within that class.

The example from the tutorial is that the BP_jumpBoost wants access to the player character to modify their jump value. Since this is done when they collect the powerup, it starts with an OnComponentBeginOverlap node. This can return the other actor that collided with it, but they then need more detailed information to modify the jump value of the player character that collided with it than that it is just an Actor. This is done by a CastToEpicCharacter node that receives the OtherActor pin data from the OnComponentBeginOverlap node. This converts it to a more specific class, where the jump velocity can then be set as wanted.

This tutorial then suggests that using interfaces is another way to achieve a similar goal in these situations. They even prefer interfaces, but both appear to be valid approaches.

Adding Variables:

1) They can be added under the My Blueprint window within the blueprint

2) Select a variable pin, right-click, and select “Promote to Variable” (similarly to Houdini)

Variables in Details Window:

Displaying:

This can quickly be done by making the variable public. This can be done by clicking the eye icon next to the variable in your blueprint, making sure it displays an open eye (indicating the variable is now public).

Organizing:

Similar to having headers in Unity to group variables, Unreal does this with Categories. Just select the variable in your blueprint, and the Details window has a section named Category where a dropdown shows all the previously made Categories this variable can be placed in. If you want to make a new category to place the variable into, just type a new name there.

Controlling Variables:

Similar to Unity, public variables within the blueprints can also be given limits and controls for better usability in the Details window. For example, you can add a slider range to a variable which creates a slider in the Details window which can be dragged within the given minimum and maximum values.

Branch Node:

Foundational conditional statement for blueprints to do various events if true and/or false


Shortcut: Hold B + Left-Click (in Event Graph)

OnComponentBeginOverlap and OnComponentEndOverlap nodes:

These are similar to the OnCollision… Enter and Exit methods within Unity. They help determine what actions to take when something enters a collider, and what actions to take when leaving a collider.
Solely entering a collider is common when collecting objects, whereas entering and exiting a collider is common when certain actions by the player can only be performed when they are with a certain proximity to an object (such as being able to open a door), since you need to allow the object to receive input from the player while they are close, but then again stop receiving input once the player gets too far away.

Sequence Node:

Used to sequentially perform a number of methods in a designated order.

Making Your Own Blueprint; Common Components:

Static Mesh & Collider (of some type)

Creating Events and Functions:

Similar to the events and functions already present in Unreal, you can also create your own custom versions of these. These can then be called from other locations as long as they have a reference to the overall class, similar to calling methods of other classes in Unity or programming.

Fig. 1: Image from my Platform Setup with Sequencer in Tutorial

Summary

I think this was a very solid tutorial overall that made me feel much more confident in working with Unreal, especially when it comes to interacting with the blueprint system. I am starting to be able to draw parallels between Unreal’s blueprints and the code used to perform similar actions in Unity which is helping me start to understand adding functionality to objects in Unreal. One major difference is just that Unreal already offers so much to the designer immediately upon creating a new project that will just require experience to learn what is already there. For example, blueprints like those for the background game mode do a lot of work you might create for a game manager class or something similar in a Unity project.

Blueprints are also just so numerous that finding what you want as a beginner to the system can be too overwhelming to be practical. Simply having more experience helps understand the more commonly used ones however, like collider overlaps and branches, so I think just a few more tutorials will allow me to start building my own small projects.

via Blogger http://stevelilleyschool.blogspot.com/2021/04/unreal-tutorial-unreal-engine-426.html

Coding Adventure: Ray Marching by Sebastian Lague

April 12, 2021

Ray Marching

Unity


Title:
Coding Adventure: Ray Marching


By: Sebastian Lague


Youtube – Tutorial

Description:
Introduction to the concept of ray marching with some open available projects.


Overview

This video covers some of the basics of ray marching while also visualizing their approach and creating some interesting visual effects and renders with the math of signed distance along with ray marching logic. The major ray marching method they show is sphere tracing, which radiates circles/spheres out from a point until anything is collided with. Then, the point moves along the ray direction until it reaches the radius of that sphere projection and emits another sphere. This process is repeated until it radiates a very small threshold radius sphere, which is when a collision is determined.

The resulting project made is available, and I think it would be very useful and interesting to explore. The Youtube video description also holds many links to various sources used to create all the tools and effects in the video, which could also be beneficial for further research into these topics.

Fig. 1: Example of Raytracing Visual from Video (by Sebastian Lague)

via Blogger http://stevelilleyschool.blogspot.com/2021/04/coding-adventure-ray-marching-by.html

Linear Algebra and Vector Math – Basics and Dot Product – by Looking Glass Universe

April 8, 2021

Linear Algebra

Vectors and Dot Product


Title:
Vector addition and basis vectors | Linear algebra makes sense


Youtube – Link #1

Description:
Introduction to this series and the basics of linear algebra and vectors.


Title:
The meaning of the dot product | Linear algebra makes sense


Youtube – Link #2

Description:
Deep dive into the dot product and what it represents and how to determine it.


Overview

I wanted to brush up on my vector math fundamentals, particularly with my understanding of the dot product and its geometric implications as it is something that comes up often in my game development path. While I am able to understand it when reading it and coding it for various projects, I wanted to build a more solid foundational understanding so that I could apply it more appropriately on my own. This video series has been very nice for refreshing my learning on these topics, as well as actually providing me a new way of looking at vector math that I think will really further my understanding in the future.

Video #1 – Vector addition and basis vectors

This was the introductory video to the series, and starts with vector addition. They then move on to linear combinations as an extension of basic vector addition. Next they show for 2D vectors that as long as you have two independent vectors, you can calculate any other vector using those two in some linear combination. This then relates to how vectors are normally written out, but they are simply using linear combinations of the standard orthonormal basis of something like x and y, or x, y, and z in 3D space.

This means a vector is simply 2 or 3 vectors created with the unit vector in the x, y, or z direction multiplied by some scalar and then summed up to create the resulting vector. This was actually a new way for me to look at vectors, as this is more intuitive when you are looking to create a new vector set to base vectors off of different from the standard x, y, z, but I never really thought to also apply it in the standard case. The x, y, z, or even i, j, k, became some standardized to me that I generally ignored them, but I think looking at them in this way will help make much more of linear algebra more consistent in my thinking space.

They then continue on to explain spans, spaces, and the term basis a bit more. A set of vectors can be called a span. If that span is all independent vectors, this indicates it is the smallest amount of vectors which can fully describe a space, and this is known as a basis. The number of basis elements is fixed, and this is the dimension of the space (like 2D or 3D). And for a given basis, any vector can only uniquely be defined in one linear combination of the basis vectors.

Video #2 – The meaning of the dot product

Dot Product

A really simple way of describing the dot product is that it shows “how much one vector is pointing in the same direction of another vector”. If those two vectors are unit vectors, the dot product of two vectors pointing the same direction is 1, two vectors that are perpendicular would have a dot product of 0, and two vectors pointing directly opposite directions would have a dot product of -1. This is directly calculated as the cosine of the angle between the two vectors.

However, the dot product also factors in the magnitude of the two vectors. This is important because it makes the dot product a linear function. This also ends up being more useful when dealing with orthonormal basis vectors, which are unit vectors (vectors of length 1) that define the basis of a space and are all orthogonal to each other.

They cover a question where a vector u is given in the space of the orthonormal vectors v1 (horizontal) and v2 (vertical) and ask to show what the x value of the u vector is (which is the scalar component of the v1 vector part of the linear combination making up the vector u) with the dot product and vectors u and v1. Since v1 is a unit vector, this can be done directly by just the dot product (u . v1). They then show that similarly the y component would just be the dot product (u . v2). They explain this shows the ease of use of using the dot product along with an orthonormal basis, as it directly shows the amount of each basis vector used in the linear combination to create any vector. This can also be explained as “how much of u is pointing in each of the basis directions”.

Since the dot product is linear, performing the dot product function on two vectors is the same whether done directly with those two vectors, or even if you break up one of the vectors before hand into a linear combination of other vectors and distribute it.


Example:

a . b = (x*v1 + y*v2) . b = x*v1 . b + y*v2 . b

Projecting a Vector onto Another Vector

They then cover the example I was very interested in, which is what is the length of the vector resulting in projecting vector A onto vector B in a general sense. The length, or magnitude, of this vector is the dot product divided by the magnitude of vector B. This is similar to the logic in the earlier example showing how vectors project onto an orthonormal basis, but since they had magnitudes of 1 they were effectively canceled out originally.

This then helped me understand to further this information to actually generate the vector which is the projection of vector A onto vector B, you then have to take that one step more by multiplying that result (which is a scalar) with the unit vector of B to get a vector result that factors in the proper direction. This final result ends up being the dot product of A and B, divided by the magnitude of B, then multiplied by the unit vector of B.


Example:

Projection vector C

C = (A . B) * ^B / ||B|| = (A . B) * B / ||B||^2

Dot Product Equations

They have generally stuck with the dot product equation which is:

a . b = ||a|| ||b|| cos (theta)


They finally show the other equation, which is:

a . b = a1b1 + a2b2 + a3b3 + …

But they explain this is a special case which is only true sometimes. It requires that the basis you are using is orthonormal. So this will generally be true in many standard cases, but it is important to note that it does require conditions to be met. This is because the orthonormal basis causes many of the terms to cancel out, giving this clean result.

via Blogger http://stevelilleyschool.blogspot.com/2021/04/linear-algebra-and-vector-math-basics.html

2014 GDC Talk – 50 Game Camera Mistakes

April 6, 2021

GDC 2014 Talk

Camera Controller


Title:
GDC 2014 Talk – 50 Game Camera Mistakes


Youtube – Link

Description:
A talk on common issues with camera controllers game developers make and how to avoid them.


Overview

As I was fixing some issues I had with my Unity camera for my architecture project, I came across this talk and thought it would be useful moving forward to understand camera controllers in games in general. It’s a bit older, but it should still be very useful for getting some tips for establishing a base understanding of some issues you may run into starting a camera controller.

via Blogger http://stevelilleyschool.blogspot.com/2021/04/2014-gdc-talk-50-game-camera-mistakes.html