Accessing Variables in Other Scripts in Unity

May 26, 2021

Accessing Variables

Unity


Title:
How To Access Variables From Another Script In Unity

By:
Infallible Code


Youtube – Tutorial #1

Description:
Goes over many programming techniques within Unity to access variables in one script from another.


Key Concepts

Scripts

C# classes that inherit from MonoBehaviour.

Collaborators

Scripts that require a reference to at least one other script in order to function.

Dependencies

Objects that collaborators need in order to function.

Categories of Resolution

Where the burden of dependency resolution lies.

External Resolution

The responsibility of dependency resolution falls somewhere else.

Public Properties

Expose dependency of a public field or property


Simple and requires no overhead, but can easily make bugs that are also hard to debug. This is because it can be unclear where the dependencies lie.

Editor Properties

Expose serializable dependencies in the Unity editor.
Use SerializeField on attribute private properties.


Similar to public properties, but are much safer.

Unity Event Methods

Functions that are called when specific events occur at runtime.


This specific example covers methods like OnCollisionEnter(). These are functions that are called when specific events occur, and they help resolve dependencies when those events are triggered.

Internal Resolution

The script itself is responsible for resolving its own dependencies.

FindObjectByType() Method

Search for dependencies in the scene based on their type.
FindObjectsByType() returns a list of matching objects.

This can be tricky to use sometimes since you may not be sure of the state of your scene when this is called. It is also relatively expensive. Most consistent to use to find manager scripts, since they should confidently be active in the scene when called.

Static Instances

Expose dependency on a public static property.
Commonly used in the Singleton pattern.

Dependency Injections

A pattern for automating dependency resolution based on a configuration.

It allows you to configure all your dependencies in one place and have them resolve automatically based on that configuration.

Summary

I have used all these techniques before, but it is always good to find condensed lists of them all together to really help organize them. Determining the cleanest and safest way to pass around variables through scripts is something I work on a lot, so laying out these options to go through in an effort to determine the best approach is always helpful. This also led me to some other resources on the topic that I am looking forward to investigating.

via Blogger http://stevelilleyschool.blogspot.com/2021/05/accessing-variables-in-other-scripts-in.html
Singletons in Unity and Many of Their Downfalls by Infallible Code

May 26, 2021

Singletons

Unity


Title:
Everything You Need to Know About Singletons in Unity

By:
Infallible Code


Youtube – Tutorial #1

Description:
Goes over the true properties of singletons in code and why they should be used sparingly in Unity game development.


Intro to Singletons

Singleton Pattern: class that is both globally accessible and can only be instantiated once

Common Example:

Audio Manager – because it is something many scripts will want access to, and you specifically want only one in your game at a time

Singleton Requirement #1: Global Access Specification

Singletons sound promising because they are an easy solution to “how do you access other scripts” or “how do you fill your class dependencies”. Using Singletons for access can hide the fact that a class depends on another, which can lead to difficult to track bugs and difficulties. This may lead to using the singleton even more than necessary because of ease of access, which creates more and more hidden dependencies.

Example #1

Non-Singleton Version

public class GameManager : MonoBehaviour
{
	[SerializeField] private Player player;
	
	privat void OnPlayerDied()
	{
		print($"Final Score: {player.Score}");
	}
}

Singleton Version

public class GameManager : MonoBehaviour
{
	privat void OnPlayerDied()
	{
		print($"Final Score: {Player.Instance.Score}");
	}
}

Because the Singleton pattern accesses a specific class directly, additions of derived classes will require more updates that may also be hard to find because of the hidden dependencies. Again, doing something similar to the Non-Singleton version of Example #1 makes it so that an additionally created derived class could fill the Player dependency with little to no edits.

Singleton Requirement #2: Restricted to a Single Instance

This is generally accomplised by creating a private constructor for the class, and then instantiating a single instance from the getter. This is already difficult in Unity as many classes you create in Unity will be MonoBehaviours, which cannot be instantiated in code with the new keyword. This is because Unity hides their constructor and allows anything to instantiate them through object.Instantiate().

So to help satisfy this, you need an extra check if another instance of the class already exists in the scene in case it was added directly in the Editor or through other object.Instantiate() calls. Once these are located, they may also require being destroyed to make sure there only exists one instance at any given time. This can also lead to strange results, as sometimes destruction prevention is used in Unity, such as with the DontDestroyOnLoad() method. Sometimes you may also get rid of and keep the “wrong” singleton if multiple somehow run into each other.

Singleton Criteria:

1) Absolutely required to exist only once
2) Must be accessible from every part of your code
3) Controls concurrent access to a resource

Summary

While I already knew that singletons should be used sparingly, having a better understanding of them fundamentally really helps put that into perspective just how sparingly they should be used. It also helps confirm that it can generally be a bad way of passing around data in Unity, and with a need that comes up so often and has so many options to be accomplished, it is good to generally remove an option from that list. It is also important to acknnowledge that in Unity specifically they are extra difficult to implement when it involves MonoBehaviours, as this again helps narrow down the process of passing around data.

via Blogger http://stevelilleyschool.blogspot.com/2021/05/singletons-in-unity-and-many-of-their.html

Game Project: Flying Game – Part 3 – Camera Controller and Zoom Control

May 25, 2021

Flying Game

Camera Controller


Overview

After getting the basics of the camera controller down, I wanted to explore ways to make it feel more immersive. One of the ways I’ve seen racing or other fast moving games handle this was to have a zoom that mimicked the acceleration to make that feel all the more impactful. Following this, I wanted to look into connecting the player’s speed with the amount the camera zooms in on the player.

Setting the Camera Zoom Suggested by Player Speed

Since the game has a speed boost option, I wanted the impact of the speed boost to be larger than any normal speed the player can reach. With this in mind, I was looking at an approach where normally their max speed gets the camera up to around 80% of the maximum zoom, and activating a boost is the only way to hit the 100% zoom mark (creating a significant difference in zoom specifically when boosting).

One immediate issue with this approach is that any zoom that is directly tied to player speed has a jarring jump in zoom position when the player boosts, since in a single frame it jumps from rather low zoom (because charing boost goes with slowing down) to maximum zoom. So while this was a decent initial approach, I knew I would want a smoother transition system to especially deal with this common extreme case.

The approach I thought of was that the camera zoom system would read the player’s speed and suggest a position for the camera to move to. If that new position is substantially far away from the current position, it would only move a portion of the way there instead of directly there. This would help me spread out extremely large zoom changes over several frames, similar to how a Lerp function may handle this.

This ended up working rather well, and can be seen in action in the video I have linked. Another hopeful benefit of this system was that I was hoping I could remove the small zoom jitter when the player’s speed is not changing any appreciable amount. This is an effect that happens often when the player is consistently maintaing the normal top speed. I was hoping to use the opposite distance check of not changing the zoom at all at very small distance changes, but as can be seen in the video as well this does not particularly fix it currently.

Camera Controller – Zoom Focus from Steve Lilley on Vimeo.

Video: Zoom Based on Speed System for Camera Controller

via Blogger http://stevelilleyschool.blogspot.com/2021/05/game-project-flying-game-part-3-camera.html

Coroutine Fundamentals in Unity

May 20, 2021

Coroutines

Unity


Title:
Introduction to Game Development (E21: coroutines)

By:
Sebastian Lague


Youtube – Tutorial #1

Description:
Covers the basics of coroutines in Unity.


Title:
Coroutines In Unity – What Are Coroutines And How To Use Them – Coroutines Unity Tutorial

By:
Awesome Tuts


Youtube – Tutorial #2

Description:
Covers some intermediate complexity uses of coroutines as well as tying them in with Invoke calls.


Title:
Coroutines – Unity Official Tutorials

By:
Unity


Youtube – Tutorial #3

Description:
Old official Unity tutorial on the fundamentals of coroutines in their system.


Overview

Coroutines appear to be a strong tool within Unity that I still am looking for ways to implement better in my systems. While understanding the basic uses for them with timing related events, I feel like they offer a lot more that I am not utilizing, so I wanted to further my understanding of them by following up on one of my older tutorial blogs and going through the tutorials it offers.

Tutorial #1 Notes

Coroutines are part of the Unity engine, and are not native to C#. They also belong to the Monobehaviour base class, so they class they are used in must inherit from Monobehaviour.

The coroutine return type is IEnumerator. Because of this, coroutines can also be stored in IEnumerator variables. This also allows them to be passed in as a paramter for the yield return statement within a Coroutine.

Use a reference to properly control the starting and stopping of a specific coroutine instance.

Tutorial #2 Notes

You can call a Coroutine from within itself (the same Coroutine). This is one way to cycle a Coroutine continously.

WaitForSecondsRealtime is similar to WaitForSeconds, except that WaitForSecondsRealtime is independent of Unity’s timescale. WaitForSeconds however is affected by the timescale. WaitUntil suspends the coroutine until the given delegate returns true.

Invoke Notes

  • Invoke – call a method after a given amount of time
  • InvokeRepeating – call a method every given amount of time, after a starting given time
  • CancleInvoke – stops an InvokeRepeating call

Tutorial #3 Notes

Coroutines are functions which execute in intervals. They work with special yield statements which return the code execution out of the function. Then, when the function continues, execution begins from where it left off.

Combining coroutines with properties can allow for efficient code which produces execution only when a value is changed, without the need to check for variable changes every frame with the Update() method or something similar.

Coroutine Return Statements

A substantial part of using and controlling coroutines is the various return statements you can use within them to determine when they should run and when they should pause execution. As such I listed several of these options and how they work within the coroutines.

yield return null

waits a frame before progressing to the next step

seems similar to the rate of the Update() method

yield return new WaitForSeconds(float time)

waits the given amount of seconds between each run of the process

yield return WaitForSecondsRealtime(float time)

waits the given amount of seconds, regardless of Unity’s timescale

yield return StartCoroutine(DoSomething())

waits until the given Coroutine “DoSomething” is finished running

yield return new WaitUntil(bool test)

suspends coroutine until the given parameter is true (opposite of WaitWhile)

yield return new WaitWhile(bool test)

suspends coroutine until the given paramter is false (opposite of WaitUntil)

Summary

Coroutines are starting to become a bit more clear to me, and this helped me learn a few more ways to incorporate them into my projects. Just seeing that they are specifically a Unity native concept was helpful to me as I did not think about that before, and that makes their somewhat strange nature make more sense in my head. This made it more clear that Unity is doing a lot of work behind the scenes to accomplish their main goals of determining when to start, pause, resume execution based on their yield values. Also the Unity note on tying them in with properties is very interesting and something I want to experiment with more myself for more efficient code.

via Blogger http://stevelilleyschool.blogspot.com/2021/05/coroutine-fundamentals-in-unity.html

Lerp Fundamentals in Unity

May 10, 2021

Lerp

Unity


Title:
How to Use Lerp (Unity Tutorial)

By:
Ketra Games


Youtube – Tutorial

Description:
A brief coverage of exactly how Lerp works in Unity with a couple ways to use it.


Overview

I was recently researching ways to effectively use Lerp in Unity and came across some strange implementations that made me unsure if I understood how it worked. This video however specifically covered that case and explained that it does work, but it’s not a particularly ideal solution.

The case covered is specifically called the “Incorrect Usage” in this video. It is when Time.deltaTime alone is entered as the time parameter for Lerp. As I thought, this is just entering some tiny number as a time parameter each time it is called, which is then used to just some value between the intial and final values entered into the Lerp. It is not very controlled, and it leads to a strange situation where it keeps getting called and updated but it does not theoretically reach the final position ever (although this may be different with how computers handle the values eventually).

Finally they cover a couple time parameters to use with Lerp to get a few varied results. SmoothStep is one they suggest to get a result similar to the “Incorrect Usage” but done properly. It adds a bit of a slowing effect as the value gets closer to the final result. They also show using an Animation Curve to control the value in many various mathematical ways over time.

via Blogger http://stevelilleyschool.blogspot.com/2021/05/lerp-fundamentals-in-unity.html

Game Project: Flying Game – Part 2 – 3D UI Guide with Rotational Matrices

May 4, 2021

Flying Game

UI & Matrix Rotations


Overview

I wanted to make a 3D UI element which could direct the player in open flying space towards a point of interest or goal. This needed to point towards the object positionally, as well as account for the rotation or direction the player is facing. This makes sure that no matter where they are and what direction they are facing, it can guide them to turn the proper direction and make informed decisions to move directly towards that goal.

After deciding that changing my frame of reference could be a solution for this problem, I found Unity’s InverseTransformDirection method which can change a Vector from one space to another. To make sure this was providing a result similar to what I expected mathematically, I also wrote out the math for performing a matrix rotation on the vector and was happy to see it gave the same results.

3D UI Element – Real Time Guide Towards Goal

Add a 3D Element to the Unity Canvas

You change the render mode of the Canvas to Screen Space – Camera, which requires adding a Camera reference. To satisfy this, create another Camera separate from the main with the above settings. Drag this Camera in as the reference for your Canvas. Now 3D objects can be added to the Canvas.

Make sure the 3D elements added are on the UI layer. Sometimes the scaling can be strange, so you may need to scale the objects up substantially to see them on the Canvas. Also your main Camera may separately render the object as well, so to avoid this remove the UI layer from the Culling Mask for your main Camera.

    Canvas Settings:

  • Render Mode = Screen Space – Camera
  • Render Camera = Created UI Camera
    UI Camera Settings:

  • Clear Flags = Depth only
  • Culling Mask = UI
  • Projection = Orthographic

Unity’s InverseTransformDirection to Set Guide Upward Ray

Using Unity’s “InverseTransformDirection()” method from the player’s transform with the vector pointing from the player’s position to the intended goal allowed me to change the frame of reference of the goal vector from world space to that of the player. This properly rotates the vector to associate itself with the player’s current rotation as well as their position relative to the goal.

Creating my Own Rotational Transformation on the Goal Vector to Compare to Unity’s InverseTransformDirection

To double check what this was doing, I found the math to change the frame of reference of a vector from one frame to another at the link attached. Since the player currently only rotates on a single axis (the y-axis in this case), I could directly copy the example seen in the video which investigates representing a vector in a new frame with a rotation about a single axis (to keep the terms simpler for now). Following this math I got the exact same results as Unity’s InverseTransformDirection method, indicating they perform the same operations.

Creates Vector from Player to Goal

private Vector3 PointTowardsGoal()
{
	return goal.position - player.transform.position;
}

Transforms Goal Vector from World Space to Player’s Space with Unity InverseTransformDirection

private Vector3 PointTowardsGoalRelativeToForward()
{
	// Translate direction to player's local space
	relativeDirectionFromForwardToGoal = player.transform.InverseTransformDirection(PointTowardsGoal());

	return relativeDirectionFromForwardToGoal;
}

Transforms Goal Vector from World Space to Player’s Space with Rotation Matrix Math

private Vector3 GoalVectorInFrameOfPlayer()
{
	// pr
	Vector3 originalVector = PointTowardsGoal();

	// Obtain rotation value (in radians); Rotation angle about the y-axis
	float theta = player.transform.localRotation.eulerAngles.y * Mathf.PI / 180;

	// p1
	Vector3 vectorInNewFrame = new Vector3(
		originalVector.x * Mathf.Cos(theta) - originalVector.z * Mathf.Sin(theta),
		originalVector.y,
		originalVector.x * Mathf.Sin(theta) + originalVector.z * Mathf.Cos(theta)
		);
		
	return vectorInNewFrame;
}


Flying Game Project: 3D UI Guide Towards Goal Prototype from Steve Lilley on Vimeo.

Video 1: Prototype of 3D UI Guide Using Unity InverseTransformDirection


Flying Game Project: Comparing Unity's InverseTransformDirection to my Own Rotational Matrices from Steve Lilley on Vimeo.

Video 2: Update Using Rotational Matrix Math on Goal Vector

Summary

It is good to know that for standard procedures where I want to change the relative frame of a vector that Unity’s InverseTransformDirection() method appears to do that. As showcased here, that can be a very strong tool when you need to translate vector information from your game’s world space to an element in your UI, whether that be through the player’s current frame reference or something else.

Learning how to setup a Canvas to use 3D assets in your UI is also good to know just to increase the flexibility of options you have when creating a UI. Some information can be difficult to convey with a 2D tool, so having that option can open avenues of clarity.

via Blogger http://stevelilleyschool.blogspot.com/2021/05/game-project-flying-game-part-2-3d-ui.html

Game Project: Flying Game – Part 1 – Introductory Movement and Camera Controller

April 30, 2021

Flying Game

Game Project


Overview

I wanted to do some work on a small, simple 3D game in Unity I could make within a week or so. My original focus is on player movement, and from there I decided to hone in on a flying game of some kind. I have been watching Thabeast721 on Twitch and he recently played Super Man 64 which I have also seen at Games Done Quick (GDQ) events and thought building off of and improving their flying controller could be a fun project.

Player Controllers

Controller #1 – Rotate Forward Axis

My initial thoughts on a basic flying player controller was to have left/right rotate the player on the y-axis, up/down rotate the player on the x-axis, and a separate button to propel the player in their current forward direction.

As a controller standard, I also tend to have the player’s input be received in the Update method to receive as often as possible, but then output these inputs as movement in FixedUpdate to keep it consistent on machines with different frame rates.

	private void Update()
    {
        horizontalInput = Input.GetAxisRaw("Horizontal");
        verticalInput = Input.GetAxisRaw("Vertical");

        if (Input.GetButton("Jump"))
        {
            isMoving = true;
        }
        else
        {
            isMoving = false;
        }
    }

    private void FixedUpdate()
    {
        // Inputs in reverse position for direction vector because that influences which axis that input rotates AROUND
        Vector3 direction = Vector3.Normalize(new Vector3(verticalInput * inversion, horizontalInput, 0.0f));
        Flying(direction);
    }

    private void Flying(Vector3 dir)
    {
        RotatePlayer(dir);
        MovePlayer(dir);
    }

    private void RotatePlayer(Vector3 dir)
    {
		transform.Rotate(dir * rotationSpeed * Time.deltaTime);
    }

    private void MovePlayer(Vector3 dir)
    {
		if (isMoving)
		{
			transform.position += transform.forward * movementSpeed * Time.deltaTime;
		}
    }

Controller #2 – Rotate on Y-Axis but Translate Directly Vertically

With my second approach I wanted to try and emulate the flying controller from Super Man 64 just to see how it felt. It seems like a more acarde-y style of flying with easier controls, so I thought it would be a good option to investigate. For this horizontal rotation (rotation on the y-axis) remained the same, as this is pretty standard with grounded player controllers as well.

The up and down rotation (rotation on the x-axis) however, was completely removed. The up/down inputs from the player simply influence the movement vector of the player, adding some amount of up or down movement to the player. This makes it much easier to keep the player’s forward vector relatively parallel to the ground and is much less disorienting than free-form rotational movement in the air.

	private void Start()
    {
        if (isInvertedControls)
        {
            inversion = -1.0f;
        }
    }

    private void Update()
    {
        horizontalInput = Input.GetAxisRaw("Horizontal");
        verticalInput = Input.GetAxisRaw("Vertical");

        if (Input.GetButton("Jump"))
        {
            isMoving = true;
        }
        else
        {
            isMoving = false;
        }
    }

    private void FixedUpdate()
    {
        // Inputs in reverse position for direction vector because that influences which axis that input rotates AROUND
        Vector3 direction = Vector3.Normalize(new Vector3(verticalInput * inversion, horizontalInput, 0.0f));
        Flying(direction);
    }

    private void Flying(Vector3 dir)
    {
        RotatePlayer(dir);
        MovePlayer(dir);
    }

    private void RotatePlayer(Vector3 dir)
    {
		transform.Rotate(dir.y * Vector3.up * rotationSpeed * Time.deltaTime);     
    }

    private void MovePlayer(Vector3 dir)
    {      
		if (isMoving)
		{
			Vector3 movementDirection = Vector3.Normalize(transform.forward + dir.x * Vector3.up);
			transform.position += movementDirection * movementSpeed * Time.deltaTime;
		}     
    }

Camera Controller

Follow Position

To follow the player’s position, I am using a really simple case where it just follows them at some fixed offset. The offset is originally determined by the initial position of the camera relative to the player, and then for the rest of its run its position is just that of the player summed with the offset.

Where transform.position is the position of the camera object:


offset = transform.position – player.transform.position;


transform.position = player.transform.position + offset;

Rotate to Follow

My first test just to initialize the camera follow was to child it to the player to see how it looked that way. This worked ok for following position, but having multiple rotation influences made this impossible to use quickly at first. As I changed the player controller to a more general, arcade-style, it worked better but was still poor for rotation.

To fix this I put the camera as a child onto a separate empty gameobject. This gameobject could then follow the player and rotate to rotate the camera around the player while keeping it at a fixed offset distance. This also made determining the rotation angle/looking vector from the camera to the player much simpler. Since the camera is rotate downward some, its forward vector is not in-line with the world z-axis anymore. This camera container however could keep its axes algined with the world’s axes. This meant I could just make sure to align this container’s forward vector with the player’s forward facing vector on the xz-plane. To do so it just required the following:

private void RotateView()
{
	Vector3 lookDirection = new Vector3(player.transform.forward.x, 0.0f, player.transform.forward.z);

	transform.rotation = Quaternion.LookRotation(lookDirection, Vector3.up);
}

Unity’s Quaternion.LookRotation method allows me to set the rotation of the object based on the direction of a forward facing vector (lookDirection in this case), with a perpendicular upward vector to make sure I keep the rotation solely around the y-axis.

The following is a quick look at how the final player controller and camera controller interact from this initial prototype approach:

Flying Game Project: Initial Player Controller and Camera Controller Prototypes from Steve Lilley on Vimeo.

Summary

via Blogger http://stevelilleyschool.blogspot.com/2021/04/game-project-flying-game-part-1.html

How to Make a Multiplayer Game in Unreal Engine 4 [Blueprint Tutorial] (Unreal) – Part 1 – by DevAddict

April 27, 2021

Multiplayer

Unreal


Title:
How to Make a Multiplayer Game in Unreal Engine 4 [Blueprint Tutorial]

By:
DevAddict


Youtube – Tutorial

Description:
A tutorial extension to the previous Unreal platformer tutorial that shows multiplayer implementation.

Summary

This tutorial extends the previous tutorial on making a platformer in Unreal found here:

Youtube – Lets Make a Platformer – Unreal Engine 4.26 Beginner Tutorial

The original tutorial follows one created by Unreal with some extra steps added. This tutorial is an expansion made by DevAddict specifically to show how to add multiplayer to this project.

Lesson 1: Introduction to Multiplayer

Play Modes

When going into Play Mode in Unreal, there are many options for testing and debugging multiplayer.

    Play Modes: Net Modes:

  • Play as Offline (Standalone): (Default) You are the server
  • Play as Listen Server: Editor acts as both the Server and the Client
  • Play as Client: Editor acts solely as Client and a Server is started behind the scenes for you to connect to

Testing Multiplayer Settings

Approach #1

  • Set Number of Players to: 2
  • Set Play Mode to: Play as Client

This tests both windows as if they were both individual clients.

Approach #2

  • Set Number of Players to: 2
  • Set Play Mode to: Play as Listen Server

The Editor will act as the Server (host) and the extra windows will act as Clients connected to that Server. This helps point out differences occurring between the Server and Clients for debugging multiplayer actors.

Editing Blueprints

Editing Game Mode

The Game Mode class only exists on the Server. It does NOT exist on any of the Clients.

This fact is why transitioning this tutorial to multiplayer causes many issues, the first of which is fixing the UI so it displays for all players. It originally only displays for the Server player because much of the programming for it is within the Game Mode class. Similarly, the respwan code is also only in the Game Mode.

Use “Event OnPostLogin” node

-> “Cast To BP_PlatformerController” node

-> Client Draw HUD (Event we created in the BP_PlatformerController class)

This tells the Game Mode (Server) that when a new player logs in and has their own Player Controller created, that that specific instance will create its own HUD for that individual Client. Note that they intially tried the “Event Handle Starting New Player” node in place of the “Event OnPostLogin” node, which did create the UI, but it did NOT create the character (so in the Unreal editor you just moved around as a camera). This approach may work with some extra modifications, but it did not direclty work in this instance.

Player Controller

The Player Controller is very powerful in multiplayer because it is replicated on the Server and the Client. They like to keep UI on the Player Controller because it exists throughout the play session. While the character may be destroyed in some instances, the Player Controller generally persists. This makes the Player Controller beneficial for respawning mechanisms as well.

Building a Player Controller:

Right-Click -> Blueprint Class -> Player Controller
Named: BP_PlatformerController

You need to connect the Player Controller and your Game Mode, as they work together to realy information between players and the Server.

In the Game Mode class (ThirdPersonGameMode) Event Graph -> Details -> Classes -> Player Controller Class -> Use dropdown to select new Player Controller (BP_PlatformerController)

Common Error – Event BeginPlay to Initialize Player Controller Blueprint

When initializing their Player Controller class, many may try using the “Event BeginPlay” node. This works for single player, which is why it may be prevalent, but it does not work for a multiplayer project. Instead you want an event that will run on the Client ONLY.

Moving HUD from Game Mode (Server) to Player Controller (Client):

Add Custom Event

Connect Custom Event to start of class

In Details of Custom Event -> Graph -> Replicates: Run on owning Client -> Replicates: Check ON Reliable

via Blogger http://stevelilleyschool.blogspot.com/2021/04/how-to-make-multiplayer-game-in-unreal.html

Exploring Vector Math with Unity – Dot Product

April 23, 2021

Dot Product Unity Project

Vector Math


References

Dot Product Wiki


Wikipedia – Link


Falstad Dotproduct Online Visualizer


Falstad Visualizer – Link


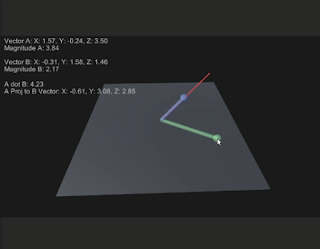
Fig. 1: My Updated Visualizer at Work

Overview

I wanted to explore vector math as a refresher for myself while also creating ways to visualize it through Unity. The dot product seemed like a good focal point to start with since it is such a useful tool in game development but can be a bit strange to fully understand the full reach it has. I took a lot of inspiration from the Falstad visualizer on how to visually represent this.

While similar to the Falstad visualizer, I wanted to create a 3D representation instead of a 2D one. I wanted to have a tool that creates two manueverable vectors that would show all the values of those vectors, as well as their dot product and the projected vector from one onto the other. While most of the math and systems behind this are practically identical in the 3D case, interacting with the vectors becomes a much trickier problem.

Dragging Objects Around 3D Space

I ended up following a tutorial on a really simple 3D dragging setup found here:

Unity Object Dragging || Tutorial: by Kjip

Youtube – Link

This provides a very quick and simple setup that at least allows the user to move objects around in 3D space using the screen to world point methods of Unity. Their exact solution however did not work for me, as the object would always gravitate to the exact position of the camera, eventually leaving it too close to interact with.

The Vector3 they were feeding into the ScreenToWorldPoint method was determined as such:


Vector3 mousePosition = new Vector3(Input.mousePosition.x, Input.mousePosition.y, Camera.main.transform.position.z + transform.position.z);

I eventually just removed the additional transform.position.z of the object added into this vector, which provided a fixed distance from the camera plane to the object at all times. This at least constantly kept it in frame, and allowed decent manueverability. The range of motion is a little weird, but it works well enough for now. I eventually just changed the entirety of the z portion of the vector to a variable float controlled from the inpspector since tying it to the camera position didn’t make any sense at this point.

Visualizing the Vectors

Line Renderers

This is the most straight forward way since I can just put in the two end points of a vector as waypoints of the line renderer to directly render that vector in 3D space. However, overlapping line renderer visuals leads to poor rendering in many cases, which is not ideal for showing the overlap of the projected dot product vector with the vector being projected on to.

Rotating/Scaling a 3D Object (Cylinder)

After trying line renderers for a while, I swapped over to using primitive cylinders as a basis for the vectors. By setting the cylinders as children of an empty container gameobject, I was able to falsely move the anchor point of the cylinder for scaling to the base of the cylinders. This allowed me to scale this container to match the exact size of the vector, and this would exactly match up the size of the cylinder while also making sure it specifically scaled up/outward from the origin of the visualization.

As for rotating the cylinder to match the individual vectors, this could easily be done by setting the up vector of the cylinders. This looks like:


cylinderA.transform.up = vectorOfInterest;

Video Samples of My Project

The following links show my first prototype of this project with the line renderer visuals, and the first update using cylinders and some cleaner camera controls.

Vector Projection Simulation – Dot Product – Prototype from Steve Lilley on Vimeo.


Vector Projection Simulation – Dot Product – Update 1 from Steve Lilley on Vimeo.

via Blogger http://stevelilleyschool.blogspot.com/2021/04/exploring-vector-math-with-unity-dot.html

Observer Pattern in Unity with C# – by Jason Weimann

April 22, 2021

Observer Pattern

Game Dev Patterns


Title:
Observer Pattern – Game Programming Patterns in Unity & C#

By:
Jason Weimann


Youtube – Tutorial

Description:
Introduction to the observer pattern and implementing it in Unity through C#.


Overview

This tutorial covers the basics of the observer pattern in game development with two ways of implementing it in Unity. The first approach is relatively simple just to establish the concept, whereas the second approach uses events with C# to create a more flexible system.

Observer Pattern Basics

An object, called the subject, maintains a list of its dependents, called observers, and notifies them automatically of any state changes (usually by calling one of their methods)

Example Uses in Games:

UI elements updating when data behind them changes

Achievement systems

Implementation #1: Inheriting Observer and Subject Classes

Observer Class:

Abstract class your observers will inherit from

OnNotify() method that accepts a value and notification type


Subject Class:

Abstract class your subjects will inherit from

Hold information on their list of observers they report to

RegisterObserver() method to add Observers to list of those reporting to

Notify() passes a value and notification type on to all the observers they report to in their list, in turn calling their OnNotify methods with the passed on data

This example gets the point across, but is not particularly well suited for Unity or C# projects. Requires a base class on all observers and subjects (although could possibly be changed to using an interface system).

Implementation #2: Using Events

Subject objects create a ‘static event Action‘, which they then call when the requirements are met.

Observer objects have their own methods to perform when those same requirements are met, and they are connected by having the observers subscribe their relevant methods to that same ‘static event’.

This reduces the direct coupling between the observers and subjects, as well as any other objects involved. Should profile this as calling events every frame can start to lead to performance loss. As always, also need to be careful to properly unsubscribe methods from events when needed (such as when deactivating or destroying objects).

via Blogger http://stevelilleyschool.blogspot.com/2021/04/observer-pattern-in-unity-with-c-by.html