Planning and Designing 2D Character Controllers: Using Lucid Chart

January 28, 2021

Planning

2D Platformer Design


Lucidchart

Description:
Visualization tool for diagramming and flowcharting.


Overview

I want to begin designing the 2D platformer character controller creation tool, so I looked for diagramming and flowcharting tools and turned to Lucidchart. I have used it a couple times in the past, and thought it would be a good source to go to again for this. It covers both the helpful programming diagramming as well as just general note and design organization is a clean and visual way.

Design Start: Inspirations and Controller Component Breakdown

Since I want to make a strong character controller creating tool, I want to gather good resources to draw from to see what different components I want to include in the tool. To start this, I began laying out all the basic components that I think can make up a 2D platforming character in a game that I am interested in covering. To support this, I have also began listing games with strong or unique 2D platforming character controllers that I want to draw options and information from. This are shown below in the images created with Ludicchart (these are just the beginnings to start getting the information down and figure out how to start organization).

2D Platformer Character Controller Components: Start


Games to Research and Draw Inspiration

As I started to fill in the games, I noticed that some of them are distinctly different in what I consider pacing so I decided to separate those out for now. Recent Yoshi games and most Kirby games tend to be a bit easier on the difficulty side, especially compared to a lot of games on my list, which I think in turn makes them feel a bit lower paced. This may not be the most accurate term, as there are times a game such as Hollow Knight can be a bit slower paced, but I do not think it has anywhere near the feel that Yoshi and Kirby games has I am trying to convey.

Summary

So far Lucidchart has been fantastic just for visually organizing my thoughts and notes so far. The components are very cleanly organized because I can lay out the major component names, while attaching notes to those individual components to give a longer description as well as some game examples to explain them better.

via Blogger http://stevelilleyschool.blogspot.com/2021/01/planning-and-designing-2d-character.html

2D Platformer Follow Camera Tutorial by Press Start and my Chunk Camera Concept

January 26, 2021

Camera

2D Platformer Design


Title:
Mario Style Camera Follow Tutorial

By:
Press Start


Youtube – Tutorial

Description:
Camera tutorial that follows similar to Mario for 2D platformers.


Overview

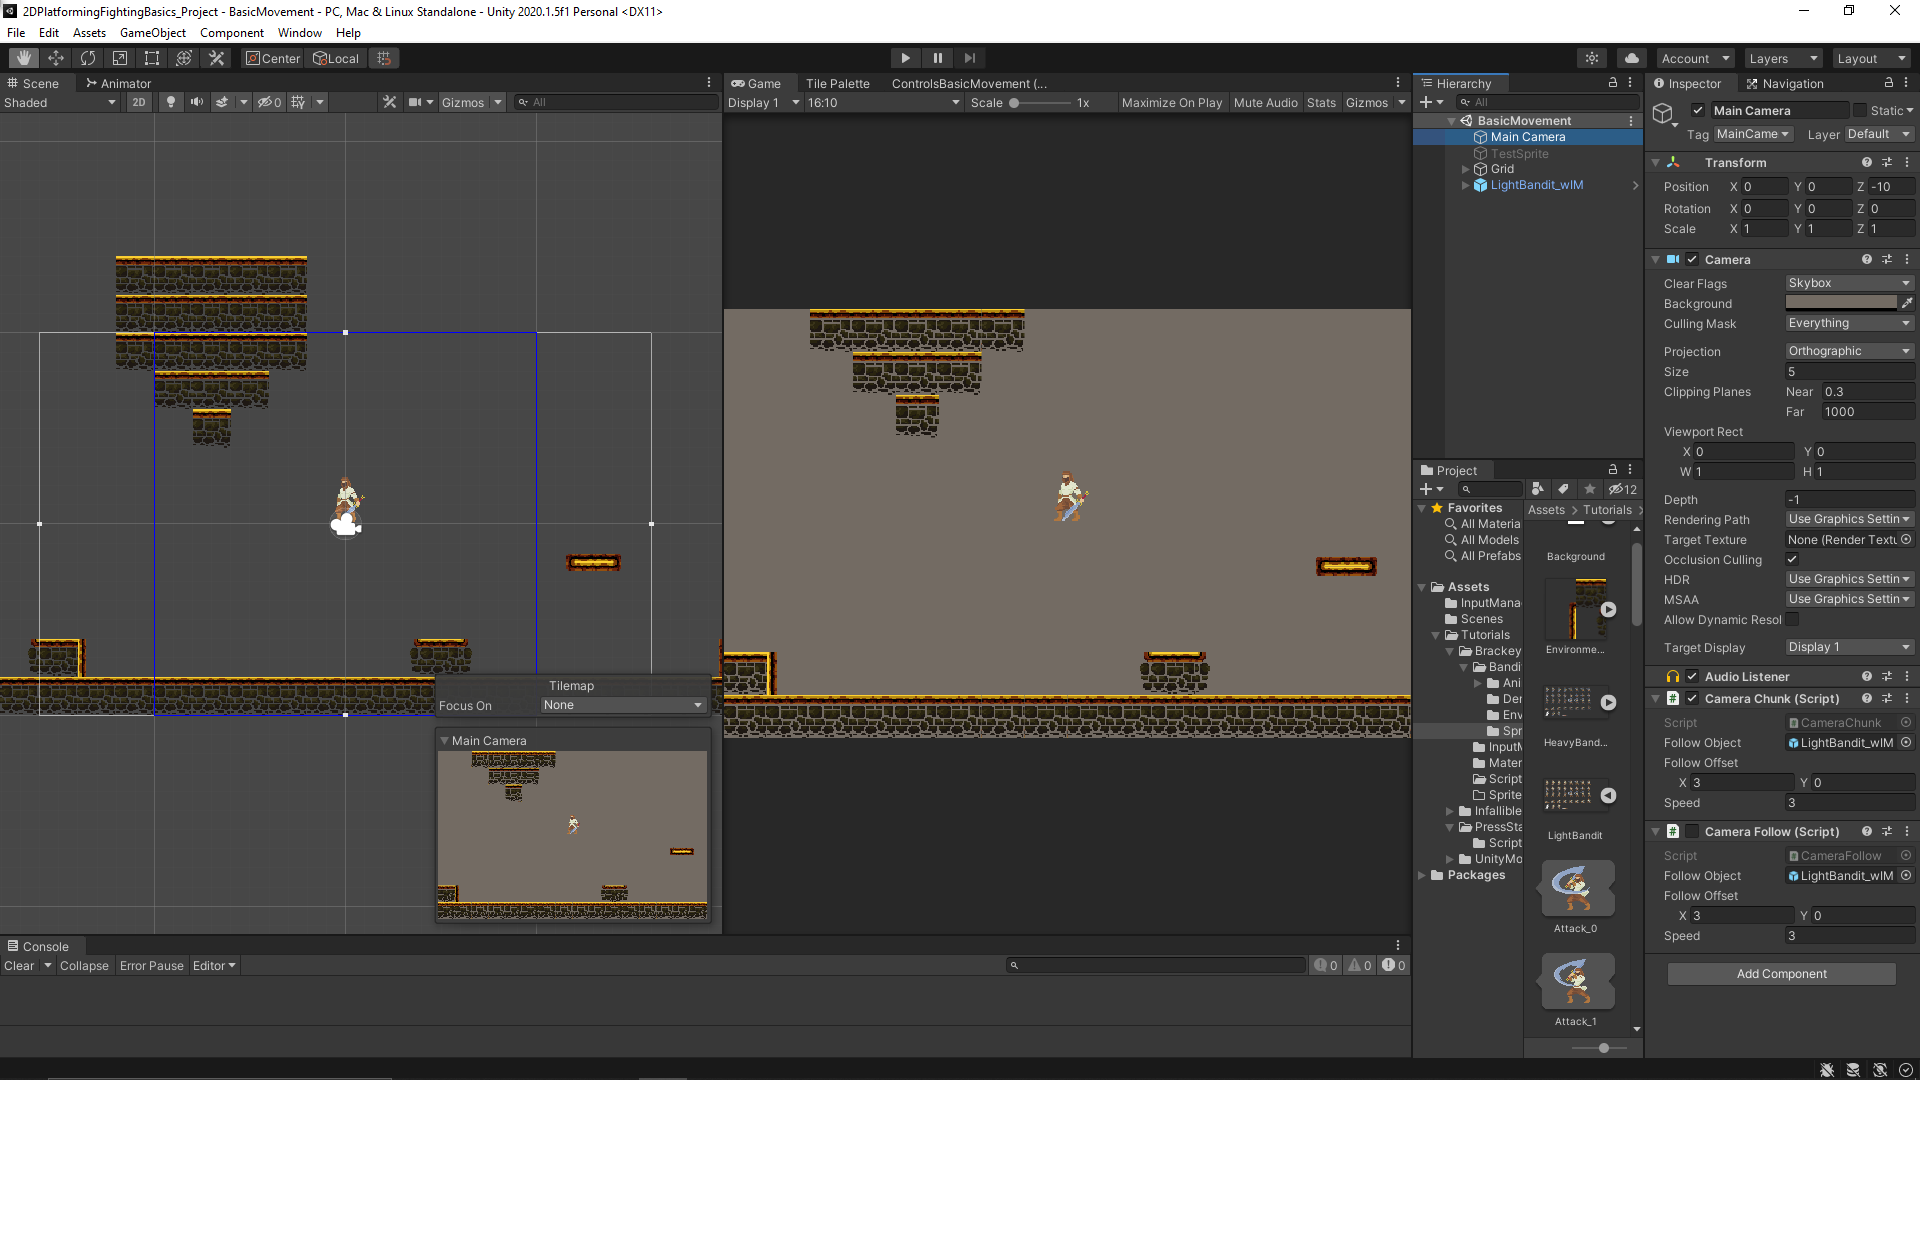
I got to implementing this tutorial into my 2D platformer project, which let me observe some of the pros and cons of this approach the way they created it. They created a direct following camera, which used a threshold to determine if the player is some distance from the center of the camera, and if so, starts to follow them as they move. I also created my own camera controller variation which moves in more

Camera Controller: Follow Camera (by Press Start)

This is the camera controller created in the tutorial linked above. The camera follows an object, generally the player, smoothly as they press against the borders of the camera threshold. The object must move some significant amount of distance before the camera moves. This keeps the camera from constantly moving, keeping more of the environment in a static frame longer.

There is an offset distance which is the distance from the edge of the camera that sets the bounds of the threshold box. When the follow object moves outside of this box, the camera begins to follow it. As long as the object continues to move out of the box, the camera will continue to keep following it.

Unity Orthographic Size

Orthographic Size: half the height in world units that the camera renders


The horizontal dimension rendered is solely determined by the screen ratio along with the height determined by orthographic size. Determining the size of a camera to fit objects vertically is very straightforward, as it is just half of the world units you would like to render. If you want to fit something horizontally however, you must include the screen ratio and use that as a multiplier (screen height / screen width) to convert the world width into an orthographic size value.

Issue: Stuttering

Originally the camera following gave a stuttering, glitchy effect while following the player at times, especially when jumping. I believe this is a result of changing the speed value set for the camera to match the player speed when it is large, since it uses the magnitude of the player’s velocity vector. This can change a lot very quickly, especially when jumping since this combines the x and y vector values of the player’s movement at that point.

Changing this speed check and set to solely the x-axis helped with consistency for most movement because most movement is horizontal. This however will most likely have a large impact if there is a lot of vertical movement since it will still be looking at the player’s velocity in the x to move the camera, regardless of their y velocity.

My Implementation of the FollowCamera Script with Modification

Alternate Camera Controller: Chunk Camera

Because of the stuttering effect I originally encountered, I tried making another type of camera controller that I thought may be a good option. I wanted to use a chunk movement approach where once the player reached the threshold of the current camera position, it would move the camera in that direction an entire chunk distance, centering the camera on the next location as opposed to directly moving with the player. The idea with this is that it keeps the camera movement more consistent, as well as showing the player much more of the next area they intend to move into more quickly.

I approached this by creating an IEnumerator named TransitionCamera that activates when the player hits a threshold. This begins a Lerp movement for the camera to the next designated chunk area, determined at Start based on the screen size and the threshold distance. A chunk distance is determined as: screen size – threshold distance. This centers the camera one full screen over, with an overlap from the previous screen equal to the threshold distance.

I also added a check to stop the coroutine if it was running and it was determined that it should start moving again to prevent weird whiplash effects if a player somehow was able to move back and forth between two screens very quickly. While mostly effective, this did have the negative resulting bug of slightly offsetting the camera completely over time because the TransitionCamera coroutine would be stopped prematurely and start moving to a new location solely determined by the current location +/- the chunk distance.

My Chunk Camera Variation

Summary

The original FollowCamera camera controller had more issues than I anticipated, so making it clean and consistent will take significantly more work. The jitteriness of the original implementation is unusable, but the modification at least makes it decent to use as a base for now as long as most movement is horizontal.

The chunk camera modification is at least cleaner already, although it still needs a bit of tweaking to make something that does not get slowly offset over time. This however probably only works for specific games and cannot be used for every 2D game case. Having both of these options is nice moving forward and is easy to switch between.

via Blogger http://stevelilleyschool.blogspot.com/2021/01/2d-platformer-follow-camera-tutorial-by.html

Unity Tilemap 2D Basics and Unity Learn Introduction

January 20, 2021

Tilemap 2D

Unity

Beginner Programming: Unity Game Dev Courses


Unity Learn Course – Introduction to Tilemaps – 2019.3


Description:
Basics of using Tilemaps for 2D projects in Unity.


Tilemap Basics

Grid

  • Only one in scene
  • Creates layout for scene that Tilemaps rely on
  • Cell Size: size of each square on Grid; applies to all Tilemaps within Grid
  • Cell Gap: space between each square on Grid; applies to all Tilemaps within Grid
  • Cell Layout: layout of tiles on grid; Options such as rectangle, hexagonal, isometric, isometric z as y
  • Cell Swizzle: direction Grid is facing; options such as XYZ, XZY, etc.

Tilemap

There can be multiple in a scene and it has two components: Tilemap and Tilemap Renderer.

Tilemap Component

Controls how the Tilemap behaves and how tiles within it work.

  • Controls how Tilemap behaves and how tiles within work
  • Animation Frame Rate: affects spped of animated tiles in Tilemap
  • Color: color and transparency
  • Tile Anchor: where tile is anchored to grid
  • Orientation: direction tiles are facing

Tilemap Renderer Component

Change how tiles are rendered and sorting order.

Modes

Chunk Mode

  • Sprites on Tilemap rendered in batches with each batch being treated as a single sort item in the 2D transparent queue
  • reduced draw calls for performance
  • other renderers cannot be layered or rendered in between part of the Tilemap
  • ideal for terrain base layer or other “single depth” maps


Individual Mode

  • sprites sorted based on position in Tilemap and Sort Order
  • render to allow interweaving of sprites
  • good for allowing sprites to pass behind other sprites
Other Parameters
  • Detect Chunk Culling: detect chunk bounds automatically or set them manually
  • Chunk Culling Bounds: extension of bounds for culling in Chunk Mode
  • Mask Interaction: can make Tilemap visible only inside or outside a Sprite Mask
  • Material: change material used to render each tile
  • Sorting Layer: Layer defining Sprites’ overlay priority during rendering
  • Order in Layer: helps determine which Layer is rendered first

Tilemap Collider 2D

This is an additional component of the Tilemap object (with Tilemap Renderer). This makes the entire Tilemap have colliders. Having many individual tile colliders can cause objects or players to get caught on the seams, so the tile colliders can be combined using composites. This can be done on the Tilemap Collider 2D, just toggle on “Used By Composite” and add the components: Composite Collider 2D, and Rigidbody 2D.

The following image shows my use of these tile map basics using Unity assets from a separate Brackeys tutorial. I experimented with adding flipped and rotated versions of some of the existing sprites to the tilemap and using the automatic colliders of the tiles. I had issues with the separate tile colliders because they would catch the player moving along the floor, so this image shows the composite collider solution to fix the colliders. This solved that issue and cleaned up the colliders.


Basic Use of Tilemap and Colliders

Keyboard Shortcuts: Rotate and Flip

Flip Sprite: { “Shift + [“

Rotate Sprite: [

Summary

Tilemaps are actually extremely easy to use and seem to give pretty effective results. I did have the issue with the individual colliders immediately after using the automatic colliders, but it appeared to be resolved with the composite colliders, which combine the colliders into large contiguous colliders. The difference between selecting, moving, and brushing tiles can be weird sometimes, but I was able to get the hang of it eventually and the process became fairly smooth after a while. Finding the keyboard shortcuts for rotating and flipping was also a bit strange, but was very useful once I found it.

via Blogger http://stevelilleyschool.blogspot.com/2021/01/unity-tilemap-2d-basics-and-unity-learn.html

Jump Physics and Controller for 2D Platformer Tutorial by Press Start

January 19, 2021

Player Controller

2D Platformer Design


Title:
A Perfect Jump in Unity – A Complete Guide

By:
Press Start


Youtube – Tutorial

Description:
More involved tutorial for jump controls for 2D platformer.


Overview

This tutorial goes more in depth on the jump control and mechanics for 2D platformers. This starts to involve logic for varied jump heights when holding the jump button as well as ensuring the proper number of jumps (generally a single jump, but can help lead to double jump or multi-jumps). This tutorial also involves some simple animations through script to help add life to the jump mechanic, such as squeezing during the jump.

via Blogger http://stevelilleyschool.blogspot.com/2021/01/jump-physics-and-controller-for-2d.html

2D Platformer Mario Style Camera Follow Tutorial by Press Start

January 14, 2021

Camera

2D Platformer Design


Title:
Mario Style Camera Follow Tutorial

By:
Press Start


Youtube – Tutorial

Description:
Camera tutorial that follows similar to Mario for 2D platformers.


Overview

I want to get back to working with 2D platforming programming and came across this useful tutorial for creating a decent camera controller. Tutorials like this are always nice as the camera is a very critical element of the overall feel of a 2D platformer, but it isn’t something I necessarily want to focus my time on for now, so this gives me a good starting point that I can quickly implement and tweak for my needs starting out. If it becomes more critical later in the process, I can come back to it with other methods.

via Blogger http://stevelilleyschool.blogspot.com/2021/01/2d-platformer-mario-style-camera-follow.html