Dev Blog

Modding Monster Train – Using Harmony to Track Methods and Log

July 1, 2021

Modding with Harmony

Monster Train


Title:
Getting Started with Trainworks Modding Tools

By:
KittenAqua


Github – Wiki

Description:
More detailed and in-depth documentation on properly setting up a C# project for modding Monster Train as well as examples for modding various content.


Title:
Harmony Patching Article

By:
Harmony


Harmony – Article

Description:
General documentation on Harmony.


Overview

As of the writing of this blog, the state of the Trainworks modding API with Monster Train after its DLC release is a bit rough. Creating custom cards was a core feature of Trainworks, but the DLC update has broken a lot of the original system. I have been investigating these issues to see if I can identify the problem(s) and potentially fix them. This has led me to learning a lot about using Harmony, a tool for modding Unity games, especially in a way to create logs to help me track bugs and problems when integrated with BepInEx.

Harmony Basics with Trainworks

The ‘Getting Started with Trainworks Modding Tools’ link above was very helpful in covering the basics of using Harmony with Monster Train. The most common methods used with these patches are ‘Postfix’ and ‘Prefix’.

Each patch is its own class, which contains methods performing the patching. It must also use attributes supplied by the Harmony API to indicate that it is a Harmony patch to be picked up when running the mod. This attributes for these cases generally contain information such as: the method name, the parameters of the method (if an overloaded method), and the class name containing said method.

Prefix and Postfix Arguments

The list of arguments covered by the ‘Getting Started…’ link above is:

  • Any arguments the original method took, with the same type and name
  • The instance of the class the method has been called on: ClassName __instance (two underscores)
  • Any fields of the instance, whether public or private. They should have the same name and type as the original, but with three underscores before: FieldType ___fieldName
  • The return value of the method: __result (two underscores)
  • A couple other things that aren’t used as often. Reference the official Harmony documentation for details.

The ‘ref’ keyword is used with the Postfix and Prefix methods often. This is because it is common that you will want to take in a variable from the existing methods and actively change the value of said argument.

Postfix

Postfix patches are used to perform actions after a method in the established project (Monster Train in this case) is called. This means it also has access to the result of said method to read from it or even alter it.

Prefix

Opposite of the Postfix, Prefix methods are those which are executed before the original method. As such, they are uniquely situated to prevent the original method from even executing if wanted (although this is something that is advised to do with care as it can easily break systems relying on it running).

From the official Harmony documentation, these are commonly used to:

  • access and edit the arguments of the original method
  • set the result of the original method
  • skip the original method and prefixes that alter its input/result
  • set custom state that can be recalled in the postfix

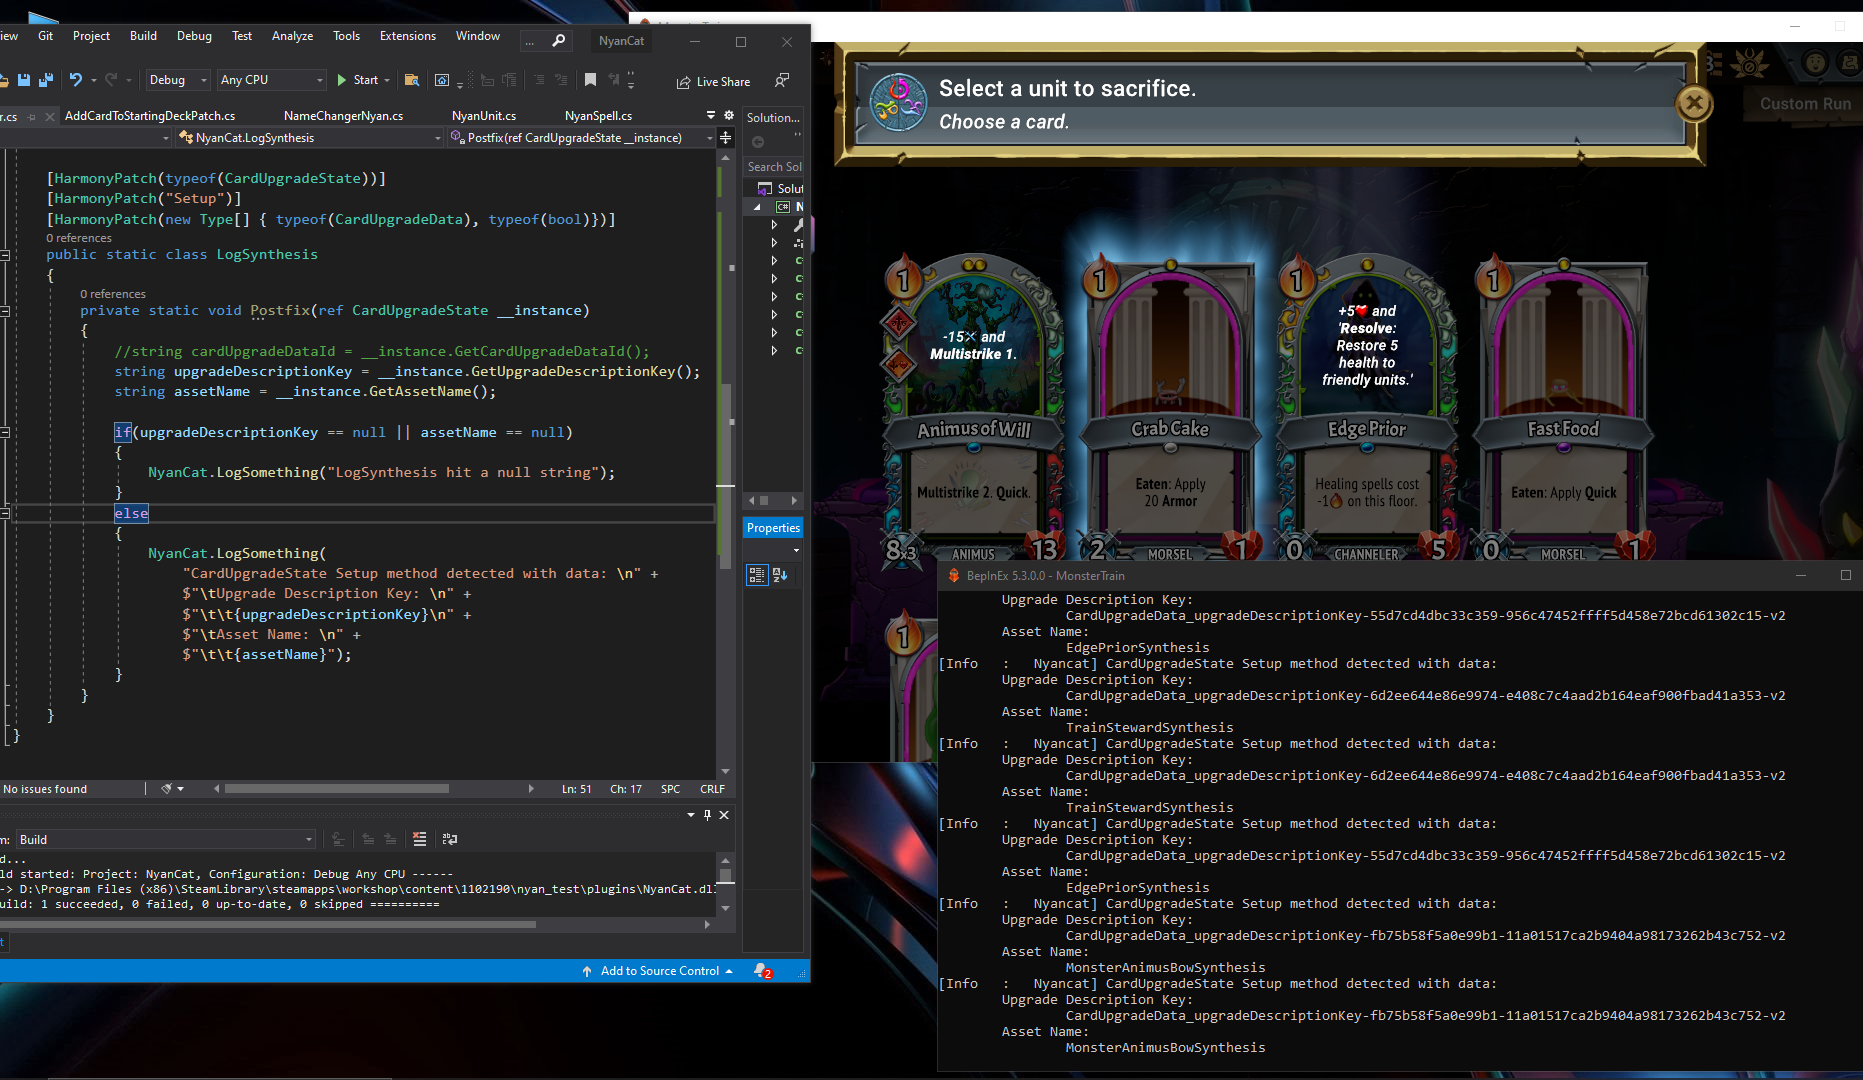
Example Logging Monster Train CardUpgradeData Setup Method

While investigating an issue with unit synthesis in the game, I encountered an error that led me to explore the Setup method in the CardUpgradeData class of Monster Train, as this appears to be a core part of the synthesis process. I decided to setup a Postfix method to return some information from this method when it was run (as well as to just help determine when this method was being run).

In this investigation I found that selecting existing units (which clearly have all the assets necessary) in the unit synthesis temple would call this method, along with a specialized unit synthesis upgrade. However, selecting a custom unit did not call this method at all. While this normally would make sense obviously since they do not have a unit synthesis upgrade made for them, the Trainworks tool is supposed to make a replacement synthesis upgrade in this case, which I thought may be picked up by this system.

Class for Logging

[HarmonyPatch(typeof(CardUpgradeState))]
    [HarmonyPatch("Setup")]
    [HarmonyPatch(new Type[] { typeof(CardUpgradeData), typeof(bool)})]
    public static class LogSynthesis
    {
        private static void Postfix(ref CardUpgradeState __instance)
        {
            //string cardUpgradeDataId = __instance.GetCardUpgradeDataId();
            string upgradeDescriptionKey = __instance.GetUpgradeDescriptionKey();
            string assetName = __instance.GetAssetName();

            if(upgradeDescriptionKey == null || assetName == null)
            {
                NyanCat.LogSomething("LogSynthesis hit a null string");
            }
            else
            {
                NyanCat.LogSomething(
                    "CardUpgradeState Setup method detected with data: \n" +
                    $"\tUpgrade Description Key: \n" +
                    $"\t\t{upgradeDescriptionKey}\n" +
                    $"\tAsset Name: \n" +
                    $"\t\t{assetName}");
            }
        }
    }

Fig. 1: Screen with Game, my Patch, and Log Console Output Example

via Blogger http://stevelilleyschool.blogspot.com/2021/07/modding-monster-train-using-harmony-to.html

Doppler Effect in Mario Kart – Game Audio – by Scruffy

July 1, 2021

Doppler Effect and Audio Controller

Game Audio


Title:
Mario Kart and the Doppler Effect

By:
Scruffy


Youtube – Information

Description:
Explanation of how Mario Kart creates the doppler effect and efficiently distributes audio to multiple players.


Overview

This video covers how Mario Kart Wii specifically uses the doppler effect, as well as just how some of their audio systems work in general. It is decent coverage of how to implement a basic doppler effect system into a game in general.

Fig. 1: Image from “Mario Kart and the Doppler Effect” Video Above by Scruffy

Setup of Doppler Effect System

The key is the relationship between sound frequency and relative velocity of objects. Their approach to measure this is just by measuring the distance from the audio source to the audio listener each frame, and if there is a difference, that is used for a relative velocity term. This relative velocity term is bound to some negative and positive scale (one direction meaning higher frequency and the other being lower frequency). The way this relative velocity maps to a difference in sound frequency can use any mathematical relationship to fit whatever feels best (i.e. linear, logarithmic, etc.).

They break this core down into three basic steps:

  1. Get distance between source and listener each frame
  2. Subtract from previous for rate of change
  3. Map rate of change to determine sound playback speed (to taste)

Expansion of the System and Efficiency

This explanation shows the direct relationship between an audio source and an audio listener, but games tend to have many audio sources. They show how immediatley this can at least be simplified by having some audio distance so the calculations only need to be performed on objects within a certain distance of the listener. The other big part of simplifying the system is just limiting which sources implement the doppler effect. Not every sound needs to use this, so it can be removed from many standard sources (i.e. the crowd in Mario Kart).

Split Screen Solution

This is fairly niche, but still interesting. With split screen, the audio of multiple listeners needs to come through a single audio output. Since they may experience different levels of the doppler effect for the same audio sources, they needed a solution to provide an experience that does not sound like a mess. Their approach was that each player only makes sound in their own camera (so one player is not listening to the other on the same screen), and when dealing with outside sources, only the player closest to the audio source is taken into account. The other player’s audio for that source is simply negated. This is a nice solution as the system already takes the distance between sources and listeners into account anyway.

via Blogger http://stevelilleyschool.blogspot.com/2021/07/doppler-effect-in-mario-kart-game-audio.html

3D Math – Always a Single Plane to Cut Three 3D Objects in Half with Borsuk-Ulam Theorem – by Zach Star

June 28, 2021

Borsuk-Ulam Theorem

3D Math


Title:
A surprising topological proof – Why you can always cut three objects in half with a single plane

By:
Zach Star


Youtube – Information

Description:
Proving that any set of n n-dimensional objects can be cut in half by n-1 dimensional object (i.e. 3 3D objects can be cut in half by a 2D plane).


Overview

This was just a fun and interesting mathematical proof I came across. Using the Borsuk-Ulam Theorem at its core, it proves how any set of 3 3D objects can be cut in half (by volume) by some 2D plane. It then expands that to show that this works for any n amount of n-dimensional objects, which are then divided by an object with n-1 dimensions.

Borsuk-Ulam Theorem

This can be read up on here at the corresponding wikipedia page:

Wikipedia – Borsuk-Ulam Theorem

This states: “every continuous function from an n-sphere into Euclidean n-space maps some pair of antipodal points to the same point”. The simple explanations they use to show how it is used is that in the 2D case, there must exist at least 2 points around the equator with the same temperature, and in the 3D case, there must exist at least 2 points in the entirety of Earth that have the same temperature and pressure. Another key note is this is only true assuming all parameters vary continuously in space.

Expanding to Proof on Dividing Objects

To apply this to the concept they were investigating, they start with the 2D example since it is easier to visualize, and will eventually lead to the same foundational concepts used for any n-dimensional case. They begin with a unit circle, and show how the tangent to every point around the circle accounts for every possible slope in this space and how any of those lines can be used to cut any shape in half by area.

The key to using the Borsuk-Ulam Theorem in this case is that they need to assign a value to that point on the circle. To do so, they use the distance between the two parallel lines that are cutting the two shapes in half. Because they want to find antipodal points which are equivalent, they create a signed distance system. The sign of the distance is based on the normal of the point on the unit circle. If that normal points towards shape #1, it is positive, and if it points towards shape #2, it is negative. They do this because there is only one case where the positive and opposite of a value is equal, and that’s when it is 0. This proves that the 0 value will exist, and a distance of 0 between the two lines indicates they are the same line cutting both shapes in half.

Summary

Honestly I was mostly just interested in the concept that there’s always at least 1 plane that can cut up to 3 3D objects in half, and was not fully connecting the dots on all the steps through the process for actually proving this to be true. Just learning about the Borsuk-Ulam Theorem in itself was very interesting, and seeing some of the unexpected cases it can be used to help prove was pretty eye opening. I did want to check it out because I thought it would be a fun concept to explore with a small Unity project to create a puzzle-like game centered around this concept, while also providing some background information on some of these concepts and theorems.

via Blogger http://stevelilleyschool.blogspot.com/2021/06/3d-math-always-single-plane-to-cut.html

Unity Shader Graph – Signed Distance Fields – Update with Subgraph Fix

June 24, 2021

Shader Graph

Unity


Title:
Drawing Boxes and Rectangles in URP Shader Graph with 2D SDFs! 2021.1 | Unity Game Dev Tutorial

By:
Ned Makes Games


Youtube – Tutorial

Description:
Exploration into calculating signed distance fields and using them with Unity’s Shader Graph.


Title:
Rectangle SDFs and Procedural Bricks! Video Production Stream | Unity Game Dev Livestream

By:
Ned Makes Games 2


Youtube – Tutorial

Description:
The full stream which most of the previous tutorial is pulled from. Useful for any more in depth questions of previous tutorial.


Overview

When I visited this tutorial yesterday I ran into an issue with Unity 2021.1.3 that working with subgraphs was extremely bugged and error prone. I had seen online that later versions potentially fixed the issue, so I download the latest version, 2021.1.12, and this did indeed fix the issue for me, making this tutorial much easier to follow along with.

This tutorial was mostly just looking at the subgraphs and shader graphs they built and following along to build them out myself. This was at least a decent learning experience at getting familiar with the work flow of setting up subgraphs for your shader graphs, as well as just using a lot of the math nodes.

Helper Scripts to Show Off Shader

Along with building the shader, they made two simple scripts to make the shader a bit interactive and more flexible.

SetPoints

This class was responsible for letting the user move the two points dictating the general length of the rectangle shape by just clicking and dragging. This however did not work immediately, as they were using a helper class named MousePointer I did not use.

I was able to get a similar result by replacing their process of getting the point:


var p = MousePointer.GetWorldPosition(Camera.main);


with my replacement:


var p = Camera.main.ScreenToWorldPoint(new Vector3(Input.mousePosition.x, Input.mousePosition.y, distanceToPlane));

distanceToPlane was a value the user could put in that is the distance from the camera to the flat plane the camera is facing to test the shader. As long as the exact same distance is put there for the z-value of ScreenToWorldPoint, the points moving correlate exactly with where the user is dragging them.

RectangleThicknessByScrollWheel

This class lets the user control the thickness, or width, of the rectangle with the scroll wheel. This class directly worked as shown.

General Notes with Scripts Interacting with ShaderGraph Properties

Integrating the scripts with the Shader Graph properties was actually pretty easy. It worked similarly to working with the Animator in Unity. You just use methods like SetFloat() and give it two parameters where one is the exact string name of the property you want to set, and the second is the value you are passing in to said property. It is worth noting this was just accessed through the Material, there was no strange Shader Graph object that needed to exist or anything like that.

An example of my implementation of the tutorial can be seen below.


Unity Shader Graph: SDF Rainbow Pulse from Tutorial by NedMakesGames from Steve Lilley on Vimeo.

Video Example of my Following of the Pulse Shader in the Ned Makes Games Tutorial

via Blogger http://stevelilleyschool.blogspot.com/2021/06/unity-shader-graph-signed-distance_24.html

Unity Shader Graph – Signed Distance Fields and Subgraph Errors

June 23, 2021

Shader Graph

Unity


Title:
Drawing Boxes and Rectangles in URP Shader Graph with 2D SDFs! 2021.1 | Unity Game Dev Tutorial

By:
Ned Makes Games


Youtube – Tutorial

Description:
Exploration into calculating signed distance fields and using them with Unity’s Shader Graph.


Overview

This shader tutorial quickly explores calculating signed distance fields and using that for interesting effects. These effects were built in HLSL in the tutorial video originally, but they also show how these can be implemented with Unity’s Shader Graph system. I wanted to use the Shader Graph approach, but unfortunately I found that Unity’s Shader Graph Subgraphs have some major issues.

Signed Distance Fields (SDFs)

Signed Distance Fields (SDFs): calculate the distance from any arbitrary point to a specific shape

Principles of Calculating

To start, they look at an example using a rectangle whose center is at the origin (0, 0).

First, they find the distance from the point, p, to the center of the rectangle, which is just the length of the Vector2 p because the center is at the origin.

Then, using the symmetry of the rectangle, the absolute value of point, p, and the half dimensions of the rectangle are used to determine the distance of the point to any corner of the rectangle.

To get the positive results, they find the vector between the absolute value of point, p, and the corner of the rectangle and find the length of this vector after converting any negative components to 0.

Since the core of an SDF is that it is signed, meaning that a point inside the shape returns a negative value and a point outside the shape returns a positive value, they expand it to deal with negative distances. The vector, d, which is that from the absolute value of point, p, to the corner of the rectangle is only inside of the shape when both components of d are negative.

Assuming both components of d are negative, the result from the previous step already results in 0, so they can add a secondary component to this that returns a negative result in this case. By using min(max(d.x, d.y), 0) they can find this distance because a point within the rectangle must be closer to one wall or the other, or they are identical values. This is why there also is no rounded effect within the rectangle.

Moving the rectangle’s center from the origin just requires an additional offset argument.

Then, rotation requires another argument, and requires rotational matrix math (something I covered in my investigation to changing vector spaces).

Unity Problem with Subgraphs

While following along to mimic their Shader Graphs, I came across a Unity issue working in Sub Graphs especially. When creating properties and moving those property nodes around, Unity consistently runs in ArgumentNullException errors which completely shut the graph down and prevent any further progress until it is closed and reopened. Apparently Unity versions 2021.2 and up may work better with this, so I will have to look into more Unity versions in the future.

via Blogger http://stevelilleyschool.blogspot.com/2021/06/unity-shader-graph-signed-distance.html

Modding Monster Train – Editing Name of Champion Tutorial

June 22, 2021

Modding

Monster Train


Title:
Monster Train – Shiny Mark mades mods

By:
Good Shepherd Entertainment


Youtube – Tutorial #1

Description:
Extremely basic introduction to setting up a C# project for modding Monster Train (slightly outdated).


Overview

This was an introductory tutorial mostly meant to help you learn how to setup a C# project to mod Monster Train. It has however become slightly deprecated since the DLC was launched, however it did lead to me gaining a better grasp on the logging system for debugging.

Following Tutorial

This tutorial is rather straight forward, but even this had its fair share of issues. One of the first major blocks I ran into and resolved was how strict Harmony is with some of the ways it interacts with the base game code. Specifically, the __result parameters used in the Postfix() methods specifically require EXACTLY 2 underscores before ‘result’. This is actually just part of their system of naming conventions, and is further explained in other Monster Train modding documentation.

The other issue I encountered is that one of the renaming conventions was not working. I was able to change the name on the card (the CardState change), however changing the name while the unit was in the train (the CharacterData change) was not performing as expected. I was able to find through logging that the method being called was indeed returning the string “Hornbreaker Prince” and my system was identifying that, but for whatever reason the result was not changing the ‘in train name’. My suspicion is that an updated underlying system is actually returning the name of the unit back to ‘Hornbreaker Prince’ and it also needs to be changed somewhere else, but I am unsure where that would be.

Either way, changing the name of a card can be done in better ways so this issue does not particularly need resolved. Some others mentioned going through Monster Train’s localization system to find a better place to change the name of a card.

Confirming Updated DLC as Error

To check that this was not just an error in my code or program, I downloaded the existing mod created in the above mentioned tutorial (as it is available in the Steam Workshop). Sure enough, even though it is seen working in the old video, the download of that mod had the same result as my mod. The name on the card was changed to ‘Frank’ but the name on the unit in the train was still ‘Hornbreaker Prince’.

Fig. 1: Showing Side by Side of Where the Name Change Worked and Did Not Work

via Blogger http://stevelilleyschool.blogspot.com/2021/06/modding-monster-train-editing-name-of.html

Modding Monster Train – Basics and Introduction

June 21, 2021

Modding

Monster Train


Title:
Monster Train – Shiny Mark mades mods

By:
Good Shepherd Entertainment


Youtube – Tutorial #1

Description:
Extremely basic introduction to setting up a C# project for modding Monster Train (slightly outdated).


Title:
Monster Train Modding Card Creation Tutorial Mod

By:
Good Shepherd Entertainment


Youtube – Tutorial #2

Description:
Introduction to using the Trainworks API, a modding tool for Monster Train geared towards adding new content.


Title:
Getting Started with Trainworks Modding Tools

By:
KittenAqua


Github – Wiki

Description:
More detailed and indepth documentation on properly setting up a C# project for modding Monster Train as well as examples for modding various content.


Overview

Monster Train is a game I have played a lot and really enjoyed, and it recently put out some modding support in the last year. Being a Unity-based game, I figured I could use some of my Unity and C# knowledge to take a crack at modding in some content of my own to play around with and possibly add to the community.

It is not the most straight forward process, and there was recently a large DLC added to the game that makes parts of the old modding tutorials different or completely obsolete, but I still think there enough to sift through to make a base for starting a mod going. I think there is also a decently strong community that would appreciate some mod content since it is rather lacking, so it could also just be a nice place to implement some game design practices and create some new stuff for others to play with.

via Blogger http://stevelilleyschool.blogspot.com/2021/06/modding-monster-train-basics-and.html

Unity Shader Graph – Liquid Effect by Gabriel Aguiar Prod.

June 18, 2021

Shader Graph

Unity


Title:
Unity Shader Graph – Liquid Effect Tutorial

By:
Gabriel Aguiar Prod.


Youtube – Tutorial

Description:
Quick shader graph tutorial exploring interesting effects of moving shader based on psuedo-physics.


Overview

This shader tutorial looked like a great way to extend my knowledge on Unity’s shader graph since it appears to have some neat and unique mechanics. The fact that the shader is responding to the changes in position and rotation of the object explore ways to have shaders follow physics-like rules to create effects visually that can mimic for physical phenomena. Many of this user’s tutorials also include setting up the initial models, but I think this effect can work decently with other simple shapes I can easily make with ProBuilder.

via Blogger http://stevelilleyschool.blogspot.com/2021/06/unity-shader-graph-liquid-effect-by.html

Unity Shader Graph – Grid Shader by UGuruz

June 16, 2021

Shader Graph

Unity


Title:
Grid Shader in Unity LWRP – Shader Graph Tutorial

By:
UGuruz


Youtube – Tutorial #3

Description:
Experimenting with tiling and the rectangle node in Unity Shader Graph to create a Tron-like glowing grid pattern.


My Final Grid Shader Graph (w/ Color Change Addition)


Overview

Following my exploration of Unity’s shader graph, I did this tutorial by UGuruz on creating a grid shader similar to what you see in Tron. I really liked the effect so I continued it slightly further by adding a color changing effect over time, as can be seen in my examples provided.

Learnings from Tutorial

Using a Fraction node with a Tiling & Offset node is an effective way to give you standard expected tiling and offset results. I however had some strange effects because of interactions with the UVs of the models. The base UVs of just a standard Unity cube did not tile effectively for me, so I tried using Unity’s ProBuilder to make a basic cube since that also gave me easy access to modifying UVs if necessary. This gave me much more consistent results similar to those in the tutorial, since I wanted to avoid the step of modifying UVs in Blender.

They mentioned the shader would only work well on flat surfaces, but I at least wanted to test on another surface to see what the result would be and see if I could improve it. That’s why I included a sphere in the environment. It immediately gave very strange results as expected, but I found that grouping faces together through the ProBuilder tool helped give a better result, as this allows it to treat the many faces of a sphere similar to a single large face. This concept works well with a basic tiling pattern like I used here.

I did end up using World type UVs to get a decent visual result on everything, especially the sphere. While this gave something very close to what is desired, it is still a somewhat strange appearance when viewed from some angles as this inherently treats the positioning in world space as the coordinates for applying the shader. I still need to investigate the UV types and UVs in general though to get a better understanding of how to control them.


Unity Shader Graph: Tutorial by UGuruz with Color Change Addition from Steve Lilley on Vimeo.

Video Example of the Grid Shader Result with Color Change Addition

via Blogger http://stevelilleyschool.blogspot.com/2021/06/unity-shader-graph-grid-shader-by-uguruz.html

Unity Shader Graph Examples and Tutorials

June 10, 2021

Shader Graph

Unity


Title:
FORCE FIELD in Unity – SHADER GRAPH

By:
Brackeys


Youtube – Tutorial #1

Description:
A quick introduction to shader graph in Unity making a transparent force field with glowing edges.


Title:
ART 200: Creating an energy Shader in Shader Graph in Unity

By:
Casey Farina


Youtube – Tutorial #2

Description:
An introduction to using noise effects in Unity Shader Graph to create a glowing generic energy effect.


Title:
Grid Shader in Unity LWRP – Shader Graph Tutorial

By:
UGuruz


Youtube – Tutorial #3

Description:
Experimenting with tiling and the rectangle node in Unity Shader Graph to create a Tron-like glowing grid pattern.


Title:
Unity Shader Graph Tutorials – Youtube Playlist

By:
Gabriel Aguiar Prod.


Youtube – Playlist #1

Description:
This user creates tons of VFX tutorials for games, and has delved into Unity’s Shader Graph, giving great examples of quick but well done effects.


Title:
Unity Shader Graph – Ice Tutorial

By:
Gabriel Aguiar Prod.


Youtube – Tutorial #4

Description:
Creates a stylized glowing, transparent ice shader to use for crystaline ice formations.


Title:
Unity Shader Graph – Shield Effect Tutorial

By:
Gabriel Aguiar Prod.


Youtube – Tutorial #5

Description:
Similar to Brackeys force field tutorial, but covers extra steps to push the effect over the edge.


Title:
Shader Graph fundamentals in Unity

By:
PabloMakes


Youtube – Tutorial #6

Description:
General coverage of a lot of commonly used nodes and tools within Unity’s Shader Graph.


Source: Unity.com

Overview

I wanted a quick way to apply some interesting effects and looks to different models I work with in my sample projects, and making cool materials and shaders seemed like a perfect tool for that. You can get some neat effects without too much effort, and as you make these tools they are easily applicable over multiple projects and give me a tool to use over and over again.

Coding shaders in HLSL for Unity can be a bit tricky, so meeting them in the middle and working with Unity’s Shader Graph was a good compromise for me. This could give me results even quicker without sacrificing too much for what I will be doing. As such, I gathered this large source of resources for learning and exploring Unity’s Shader Graph system.

Quick Notes

URP vs HDRP

HDRP is for more high end games and devices (PC, XBOX, PS) but is more demanding. URP is better for 2D projects in general, and is made to be more accessible and less demanding.

URP vs Deprecated LWRP

Many resources, including some of these tutorials, used Unity’s Light Weight Render Pipeline (LWRP). This has already been phased out and replaced by the Universal Render Pipeline (URP). So it is generally safe to use the URP system if a tutorial or example uses the LWRP.

PBR Graphs Replaced with Lit Shader Graphs

Some of these old tutorials also use PBR graphs, which have also been phased out already. They can be replaced with Lit Shader Graphs. The PBR master node within the graph has also been broken up and replaced in newer Unity projects by two nodes, a Fragment node and a Vertex node (makes it more similar to shader coding).

via Blogger http://stevelilleyschool.blogspot.com/2021/06/unity-shader-graph-examples-and.html